
Manual

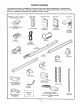


Assembly Section: Pages 8 - 11
To avoid installation difficulties, do not run the garage door opener until instructed to do so.
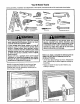
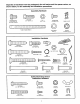
Assembly Step 1
Assemble the T-rail & Attach
the Cable Pulley Bracket
• Align the 3 T-rail sections on a flat surface exactly
as shown. The end sections are identical. Make
sure the "arrow label" on the center section is
pointing toward the door.
• Insert the carriage bolts so the square bolt necks
seat in the square holes in the T-rail end sections
and pass through the round holes in T-rail center
section. Assemble lock nuts, ensure alignment and
tighten.
Makesure boltnecksare
seatedtnthesquare ,_=
holesand railsare
alignedbeforeyou
tighten lock nuts.(See
rightand wrong views).
Improperassemblycan
causejerkytrolley
operation,noise and/or Right
nuisancedoor reversals.
Wrong
T-RAIL BACK
(TO OPENER)
T-rail
(End Section)
1/4" Lock Nut
Brace
If T-rail is not assembled
EXACTLY as shown, trolley
will not travel smoothly
along length of rail or it will
hit against the nuts.
Brace
T-rail
(Center Section)
Carriage Bolt
, "_f 1/4"-20xl/2"
T-rail
(End Section)
Cable pulley bracket
attaches to FRONT
END of T-rail Square Carriage
Bolt Holes
T-RAIL FRONT
(TO DOOR)
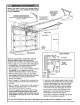
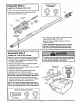
Position the cable pulley bracket on the front end of the
T-rail as shown. Fasten securely with the hardware,
Rex Screws
5/16'-18x7/8"
Cable Pulley _£\o_,e6
Bracket
Lock Washer
5/16" Nut
5/16"
Hardware Shown Actual Size
©
Lock Nut
1/4" o20 x 7/16"
Hex Screw
5/16" - 18 x7/6'
Carriage Bolts
1/4" - 20 x 1/2"
©©
Nut Lock Washer
5/16" - 18 5/16"
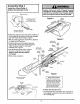
(
Ri,
When tightening
b Q thescrews'be
sure to keep
bracket parallel
to the rail
Otherwise, the
rail may bow
when opener is
ht Wrong operated.
8