
Manual


Adjustment Step 3
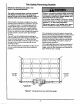
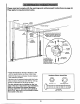
Test The Safety Reversing Sensor
• Press the remote control push button to open the
door.
• Place the opener carton in the path of the door.
• Press the remote control push button to close the
door. The door will not move more than an inch,
and the opener light will flash.
Professional service is required ff the opener
closes the door when the safety reversing
sensor is obstructed.
i The garage door opener will not close from a
remote control if the indicator light in either
sensor is off(alerting you to the fact that the
sensor is misaligned or obstructed).
The garage door can be closed by pressing and
holding the Door Control push bar or button until
down travel is completed.
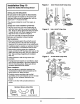
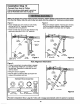
Adjustment Step 4
Test the Safety Reverse System
I
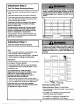
F-- l II I
Test:
• Place a one-inch board (or a 2x4 laid flat) on the
floor, centered under the garage door.
• Operate the door in the down direction. The door
must reverse on striking the obstruction.
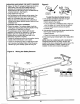
Adjustment:
If the door stopson the obstruction, it is not traveling
far enough in the down direction.
• Increase the DOWN limit by turning the DOWN
limit adjustment screw counterclockwise 1/4 turn.
• Repeat the test.
On a sectional door, make sure limit
adjustments do not cause the trolley to move
within 2-1/2" of the trolley stop bolt. If
necessary, lengthen straight door arm to
maintain this minimum distance.
• When the door reverses on the one-inch board,
remove the obstruction and run the opener through
3 or 4 complete travel cycles to test adjustment.
If the door will not reverse after repeated
adjustment attempts, call Sears Service Center
for garage door opener service.
o' 'oooooi
I
(or a 2x4 laid fiat)
Important safety check
Repeat Adjustment Steps 1, 2 and 4 after:
• Each adjustment of door arm length, force controls
or limitcontrols.
• Any repair to or adjustment of the garage door
(including springs and hardware)•
• Any repair to or buckling of the garage floor.
• Any repair to or adjustment of the opener.
3O