
Manual
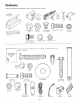

installation
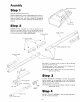
Step 1:3
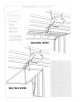
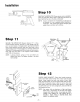
DETERMINE DOOR ARM LENGTH: Thread one end of nylon
cord through red handle and secure with knot,_ Thread other
end through hole in release arm of trolley, Secure with a knot
Remove plastic carrying strap from straight door a_m,. Place
one end of straight door arm in slot in trolley and fasten with
3/8 inch clevis pin and cotter pin,. Fasten short end of curved
door arm to door bracket with 3/8 inch clevis pin and cotter
pin
-x Release Arm
/
Cotter _-%---- Clevis
Pin Pin
-- Straight
ti Door Arm
/
Door
Curved Door
Arm
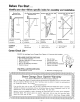
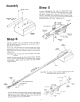
o Push the garage door to "closed tight"
o Bring the two door arm sections together If holes (in each
section) line up, join the sections with two 3/8 inch by 7/8
inch bolts, lock washers and nuts. PUT BOLT HEADS ON
STRAIGHT DOOR ARM SIDE Select bolt holes as far
apart as possible to increase door arm rigidity,, DO NOT
USE MORE THAN ONE SLOTTED HOLE,
318"" Nut
31a- \@_
Lockwasher
318"' x 7/8-' Bolt
If door arm holes do not line up when the two sections are
brought together, cross the door- arms in scissors fashion (see
illustration) until a pair of holes (one in each section) line up,
insert a 3/8 inch by 7/8 inch bolto Secure "finger tight" with
lock washer and nut,
• Pull the emergency release cord to disengage trolley,,
• Bring the door arm sections together and bolt securely with
both bolts,.
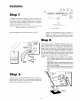
NOTE: Sears Keylock Release accessory No., 64-6571 provides
an outside emergency access for ga[ages without a
service entrance door',
-- Straight Door
Arm
_ Door Arm
-10-