
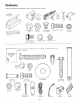
Manual

Installation
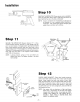
Step 7
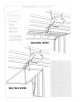
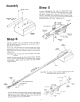
TIGHTEN THE CHAIN: Tighten the chain by adjusting the
two 5/16 inch nuts on chain stud de_ignated"inner" and "outer"
as illustrated,, Chain is propmty tightened when it is approxi-
mately 1/2 inch above the base of the Tee rait at its midpoint
between idler sprocket and the operator
CAUTION: Keep the chain from twisting as nuts are turned
Remove screwdriver or nait from Tee rail
Chain
/
Base of Tee Rail
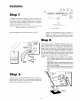
REPLACE SPROCKET COVER REMOVED IN STEP 1,
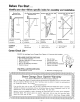
GARAGE
HEADER
" +._ LAG SCREWS
HEADER _"_
BRACKET
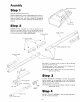
Assembly of the garage door operator is complete in-
statlation now begins+ Refer to Pages t4-17 for in-
stallation on one-piece doors, With Step 8 below,
begin installation on sectional doors with curved track,
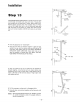
Step 8
POSITION AND INSTALL HEADER BRACKET. Opener" hard-
ware in plastic bag will be needed in the following steps,, De-
termine vertical center" line of garage door+ Extend this onto
garage header wall above door+ Position header bracket center-
on-center with this line at height approximately 2 inches above
the high arc point (this is high point of travel of top edge of
door as illustratedL Mark either' pair of bracket holes - vertical
or horizontal on header" watlo Drill 3/16 inch pilot holes and
instatl bracket with 5/16 inch by 1-7/8 inch lag screws,.
NOTES: t, When headroom is not sufficient for 2 inch clear-
ance, the bottom edge of bracket may be placed at
high arc height. Bracket can also be attached to
the ceiling+
2,, The header bracket must be rigidly fastened to the
header' walt or ceiling. Reinforce the wall or ceiling
with a 2 x 4 if necessary.
& If it is necessary to fasten the header bracket to the
ceiling, use the horizontal (left and right) bracket
holes°
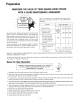
Step 9
ATTACH RAIL TO HEADER BRACKET: Place operator on
packing material° Raise Tee rail until sprocket bracket joins
header bracket, Align the bracket holes, Attach with 3/8 inch
by 3 inch clevis pin, Secure with cotter pin+
PIN
PIECE OF'