Operator's Manual 1450 Series Engine Chipper Shredder For questions, call 1-800-4-iViY-HOME CAUTION: Before using this product, read this manual and follow ail safety rules and operating instructions. • • • • • • SAFETY ASSEMBLY OPERATION MAINTENANCE PARTS LIST ESPAÑOL Sears, Roebuck and Co., Hoffman Estates, IL 60179, U.S.A. Visit our web site: www.craftsman.com FORM NO.
TABLE OF CONTENTS Warranty Statement.................................. Page 2 Safe Operation Practices.......................... Pages 3-6 Safety Labeis.............................................Page 7 Assembiy................................................... Pages 8-11 Operation...................................................Pages 12-13 Service and Maintenance..........................Pages 14-17 Off-Season Storage...................................Page 18 Troubie Shooting..........................
J SAFETY INSTRUCTIONS A DANGER A WARNING This machine was built to be operated according to the safe opera tion practices in this manual. As with any type of power equipment, carelessness or error on the part of the operator can result in serious injury. This machine is capable of amputating fingers, hands, toes and feet and throwing debris. Failure to observe the following safety instructions could result in serious injury or death.
SAFETY INSTRUCTION Safe Handling of Gasoline; To avoid personal injury or property damage use extreme care in handling gasoline. Gasoline is extremely flammable and the vapors are explosive. Serious personal injury can occur when gasoline is spilled on yourself or your clothes which can ignite. Wash your skin and change clothes immediately. • Use only an approved gasoline container. • Never fill containers inside a vehicle or on a truck or trailer bed with a plastic liner.
J SAFETY INSTRUCTIONS • • • • • • • • Maintain or replace safety and instruction labels, as necessary. Follow this manual for safe loading, unloading, transporting, and storage of this machine. Never store the machine or fuel container inside where there is an open flame, spark or pilot light such as a water heater, furnace, clothes dryer, etc. Allow machine to cool at least 5 minutes before storing. Always refer to the operator's manual for proper instructions on off-season storage.
SAFETY INSTRUCTION I SAFETY SYMBOLS This page depicts and describes safety symbols that may appear on this product. Read, understand, and follow all instructions on the machine before attempting to assemble and operate. Symbol -T Description READ THE OPERATOR’S MANUAL(S) Read, understand, and follow all instructions in the manual(s) before attempting to assemble and operate WARNING— ROTATING BLADES Keep hands out of inletand discharge openings while machine is running.
SAFETY LABELS ADANGER ADANGER TO AVOID SERIOUS INJURY: TO AVOID SERIOUS INJURY: • Do not operate on uneven ground where unit is unstable. Do not operate on pavement, gravel or other hard surfaces since objects can ricochet and cause injury. • To avoid a fire hazard, keep leaves, grass, and other combustible materials away from hot engine and muffler. • Keep children and others away from area of operation. • Wear approved safety glasses, gloves and ear protection.
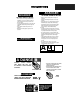
ASSEMBLY IMPORTANT: This unit is shipped without gasoline or oil in the engine. Be certain to service engine with gasoline and oil as instructed in the Operation section of this manual before operating your machine. NOTE: Reference to right and left hand side of the Chipper Shredder is observed from the operating position. OPENING CARTON 1. 2. 3. Cut each corner of the carton vertically from top to bottom. Remove all loose parts. Remove loose packing material. REMOVING UNIT FROM CARTON 1. 2.
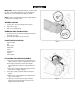
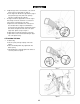
ASSEMBLY ATTACHING THE CHUTE DEFLECTOR 1. 2. A. Remove the wing knobs from each side of the lower impeller housing. See Figure 3. B. Remove the hex lock nut, spacers, and hex bolt from the top of the impeller housing. A. Align the chute deflector in position on the discharge opening and insert hex bolt with spacer through hinge on chute deflector (spacers fit inside of hinges). See Figure 4. B. Place second spacer over hex bolt inside other hinge and secure with hex lock nut. C.
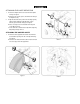
ASSEMBLY 2. 3. A. Align the chipper chute over the weld studs, so the slot in the bottom of the chute is facing down. See Figure 6. B. Secure chipper chute with the three cupped washers (cupped side against the chipper chute) and hex nuts previously removed. Do not tighten the nuts at this time. The chipper shredder was shipped with one end of the support brace already secured to the lower frame. Loosen but do not remove the bolts securing the brace to the frame. A.
OPERATION Now that you have set up your chipper shredder for operation, get aquainted with its controls and features. These are described below and illustrated on this page. This knowledge will allow you to use your new equipment to its fullest potential. Awarning The operation of any chipper shredder can result in foreign objects being thrown into the eyes, which can damage your eyes severely.
J OPERATION GAS AND OIL FILL-UP A CAUTION Alcohol blended fuels (called gasohol or using ethanol or methanol) can attract moisture which leads to separation and formation of acids during storage. Acidic gas can damage the fuel system of an engine while in storage._ _ _ _ _ _ _ _ _ _ _ _ _ _ _ _ _ _ _ _ _ _ _ _ _ _ _ _ _ _ _ _ _ _ _ _ _ Oil (one bottle shipped with unit) First Time Use 1. Remove oil fill dipstick. 2.
OPERATION NOTE: A noise will be heard when finding the start of the compression cycle. This noise is caused by the flails and fingers, which are part of the shredding mechanism, and it should be expected until the impeller reaches full speed. 7. Pull the rope with a rapid, continuous, full arm stroke. Keep a firm grip on the starter handle. Let the rope rewind slowly. 8. Repeat, if necessary, until engine starts. When engine starts, move choke control gradually toward the RUN m position.. 9.
SERVICE AND MAINTENANCE MAINTENANCE SCHEDULE Awarning Before performing any type of maintenance/service, disengage all controls and stop the engine. Wait until all moving parts have come to a complete stop. Disconnect spark plug wire and ground it against the engine to prevent unintended starting. Always wear safety glasses during operation or while performing any adjustments or repairs. Follow the maintenance schedule given below. This chart describes service guidelines only.
SERVICE AND MAINTENANCE Servicing the Air Cleaner A CAUTION Do not use pressurized air or solvents to clean the air cleaner cartridge. The air cleaner prevents damaging dirt, dust, etc., from entering the carburetor and being forced into the engine and is important to engine life and performance. Never run the engine without an air cleaner completely assembled. Replace the air cleaner every 25 hours of operation. 1. Loosen screws that hold the air filter cover. 2. Cpen cover and remove air filter.
SERVICE AND MAINTENANCE Service Muffler Awarning Temperature of muffler and nearby areas may exceed 150° F (65°C). Avoid these areas. • Inspect muffler every 50 hours, and replace if necessary. Replacement parts for the muffler must be the same and installed in the same position as the original parts. Clean Engine • • • Daily or before every use, clean grass, chaff or accumulated debris from engine. Keep linkage, spring, and controls clean.
SERVICE AND MAINTENANCE 4. 5. 6. Remove the chipper chute support brace from the frame by removing the hex bolts. Rotate impeller assembly by hand until you locate one of two chipper blades in the chipper chute opening. Remove the blade by removing the internal hex screws, lock washers, and hex nuts which secure it to the impeller. Retain the hardware. See Figure 15. NOTE: Use a 3/16” hex key (Allen) wrench on the outside of the blade and a 1/2” box (or socket) wrench on the inside of the impeller.
OFF-SEASON STORAG Awarning Never store chipper shredder with fuel in tank indoors or in poorly ventilated areas where fuel fumes may reach an open flame, spark, or pilot light as on a furnace, water heater, clothes dryer, or gas appliance. PREPARING THE ENGINE PREPARING THE CHIPPER SHREDDER For engines stored over 30 days: 1. To prevent gum from forming in fuel system or on carburetor parts, run engine until it stops from lack of fuel or add a gasoline additive to the gas in the tank.
I TROUBLESHOOTING Awarning Before performing any type of maintenance/service, disengage all controls and stop the engine. Wait until all moving parts have come to a complete stop. Disconnect spark plug wire and ground it against the engine to prevent unintended starting. Always wear safety glasses during operation or while performing any adjustments or repairs. Problem Engine fails to start Cause Remedy 1. 2. 3. 4. 5. 6.
I PARTS LIS Craftsman Chipper Shredder — Model No. 247.
PARTS LIS J I Craftsman Chipper Shredder — Model No. 247.77638 Ref. No. Part No. Description Ref. No. Lock Washer, 3/8 Part No. 1. 936-0217 2. 914-0149B Cotter Pin 23. 736-0247 Flat Washer 3/8 X 1.25 3. 720-0170 Wing Knob 5/16-18 24. 942-0571 Shredder Blade 4. 681-0094-0721 Chute Deflector Assembly 25. 710-1254 Hex Cap Screw 3/8-24 x 2.25 5. 911-0835 Clevis Pin 26. 681-0004A-0721 Outer Impeller Housing Assembly 6. 781-0457-0637 Shredder Screen 27.
PARTS LIS Craftsman Chipper Shredder — Model No. 247.
PARTS LIS J I Craftsman Chipper Shredder — Model No. 247.77638 Ref. No. Part No. Description Ref. N- Part No. Description 1 728-0175 Pop Rivet 15 936-0170 Bell Washer 5/16 x 1.0 2 753-05094 Chipper Shredder Chute 16 950-0786 Spacer 3 735-0249A Chute Flap 17 738-0813 Axle Assembly 4 781-0633 Chute Flap Strip 18 737-0298 Pipe, Oil Drain 5 681-0068A-0637 Chipper Chute Assembly 19 634-04009 Wheel Complete, 10.0 x 4.0 Gray 6 710-0751 Hex Cap Screw 1/4 -20 x.
I PARTS LIST Craftsman Engine Model 204312-0529 For Chipper Shredder Model No. 247.
J PARTS LIST Craftsman Engine Model 204312-0529 For Chipper Shredder Model No. 247.77638 13 914 1023 33 42 /3-....... 7==--*® l\v> ..... '1 / i. 7.j Xry 35 I 1022 7 36 383, '■ '\ 337 1029 ^ (9 x 0 ^ /..
I PARTS LIST Craftsman Engine Model 204312-0529 For Chipper Shredder Model No. 247.77638 121 CARBURETOR OVERHAUL KIT 98 '..... 127 (0 104 ‘ 137 105 117 163 ® 118 122 51A S*, 633 © 5l\U (0 ^ '' 53 11 967 'l«S- , 445 i"' 161 163 832 836 U 187 957 fc ^...
J PARTS LIST Craftsman Engine Model 204312-0529 For Chipper Shredder Model No. 247.77638 I... ...................................... I 304 363 37 78 305 1005 455 1070 332 334 333 774 f 635 ^....^.......
PARTS LIST Craftsman Engine Model 204312-0529 For Chipper Shredder Model No. 247.77638 Ref. No. 51 Part No.
J PARTS LIST Craftsman Engine Model 204312-0529 For Chipper Shredder Model No. 247.77638 Part No.
PARTS LIST Craftsman Engine Model 204312-0529 For Chipper Shredder Model No. 247.77638 Ref. No. 851 Part No.
Parts Li J L Craftsman Chipper Shredder Model No. 247.77638 777S33113 777S33200 Operation Of This Equipment May Create Sparks That Can Start Fires Around Dry Vegetation. A Spark Arrestor May Be Required. The Operator Should Contact Local Fire Agencies For Laws Or Regula tions To Fire Prevention Requirements. “ROTATING CUTTING BLADES. KEEP HANDS AND FEET OUT RUNNING.
(This page applicable in the U.S.A. and Canada only.) Sears, Roebuck and Co., U.S.A. (Sears), the California Air Resources Board (CARB) and the United States Environmental Protection Agency (U.S.
Look For Relevant Emissions Dorabiiity Period and Air Index Information On Your Engine Emissions Label Engines that are certified to meet the California Air Resources Board (GARB) Tier 2 Emission Standards must display information regarding the Emissions Durability Period and the Air Index. Sears, Roebuck and Co., U.S.A. makes this information available to the consumer on our emission labels.
REPAIR PROTECTION AGREEMENT Congratulations on making a smart purchase. Your new Craftsman® product is designed and manufactured for years of dependable opera tion. But like all products, it may require repair from time to time. That's when having a Repair Protection Agreement can save you money and aggravation.
Declaración de garantía.......................Página 35 Prácticas operación seguras............... Páginas 36-39 Montaje................................................ Páginas 40-43 Operación............................................ Páginas 44-45 Servicio y Mantenimiento.....................Páginas 46-49 Almacenamiento fuera de temporada.... Página 50 Solución de problemas....................... Página 51-52 Etiquetas de seguridad........................Página 7 Lista de piezas.........................
INSTRUCCIONES DE SEGURIDA A PELIGRO A ADVERTENCIA Esta máquina fue construida para ser operada de acuerdo con las reglas de seguridad contenidas en este manual. Al igual que con cualquier tipo de equipo motorizado, un descuido o error por parte del operador puede producir lesiones graves. Esta máquina es capaz de amputar manos y pies y de arrojar objetos con gran fuerza. De no respetar las instrucciones de seguridad siguientes se pueden producir lesiones graves o la muerte.
INSTRUCCIONES DE SEGURIDAD Manejo seguro de la gasolina Para evitar lesiones personales o daños materiales sea sumamente cuidadoso al manipular la gasolina. La gasolina es altamente inflam able y sus vapores pueden causar explosiones. Se puede lesionar gravemente si derrama gasolina sobre usted o sobre la ropa ya que se puede encender. Lávese la piel y cámbiese de ropa de inmediato. • Utilice sólo recipientes para gasolina autorizados.
INSTRUCCIONES DE SEGURIDA MANTENIMIENTO Y ALMACENAMIENTO NO MODIFIQUE EL MOTOR • Para evitar lesiones graves o la muerte, no modifique el motor bajo ninguna circunstancia. Si cambia la configuración del regulador el motor puede descontrolarse y operar a velocidades inseguras. Nunca cambie la configuración de fábrica del regulador del motor. • • • • • • • • • • • Nunca manipule los dispositivos de seguridad de manera imprudente. Controle periódicamente que funcionen de forma adecuada.
INSTRUCCIONES DE SEGURIDAD J SIMBOLOS DE SEGURIDAD Esta página representa y describe la seguridad los símbolos que pueden parecer en este producto. Lea, comprenda, y siga todas instrucciones en la máquina antes procurar para reunir y operar. Símbolo r Descripción LEA EL MANUAL(S) DELOPERADOR Lea, comprenda, y siga todas instrucciones en el manual (manuales) antes procurar para reuniry operar ADVERTENCIA— GIRANDO HOJAS Mantenga manos fuera de aperturas de cala y descarga mientras máquina corre.
MONTAJ IMPORTANTE: Esta unidad se entrega sin gasolina o aceite en el motor. Asegúrese de servicio con motor de gasolina y aceite según las instrucciones en la operación de este manual antes de operar su máquina. NOTA: Referencia a la derecha y la izquierda de la Trituradora Chip per se observa desde la posición de funcionamiento. APERTURA DE LA CAJA DE CARTÓN 1. 2. 3. Corte cada una de las esquinas de la caja verticalmente, de la parte superior a la base. Saque todas las piezas sueltas.
MONTAJE COLOCACION DEL CANAL DEFLECTOR 1. 2. A. Saque las perillas a mariposa de los costados de la caja inferior del motor. B. Saque la tuerca de seguridad hexagonal, los separadores y el bulón hexagonal de la parte superior de la caja del motor. Vea la Figura 3-3. A. Ponga en línea el canal deflector en su posición en la abertura de descarga e inserte el bulón hexagonal con el separador a través de la bisagra del canal deflector (los separadores van dentro de las bisagras). Vea la Figura 3-4. B.
MONTAJ 2. 3. A. Ponga en línea el canal de la cortadora por encima de los espárragos de la soldadura de manera que la ranura en la base del canal mire hacia abajo. B. Ajuste el canal de la cortadora con tres arandelas curvas (con el lado curvo contra el canal de la cortadora) y con las tuercas hexagonales que había sacado anteriormente. No ajuste las tuercas en este momento. Vea la Figura 6. La cortadora trituradora fue enviada con un extremo de la traba de sostén ya unido al bastidor inferior.
MONTAJE CANAL DE LA CORTADORA A ADVERTENCIA Permite que las ramas pequeñas de hasta 3” de diámetro ingresen al motor para ser picadas. Vea la Figura 9. Al operar una cortadora trituradora puede ser que objetos extraños sean arrojados a los ojos lo cual puede dañarlos gravemente. Utilice siempre los anteojos de seguridad provistos con esta unidad o protectores para ojos antes de picar o triturar el material o mientras realiza ajustes o reparaciones.
OPERACION Llene el tanque de combustible sólo con gasolina normal sin plomo, limpia y fresca. No use gasolina que contenga METANOL. Vuelva a colocar la tapa de combustible en su lugar. LLENADO DE GASOLINA Y ACEITE Aceite (se envía una botella junto con la unidad) Primer uso 1. Saque la varilla del nivel de aceite. 2. Con la cortadora trituradora al nivel del suelo, utilice un embudo para vaciar dentro del motor todo el contenido de la botella de aceite suministrada con la unidad. 3.
OPERACION 3. 4. 5. 6. Gire la válvula de cierre de combustible a la posición EN. Mueva el control del obturador hacia el control del regulador para obturar el carburador del motor. (Si el motor está tibio la obturación puede no ser necesaria). Mueva la palanca de control del estrangulador a la posición START/RUN (encendido / funcionamiento, representado por una liebre). Vea la figura 10. Situado detrás de la unidad, tome la manija del arrancador y tire de la cuerda hasta que sienta un tirón.
SERVICIO Y MANTENIMIENTO LISTA DE MANTENIMIENTO A ADVERTENCIA Antes de realizar cualquier tipo del mantenimiento/servicio, suelte todos los mandos y pare el motor. Espere hasta que todas las partes de movimiento hayan venido a una parada completa. Desconecte el alambre de bujía y báselo contra el motor para prevenir el comienzo involuntario. Siempre lleve puestos cristales inastillables durante la operación o realizando cualquier ajuste o reparaciones. Intervalo Siga la lista de mantenimiento dada abajo.
SERVICIO Y MANTENIMIENTO Servicio Del Filtro De Aire A PRECAUCIÓN No use aire presurizado o solventes para limpiar el cartucho de filtro de aire. El filtro de aire evita el ingreso al carburador de suciedad, polvo, etc. perjudiciales y evita que los mismos sean introducidos dentro del mo tor. Además, dicho filtro es importante para la vida útil y el rendimiento del motor. No ponga nunca en funcionamiento el motor sin haber montado totalmente el filtro de aire.
SERVICIO Y MANTENIMIENTO Limpieza Del Motor • Diariamente o antes de cada uso, limpie hierba, barcia o escombros acumulados del motor. Guarde encadenamiento, primavera, y mandos limpios. Guarde el área alrededor y detrás del silenciador sin cualesquiera escombros combustibles. El cuidado del motor limpio permite el movimiento aéreo alred edor del motor. Las partes de motor deberían ser guardadas limpias para reducir el riesgo de recalentarse y la ignición de escombros acumulados.
SERVICIO Y MANTENIMIENTO NOTA: Use una llave hexagonal de 3/16” (Alien) en el exterior de la cuchilla y una llave de tubo de 1/2” (o cubo) en el interior del motor. Sostenga la llave Alien firmemente y gire la llave de tubo (o cubo) para aflojar la tuerca. 7. Coloque una cuchilla de repuesto (Número de pieza 742-0544) con los elementos de ferretería que extrajo anteriormente o afílela. IMPORTANTE: Cuando afila la cuchilla, protéjase las manos utilizando guantes.
ALMACENAMIENTO FUERA DE TEMPORAD I I Awarning Nunca almacene cortadora trituradora con el combustible en el tanque dentro o en áreas mal ventiladas donde los vapores de combustible pueden alcanzar una llama abierta, la chispa, o el piloto como en un horno, calentador de agua, secador de ropa, o aplicación de gas. PREPARACION DEL MOTOR Ya que los motores almacenaron más de 30 días: 1.
I SOLUCION DE PROBLEMA A ADVERTENCIA \ntes de realizar cualquier tipo del mantenimiento/servicio, suelte todos los mandos y pare el motor. Espere hasta que todas las partes de novimiento hayan venido a una parada completa. Desconecte el alambre de bujía y báselo contra el motor para prevenir el comienzo involunario. Siempre lleve puestos cristales inastillables durante la operación o realizando cualquier ajuste o reparaciones. Problema El motor no arranca Causa 1. 6.
J SOLUCION DE PROBLEMAS A ADVERTENCIA \ntes de realizar cualquier tipo del mantenimiento/servicio, suelte todos los mandos y pare el motor. Espere hasta que todas las partes de novimiento hayan venido a una parada completa. Desconecte el alambre de bujía y báselo contra el motor para prevenir el comienzo involunario. Siempre lleve puestos cristales inastillables durante la operación o realizando cualquier ajuste o reparaciones. Problema Causa Remedio El motor recalienta 1. 2.
(Esta página se aplica sólo en EE.UU. y Canadá). Sears, Roebuck and Co., U.S.A.
Busque el período de duración de emisiones importantes yla información de clasificación de aire en la etiqueta de emisiones de su motor Los motores cuyo cumplimiento con los estándares de emisión Tier 2 de la Comisión de Recursos Ambientales de California (CARB) esté certificado deben exhibir la información relacionada con el período de duración de las emisiones y la clasificación de aire. Sears, Roebuck and Co.
ACUERDO DE PROTECCION PARA REPARACIONES Felicitaciones por haber realizado una adquisición inteligente. El producto Craftsman® que ha adquirido está diseñado y fabricado para brindar muchos años de funcionamiento confiable. Pero como todos los productos a veces puede requerir de reparaciones. Es en ese momento cuando el disponer de un Acuerdo de protección para reparaciones le puede ahorrar dinero y problemas.
Get it fixed, at your home or ours! Your Home For expert troubleshooting and home solutions advice: I I www.managemyhome.com For repair - in your home - of all major brand appliances, lawn and garden equipment, or heating and cooling systems, no matter who made it, no matter who sold it! For the replacement parts, accessories and owner’s manuals that you need to do-it-yourself. For Sears professional installation of home appliances and items like garage door openers and water heaters.