
Operating instructions

G
H
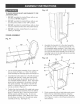
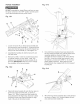
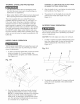
4, Turn the hand knob (H) that is under the outfeed
tame clockwise to raise tame or counterclockwise to
Uowertame, See Figure 15-2,
5, To check UeveUof tame to knives, set a straight edge
(E) on the outfeed tame, extending over center of
the cutterhead (D), See Figure 15-1, To check that
the knives are installed correctly, see KNUFE
ADJUSTMENTS,
6,
When the outfeed tame is exactly UeveUwith the
highpoint of the knives, tighten Uockthumbscrew
(G), See Figure 15-1 and 15-2,
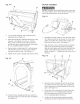
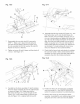
MOVING THE FENCE
Turn the power switch OFF and unplug the power cord
from its power source prior to performing any mainte-
nance or adjustments,
Fig. 16-1
A C
B
7
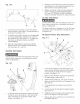
To slide the fence (A) across the width of the jointer,
Uoosenthe cam UockhandUe (B), Note this handUe
Uocksand unUocks in one quarter rotation of the
handUe, See Figure 16-1,
2, Standing in front of the jointer, grasp the top of the
fence between the front support brackets (C) and
slide the fence to the desired position,
3, Tighten cam handle, Make sure the cutterhead
guard (D) returns and rests against the fence,
If not see CUTTERHEAD GUARD ASSEMBLY
section in assembly instruction for setup procedure,
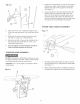
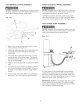
TILTING THE FENCE
Turn the power switch OFF and unplug the power cord
from its power source prior to performing any mainte-
nance or adjustments,
The fence can tilt up to 45 degrees in or out, The fence
has positive stops at 45 degrees in, 90 degrees and
45 degrees out,
90 Degree Positive Stop Adjustment
Fig. 17-1 A
B
2O
1, To set fence 90 degree to the table surface, first
make sure the 90 degree stop knob (A) is pushed
in and is inside of slot (B) of the front support
bracket, See Figure 17-1,
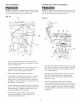
2, Make sure the 90 degree stop knob is against the
90 degree positive stop screw (C),
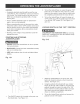
3, Tighten tilt lock handle (D), and use an accurate
square to check that the fence is 90 degrees to the
table surface,
if any adjustments are needed, loosen tilt lock
handle,
4,
5, Loosen stop nut (E) and adjust 90 degree positive
stop screw (C),
6, Retighten bevel lock handle, and recheck that the
fence is 90 degrees to the table surface,
7, Repeat steps above until fence is set correctly and
then tighten stop nut,