
Operating instructions

,, DO NOT expose the drHHpress to rain or operate the
in damp Hocations.
,, MAKE SURE aHHparts have been assembHed correctly
and are in working order.
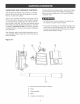
SWITCH OPERATION
CHILDPROOF THE WORKSHOP AREA by removing
switch keys, unpHugging tooHsfrom the eHectricaHrecep-
tacHes, and using padHocks.
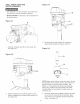
Figure 7-1
p- ............... \
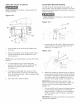
1. The ON/OFF switch (A) is located on the front of
the drill press head. See Figure 7-1.
2. To turn the Drill Press on, press the green ON
button (B) in one-half inch. Note: There is a safety
feature on the switch to insure that the switch must
be completely pressed before the motor wiil start.
3. To turn the Jointer/Pianer off, press the large red
OFF paddle (C) or lift the paddle and press directly
on the red "OFF" button (D). See Figure 7-1 and
7-2.
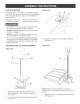
IMPORTANT: When the machine is not in use, the
switch shouHdbe Hocked in the OFF position to prevent
unauthorized use.
4,
5.
When the Drill Press is not in use, the "ON" button
should be Hockedso that it cannot be started.
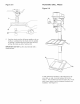
Using the padlock (E) included with your Drill Press,
lift the red "OFF" paddle (C) and place the padlock
through the holes in the side of the "ON" button
and then Hockthe padlock. Make sure keys have
been removed from padlock and placed where no
children can get them. See Figure 7-2.
Figure 7-2
6. To use the Drill Press, unlock and remove the
padlock from the "ON" button.
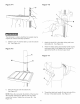
FLEXIBLE LAMP
To reduce the risk of fire, use 40 watt or less, 120 volt,
reflector track-type Hightbulb (not supplied). DO NOT
use a standard household Hightbulb. The reflector track°
type Hightbulb should not extend below the lamp shade.
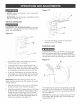
Figuce 8-1
B
The fHexibHeHamp(A) operates independently of the drHH
press and has its own power cord. To turn the HampON
and OFF, rotate the switch (B) in the cHockwise direction
onHy.See Figure 9-1.
CAUTION: The flexibHe Hamphousing wiHHremain hot for
a few minutes after turning it OFF. Avoid contact with
housing untiHit is cool
17