
Manual


9
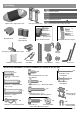
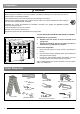
Attaching Rail to Header Bracket and Mounting Door Bracket
!
CAUTION
To prevent SERIOUS INJURY:
- DO NOT connect power until instructed.
- Horizontal and vertical REINFORCEMENT is needed for fiberglass, aluminum or lightweight steel garage
doors BEFORE installing the door bracket. Contact your door manufacturer for reinforcement options.
Fig.1
Fig.2
Fig.3
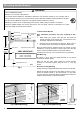
Self-Threading
Screw - 1/4” x 5/8”
UP
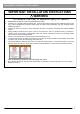
Vertical Centerline of Door
(a) (b) (c)
2-4” (5-10cm)
Top Edge of Door
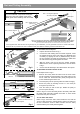
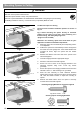
To Attach the Opener to the Header Bracket
1. As shown in Fig.1, use the packaging carton as temporary
support for the opener. Place the opener on carton to
prevent damage.
2. Align the mounting hole on the header rail to the mounting
hole on the Header Bracket.
3. Connect the header rail and the door bracket together with
a 5/16” x 1-1/2” clevis pin and lock it in place with a hitch
pin.
To mount the Door Bracket
Note: Some door reinforcement kits may provide direct
attachment of the door arm to the reinforcement bracket. If you
have a door reinforcement bracket with this option, skip this step
and proceed with the next step “mounting opener to ceiling”.
1. Position the door bracket on the centerline of the door
approximately 2” - 4” (5-10cm) below the top edge of the
door, as shown in Fig.2.
2. Depending on the construction of your door, install using
one of the steps shown if Fig. 3 below:
For lightweight steel doors, with factory equipped
vertical steel reinforcement and horizontal strut.
(a) Mark and drill two 3/16” holes. Make sure not to drill
through the garage door. Secure the door bracket with two
1/4” x 5/8” self-threading screws (provided) as shown in
Fig.3(a).
(b) Alternative installation: Drill two 5/16” holes through the
door. Secure the door bracket using two 5/16” bolts, lock
washers and nuts (not provided) as shown in Fig.3(b). The
length of bolts will depend on the thickness of your door.
Wood door
(c) Mark and drill two 5/16” holes through the garage door.
Secure the door bracket using two 5/16” carriage bolts,
washers and nuts (not provided) as shown in Fig.3(c). The
length of bolts will depend on the thickness of your door.
Note: DO NOT use Self-Threading Screws on a wood door.
Carton
Hitch Pin
Clevis Pin - 5/16” x 1-1/2”