
Manual


5
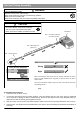
Rail and Trolley Assembly
!
WARNING
To prevent SERIOUS INJURY:
- DO NOT connect power until instructed.
- Keep hands and fingers clear from sprocket during operation.
- Wear gloves when installing belt.
- Keep hands and fingers away from joints and possible sharp edges.
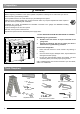
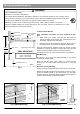
Trolley direction (Top View)
!
CAUTION
- DO NOT connect power until instructed.
- To prevent INJURY, keep hands and fingers
away from joints and possible sharp edges.
- Wear gloves when installing chain/belt and cable.
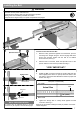
When connecting the rails ensure they are securely connected as shown
above. To apply additional force tap gently on the end of the rail with a
rubber mallet*.
*Only use a soft rubber mallet to tap on the end of the rails as other tools
may damage the rail.
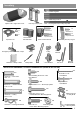
Rail — Header Segment
Rail — Middle Segments
(tapered) x 3
Rail — End Segment (tapered)
with Trolley Stop Bolt
Fig.1
Loosely connected
Securely connected by applying force
To Assemble Rail and Opener
1. Prepare the rails as shown in Fig.1.
2. Connect the rails starting with the Header Segment. Insert the tapered ends into open ends, apply any additional
force necessary by tapping the Rail on padded flooring. Ensure the End Segment has Trolley Stop Bolt facing up.
Make sure the rails are securely joined together as shown.
3. Slide the Trolley onto the rail from the Header Segment. Make sure the arrow is pointing towards the door as shown .
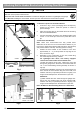
4. Insert the Rail - End Segment into the Rail Bracket on the Opener. Secure End Segment to Bracket as described on
next page.
* VERY IMPORTANT! *
Right
Wrong
Rail Bracket