
Manual


6
Installing the Belt
!
WARNING
To prevent SERIOUS INJURY:
- DO NOT connect power until instructed.
- Keep hands and fingers clear from sprocket during operation.
- Wear gloves when installing the belt.
- Keep hands and fingers away from joints and possible sharp edges.
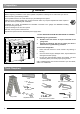
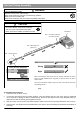
To Secure the Rail on the Opener
With the End Segment of the rail fully inserted into the Rail
Bracket, insert a 5/16” x 1-1/2” Clevis Pin through the hole and
lock it into position with a Hitch Pin as shown in Fig.1.
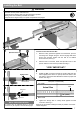
To Assemble the Header Section of Rail
See Figure 2 for steps 1 through 7.
1. Place the belt beside the rail as shown
2. Insert a screwdriver into the hole approximately 10-1/4” from
the end of the Rail - Header Segment. Slide the trolley
against this screw driver. The trolley must stay in this posi-
tion for proper alignment of the belt.
3. Pass the belt end with Trolley Shaft Connector through the
slot on the Rail - Header Segment.
4. Insert the Pulley into the slot to the right of the belt.
5. Secure the Pulley by inserting the 3/8” x 1-3/4” Clevis Pin
through the top of the rail.
6. Lock the Clevis Pin with a Hitch Pin. Rotate the Pulley to
ensure it spins smoothly.
7. Connect the Trolley Shaft to the Trolley Shaft Connector on
the belt, using the Master Link Set.
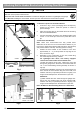
8. Slide the Trolley Shaft into the Trolley until you hear a "click"
when they lock together. See Fig. 3.
Clevis Pin - 5/16” x 1-1/2”
Hitch Pin
Fig.1
Hitch Pin
Clevis Pin
Rail Bracket
Clevis Pin — 3/8” x 1-3/4”
Hitch Pin
Hitch Pin
1
2
Trolley Shaft
Clevis Pin
Pulley
3
4
6
5
7
Fig.2
2
Trolley Shaft
Fig.3
Trolley Shaft Connector
Screwdriver
Opener Unit
Garage Door
Trolley
Slide trolley shaft into trolley to lock
10-1/4”
Trolley