
Manual


7
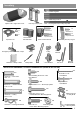
To Connect and Tension the Belt
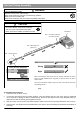
1. With the trolley positioned against the screwdriver, pull the
remaining belt straight along the rail and engage belt teeth
around the sprocket. (Make sure the belt is not twisted
around the rail.) See Fig. 1.
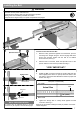
2. After the belt is connected, attach the Sprocket Cover to the
opener with the screw and nut provided. See Fig. 2.
!
WARNING
To prevent SERIOUS INJURY:
- DO NOT connect power until instructed.
- Keep hands and fingers clear from sprocket during operation.
- Wear gloves when installing chain/belt and cable.
- Keep hands and fingers away from joints and possible sharp edges.
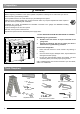
Belt Connector
Tighten until...
Tighten nut
Flange Nut
1
4
Installing the Belt
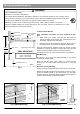
1/4” (6mm)
Base of Rail
Mid-point of rail assembly
Belt
Top of Rail
Actual Size
3
2
THE SPROCKET COVER MUST BE SECURELY INSTALLED!!
3. Rotate the Belt Connector towards the Trolley Shaft until the
belt is slightly loose about 1/4” (6mm) above the base of the
rail. Refer to the actual-sized illustration below for proper belt
tension. See Fig. 3.
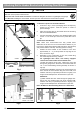
4. Tighten the Flange Nut on Trolley Shaft against the Belt
Connector. See Fig. 4.
Remove the screwdriver holding the trolley in position on the Rail -
Header Segment.
* VERY IMPORTANT! *
For heavier doors an additional half turn to the belt
connector may be required to eliminate belt slippage.
NOTE: FOR HEAVY DOORS
Sprocket Cover