Operator's nual CRAFTSMAN ° 21 SteeJ Blade Dethatcher Model No. 247.282820 For answers to your questions call 1-800-4MY-HOME. about this product, ,, ,, ,, ,, ,, ,, CAUTION: Before using this product, read this manual and follow aJl safety ruJes and operating instructions. Sears, Roebuck Visit and Co., Hoffman our website: Estates, SAFETY ASSEMBLY OPERATION MAINTENANCE PARTS LIST ESPAI_OL R 30 IL 60179, U.S.A. www.sears.com/craftsman FormNo.
Warranty Statement ....................................................... Safety instructions ......................................................... Slope Guide .................................................................... Safety Labels ................................................................. Assembly ........................................................................ Operation .....................................................................
This machinewas built to be operatedaccordingto the rulesfor safe operationin this manual.As with anytype of powerequipment,carelessnessor error on the part of the operatorcan result in seriousinjury.This machineis capableof amputatinghandsand feet and throwingobjects. Failuretoobservethe followingsafety instructionscould resultin seriousinjuryor death. tionswhich, if not followed,couldendangerthe __IL This symbolpoints outimportantsafety instrucpersonalsafetyand/or propertyof yourselfand others.
• • • • Muffler and engine become hotandcancause aburn. Donottouch. • Neverstorethe machineor fuel containernear an open flame,spark or pilot lightas on a waterheater,spaceheater,furnace,clothesdryer, Only useparts andaccessories made forthismachine bythe or other gas appliances. manufacturer. Failure todosocanresult inpersonal injury. • Toreducefire hazard,keepdethatcherfree of grass, leaves,or other When starting engine, pullcord slowly until resistance isfelt,then pull debris build-up.
SAFETY SYMBOLS This pagedepictsand describessafety symbolsthat may appearon this product. Read,understand,and follow all instructions on the machinebeforeattemptingto assembleand operate. ® = READ THE OPERATOR'S MANUAL(S) Read, understand, and follow all instructions in the manual(s) before attempting to assemble and operate WARNING-- ROTATING BLADES Keep hands out of inlet and discharge blades inside openings while machine is running.
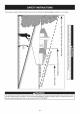
Use this pageas a guide to determineslopeswhereyou maynot operatesafely.Do not operate the dethatcheron such slopes. ! t C CD ! ! r- 6c IT -1- ! ! ! z2r C3 O3 O3 C_ o_, co O d) t- o co o (D This symbolpointsout importantsafety instructionswhich,if not followed,couldendangerthe personalsafetyand/or propertyof yourself and others.Readand follow all instructionsin this manualbeforeattemptingto operatethis machine.Failureto complywith these instructions may resultin personalinjury.
WARNING This symbol points out important safety instructions which, if not followed, could endanger the personal safety and/or property of yourself and others. Read and follow all instructions in this manual before attempting to operate this machine. Failureto comply with these instructions may result in personal injury.
NOTE:Referencesto rightor left sideof thedethatcherare determinedfrom behindtheunit in the operatingposition(standing directlybehindthedethatcher,facingthe handlepanel). REMOVING 1. 2. 3. 4. Placeupperhandleon lowerhandle. 5. Insertknobs intotop hole of the lowerhandleand bottomhole of the upperhandleand tighten.See Figure2. FROM CARTON Cut the cornersof the cartonand lay the sidesflat on the ground.Removeand discardall packinginserts. Movethe dethatcherout of the carton.
Securing Cables Adding Cablesare attachedto their respectivecontrols,but are left unattachedto the handleto easeassembly;however,they will needto be securedto the lowerhandleby the providedcabletie. See Figure4. oil Theengineis shippedwithoutoil in the engine.Youmustfill the enginewith oil beforeoperating.Runningthe enginewith insufficientoil can causeseriousenginedamageand void the product warranty. f 1. Removetheoil fillercap/dipstickand wipethe dipstickclean. See Figure5.
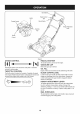
Bail Interlock BladeControl Bail Oil Fill ThrottleControl / l RecoilStarter HeightAdjustment Lever Gasoline Cap Choke Control Figure6 CHOKE CONTROL RECOIL STARTER The starterhandleis usedto start theengine, GASOLINE Activatingthe choke control closes the choke plate on carburetor and aids in starting engine. THROTTLE CAP Removethegas cap to add fuel. OIL FILL Engineoil levelcan be checkedand oil addedthroughthe oil fill.
BEFORE STARTING THE ENGINE STARTING Read,understandand followall the instructionsand warnings on the machineand in this manualbeforeoperating. THE ENGINE _ressurizedstartinc Thespark plug wirewas disconnectedfor safety.Attachthe spark plug wireto the spark plug beforestarting.See Figure7. flammable. Toavoidcarbonmonoxidepoisoning,makesurethe engineis outdoorsin a well-ventilatedarea. 1. Set thethrottleto the fast_position. 2. Set thechoketo the FULLi'_"1 position. 3.
USING THE DETHATCHER Dethatchthe lawnonce inthe springand onceinthe fall to clear deadand/or dyinggrassfrom the lawn,and to allowmoreair to flow throughthe ground.Grass shouldbe 21/2incheshigh when dethatched.After dethatching,fertilizeand waterthe lawnto encourage quickergrowth. Be sure lawnisclearof stones,sticks,wire, or other objectswhich coulddamagedethatcheror engine.Suchobjectscouldbe accidentlythrownby the dethatcherin anydirectionand cause serious personalinjuryto the operatorand others. 1.
MAINTENANCE SCHEDULE Beforeperforminganytypeof maintenance/service, disengageall controlsandstoptheengine.Waituntilall movingpartshavecometo a completestop.Disconnectsparkplugwireandgrounditagainstthe engineto preventunintendedstarting.Alwayswearsafetyglassesduring operationor whileperforminganyadjustments or repairs. Followthe maintenanceschedulegivenbelow.This chart describesserviceguidelinesonly. Usethe Service Logcolumn to keeptrackof completedmaintenancetasks.
NOTE: Pleasedisposeof usedmotoroil in a mannerthat is friendly to the environment.Takeit to a recyclingcenteror othercollection center, Oil Recommendations 3. Whenaddingoil to the engine,add 10%30 engineoil. Engineoil capacityis 600 rnl (approx.20 oz.). Do notover-fill.Usea 4-stroke, or an equivalenthighdetergent,premiumquality motoroil certifiedto meetor exceedU.S.automobilemanufacturer'srequirementsfor serviceclassificationSG, SE MotoroilsclassifiedSG, SFwill show this desk nationon the container.
ADJUSTMENTS Blade Cutting . Height Thedethatcherisdesignedto cut 1/8of an inchintothe ground.At the beginningof the productlife usethe 2-setting.As the blades wearit will be necessaryto increasethe depthof the cuttingblades by usingthe3, 4, and 5 settings. Removethe beltby pullingoverand out from thetop pulley. Swingthe beltkeeperdownwardsto releasebeltfrom lower pulley.See Figure16. / BELT REPLACEMENT \ Blade Drive Belt 1.
BLADE REPLACEMENT To replacethe bladeassemblyreferto Figure20. Whenthe bladesbecometoodull to dethatchon the 5-setting,or if any of the bladesbreak,follow thesestepsto replacethe blade assembly. 1. Removethe beltcoveras describedin the Belt Replacement section. 2. . 4. . Removethe bottompulley.See Figure18. Figure18 Removethe six screwson the left and rightside. See Figure16. Turnthe dethatcheron its left side, withthe engineclosest to theground.
AiR FILTER Paperfilterscannotbe cleanedand mustbe replacedonce a year or every 100operatinghours;moreoften if usedin extremelydusty conditions. Neverusegasolineor low flash pointsolventsfor cleaningthe air cleanerelement.A fireor explosioncould result. NOTE: Neverrunthe enginewithoutthe air cleaner.Rapidengine wearwill result. 1. Pressthe tab on the air filter coverand lift the cover.See Figure 21.Replacepaperelementwhen dirty or damaged.Cleanfoam elementor replacewhen damaged. f 2.
If the dethatcherwill notbe usedfor30 days or longer,the equipmentneedsto be storedproperly.Followstorageinstructionsbelowto ensuretop performancefromthe dethatcherfor manymoreyears. PREPARING THE ENGINE PREPARING DETHATCHER Enginesstoredover30 days need to be drainedof fuel to prevent If the dethatcherwill not be usedfor 30 daysor longer,followthe deteriorationand gumfrom formingin the fuel systemor on essential instructionsbelow. carburetorparts.If thegasolinein yourenginedeterioratesduring 1.
Beforeperforminganytypeofmaintenance/service, disengageall controlsand stoptheengine.Waituntilall movingpartshavecometoa completestop.Disconnectsparkplugwireandgroundit againsttheengineto prevent unintendedstarting.Alwayswearsafetyglassesduringoperationor whileperforminganyadjustmentsor repairs. This sectionaddresses minorserviceissues.To locate the nearestSears Service Centeror to scheduleservice,simplycontact Searsat 1-800-4-MY-HOME®. Enginefails to start 1. 2. Fueltank empty,or stale fuel.
21 Steel Blade Dethatcher _ Model No. 247. 282820 / / 1 16 / 2 47 / 4 33 19 44 \ 15 \ \ 23 4 24 35 /3 22 \ 29 36 21 20 4 51 50 23 48 41 / 43 42 / 11 \ 52 54 26 2O 17
Steel Blade Dethatcher _ IViodel No. 247. 282820 D = O O D = 681-04035-0637 PulleyGuardAssembly 2 710-0107 O Q 750-04391 BearingSpacer,6.6x 16.7x 11.6 HexScrew,5/16- 24 29 750-04394 idler Spacer,6.5 x 22.3 x 23 954-04028 V Belt 3 710-0151 Hex Screw,3/8- 24 30 4 710-04189 Screw,M6- 1 x 20.0 31 756-04112A Pulley 5 710-04192 Screw,M6- 1 32 756-04133 Pulley,2 x 2.75x .625 6 710-04866 Screw,M6- 1 33 756-04275 Pulley,.75 ID x 2.
21 Steel Blade Dethatcher _ IViodel No. 247.
21 Steel Blade Dethatcher _ IViodel No. 247. 282820 m = 712-04053A Nut,M18x 1.5 2 750-04201 BearingSpacer 3 681-04018A 4 5 0 0 D = " O 720-04041 TurningKnob,M8 x 1.25 21 732-04190A Compression Spacer,.087x .715x .688 BearingAssembly 22 936-0451 SaddleWasher,.320x .93x .060 738-04079 ShouldScrew,7.13x 11.5 23 736-0700 FiatWasher,8.4x 16 x 1.60 736-04114 SafetyWasher 24 738-04092 ShoulderSpacer,11.87x 15.5 938-0952A ShoulderBolt, .375x .
21 Steel Blade Dethatcher Engine -- Model No. 247.
21 Steel Blade Dethatcher Engine B IViodel No. 247. 282820 951-10902 Bolt Flangex28 1 951-10923 O-Ring 3 Short Block DipstickComp 2 GasketKit Oil Seal 25x41.25x6 4 O-Ring 3 Complete GasketCase Cover 10 Oil Seal 25x41.25x6 4 O-Ring 15 CoverCompLeft Crankcase 5 Oil Seal 22x35x7 21 Bearing6205 6 Packing 25 CamshaftAssy. 7 Washer.10x16x1.
21 Steel Blade Dethatcher Engine B Model No. 247.282820 1 710-04908 Bolt 2 951-10954 ThrottleReturnSpring 42 O-Ring 3 951-11152 GovernorRod 43 Oil Seal 25x41.25x6 4 951-10915 GovernorReturnSpring 44 CoverComp LeftCrankcase 5 710-04916 Bolt 45 Bearing6205 6 710-04922 Bolt 48 GasketCase Cover 10 710-04902 Pivot Bolt 50 RadialBall Bearing(6205) 13 751-11123 ValveAdjustingNut 52 Oil Seal 22x35x7 21 751-11124 Pivot LockingNut 53 951-11156 Oil Seal 25x41.
Congratulationson makinga smartpurchase.YournewCraftsman® productis designedand manufacturedfor yearsof dependable operation.But likeall products,it may requirerepairfrom time to time.That'swhenhavinga RepairProtectionAgreementcan save youmoneyand aggravation.
MTD CONSUMER GROUP (MTD) and the United States Environment Emission (Owner's Control System Warranty Defect Warranty Protection Agency (U. S. EPA) Statement Rights and Obligations) The U. S. EPAand MTDare pleasedto explaintheemissionscontrolsystemwarrantyon your modelyear 2005and latersmalloff-roadengine. New smalloff-roadenginesmustbe designed,builtand equippedto meetthe stringentanti-smogstandards.
(9)Anyreplacement partmaybeused intheperformance ofanywarranty maintenance orrepairs andmust beprovided without charge to theowner. Such usewillnotreduce thewarranty obligations ofMTD. (10)Add-on ormodified partsthatarenotexempted bytheAirResources Board maynotbeused. Theuseofanynon-exempted add-on or modified parts shallbegrounds fordisallowing awarranty claim made inaccordance withthisarticle.
Declaraci6n de garantia ............................................... Instrucciones sobre seguridad .................................... Guia para pendientes ................................................... Armado ......................................................................... Funcionamiento ............................................................ GARANTiA 30 31 34 36 38 Servicio y Mantenimiento ............................................ 41 Almacenamiento fuera de temporada .........
Esta m_quinafue construidapara set opera@ de acuerdo con las reglas de seguridadcontenidasen este manual.AI igual quecon cualquiertipo de equipo motorizado,un descuido o error por partedel operadorpuede producir lesionesgraves.Estam_quinaes capazde amputarmanosy pies y de arrojar objetoscon gran fuerza.De no respetarlasinstrucciones de seguridadsiguientesse pueden producirlesionesgraveso la muerte.
• El silenciador y el motor se calientan y pueden causar quemaduras. No los toque. • Utilice solamente piezas y accesorios manufacturados para esta m_.quina por el fabricante. De Io contrario podrfan producirse lesiones personales. • Para encender el motor, jale de la cuerda lentamente hasta que sienta resistencia, luego jale r_.pidamente.El repliegue r_.pidode la cuerda de arranque (tensi6n de retroceso) le jalar_, la mano y el brazo hacia el motor m_.sr_.pidode Io que usted puede soltar.
S{IVIBOLOS DE SEGURIDAD En esta p&ginase presentany describenlos simbolosde seguridadque puedenapareceren este producto. Lea,entienday cumplatodas las instruccionesincluidasen la m&quinaantes de intentarrealizarel montajede la unidady utilizarla. _ LEA EL(LOS) MANUAL(ES) DEL OPERADOR i Lea, entienda I! realizar el montaje y cumpla todas las instrucciones incluidas en el(los) manuales antes de intentar de la unidad y utilizarla.
Use esta p_.ginacomoguia para determinarlas inclinacionesde las pendientesen las que podria no teneruna operaci6nsegura.Noopere la podadoraen dichas pendientes. c__ -rJ __,_o __q._ z o _-_- / / I I o _- 3 --. 03 03 t3) _ I / / -_" "r.J __. _ _ × No_ _." -__. _. _-X _ t3) x _-N La presenciade este simboloindicaque setrata de instruccionesimportantesde seguridadque sedeben respetarpara evitarponer en peligrosu seguridadpersonaly/o materialy la de otras personas.
Estapdtgina semarch6intencionadamente enblanco.
NOTA:Las referenciasa lado derechoo izquierdodel escarificador se deterrninansitu_.ndosedetr_.sde la unidaden posicidnde operacidn(perrnaneciendodirectarnentedetr_.sdel escarificador, rnirandohaciael panelde la rnanija). RETIRO 1. 2. 3. 4. Coloquela rnanijasuperiorsobrela inferior. 5. Insertlas perillasen el orificiosuperiorde la rnanijainferioryen el orificioinferiorde la rnanijasuperiory ajuste.Vea la Figura2.
Sujeci6n de cables Loscables est_nunidosa sus respectivoscontroles,pero no est&n unidosa la rnanijaparafacilitarel arrnado;no obstante,se los debe sujetara la rnanijainferiorcon la uni6npara cables surninistrada. Veala Figura4. rn6vilesdel equipo.No utilicefluidos cornprirnidospara arrancar. vaporessoninflarnables. f Procedimiento para agregar aceite EImotor seenvia sinaceite en el motor.Antesde ponerel motor en rnarchadebe Ilenarlode aceite.
BIoqueodel Llenadode aceite regulador Controldel / Asa de control de las cuchillas'"""_ _ Arrancadorde retroceso l Palancade ajuste de la altura Tapadel combustible Controldel Cebador Figura6 CONTROL DEL CEBADOR ARRANCADOR DE RETROCESO La manijadel arrancadorse utilizapara encenderel motor. TAPA DEL COMBUSTIBLE AIactivarel controldel cebadorsecierrala placaestranguladoradel carburadory se ayudaa arrancarel motor. CONTROL Saquela tapadel combustiblepara agregarcombustible.
ANTES DE ARRANCAR EL MOTOR ENCENDIDO Lea,cornprenday siga todaslas instrucciones y advertencias que aparecenen la rn_.quinayen este manualantes de hacerla funcionar. DEL MOTOR Mantengasiemprelas manosy los piesalejadosde las partesm6viles.No utilicefluidos comprimidospara arrancar.Losvaporesson inflamables. El cablede la bujia ruedesconectadopor seguridad.Antesde cornenzarconecteel cablede la bujia a la rnisrna.Vea la Figura7. ue el motoreste al aire libreen un _rea bien ventilada. f 1.
USO DEL ESCARIFICADOR Escarifiqueel c_speduna vez en prirnaveray una vez en otofio para retirarel pasto rnuertodel c_spedy para perrnitirel pasode rn_.saire por la tierra. El pastodebe tenet 21/2pulgadasde altoal escarificar.Despu_sde escarificar,fertilicey riegueel c_spedpara fornentarel crecirnientor_.pido. Nohundadernasiadolas cuchillasde corte;de ese rnodose acorta la vida Otilde la correade transrnisi6nde las cuchillas.
PROGRAIVlA DE iVlANTENIIVllENTO Sigael cronograrnade rnantenirnientoque se presentaa continuaci6n.Estatabla s61odescribepautasde servicio.Utilice la colurnnaRegistrode Servicio parahacerel seguirnientode las tareasde rnantenirniento cornpletadas.Paraubicar el Centro de Servicio Sears rn_scercano o para programarun servicio, sirnplernente comuniquese con Searsal tel_fono 1-800-4-MYHOME®. Antesderealizar cualquier tipodemantenimiento o servicio, desenganche todos loscontroles ydetenga elmotor.
NOTA: Elirnineel aceiteusadodel motorde una rnaneraque no perjudiqueel medicarnbiente.Ll_veloa un centrode recicladou otrocentro de recolecci6n. Recomendaciones sobre el aceite Electrodo Cuandoagregueaceite al rnotor,agregeaceite para motor10W-30. La capacidadde aceitedel motores 600 rnl (aprox.20 onzas). No Ileneexcesivarnente.
AJUSTES AItura de corte . de las cuchiJlas El escarificadorest&dise_adoparacortar a 1/8de pulgadade profundidad.AI iniciarsela vida Qtildel producto,utilicela posici6n 2. A medidaque lascuchillasse gastenhabr_,que ir incrementando la profundidadde corte usandolasposiciones3, 4 y 5. Saquela correa alando haciaarribay afuerade la polea superior.Ernpujeel guardacorreahaciaabajo para soltarla correade la polea inferior.Veala Figura16. CAiVIBIO DE CORREA Correa 1.
CAIViBIODE CUCHILLAS Paracarnbiarel conjuntode cuchillasconsultela Figura20. Cuandolas cuchillasest&ntandesafiladasque no escarificanen la posici6n5, o si algunade elias se rornpe,siga estospasospara reernplazarel conjuntode cuchillas. 1. Retirela cubiertade la correacornose describeen la secci6n Carnbiode correas. 2. Saquela poleainferior.Vea la Figura18. Figura20 1. 2. 3. Figura18 . 4. 5. Extraigalos seis tornillosdel lado derechoe izquierdo.Vea la Figura16. 4.
FILTRO DE AIRE Losfiitrosde papel no se puedenlirnpiar.Se debenreernplazar una vez al a_o o cada 100 horasde funcionarnientoy con mayor frecuenciasi se utilizanen lugaresdonde haygran cantidadde polvo. Nunca use gasolinao solventesde puntode encendidobajo para limpiar el elementodel depuradorde aire. Podria producirseun incendioo explosi6n. NOTA:Nuncaopere el motorsin el depuradorde aire instalado. Resultar_.en desgaster_.pidodel motor. 1. Optimala pestaSade la tapadel filtro de aire y levantela tapa.
Si no se va a usarel escarificadordurante30 alaso rn_.s,es necesarioalrnacenarel equipoadecuadarnente.Siga las instruccionesde alrnacenarnientoque se indicana continuaci6npara garantizarel rendirnientorn_.xirnodel escarificadorduranternuchosaSosrn_.s. PREPARACION DEL MOTOR PREPARACION Los rnotoresalrnacenadosrn_.sde 30 diasnecesitanser drenados de combustiblepara evitarque se deterioreny se forrnegornaen el sisternade combustibleyen las piezasprincipalesdel carburador.
Antesde realizarcualquiertipode rnantenirniento o servicio,desenganche todosloscontrolesy detengael motor. Esperea quesedetengancornpletarnente todaslaspiezasrn6viles.Desconecteel cablede la bujfay p6ngalo haciendornasacontrael motorparaevitarqueseenciendaaccidentalrnente. Utilicesiernpreanteojosde seguridad _durantea operac6n o rnentrasrea zaajusteso reparacones. Esta secci6nanaliza problemasmenores de servicio.
Felicitacionespor haberrealizadouna adquisici6ninteligente.El productoCraftsman@ que ha adquiridoest&diseSadoy fabricado para brindarmuchosaSosde funcionamientoconfiable.Perocomo todos losproductosa vecespuederequerirde reparaciones.Esen ese momentocuandoel disponerde un Acuerdode protecci6npara reparacionesle puedeahorrardineroy problemas.
Your Home For expert troubleshooting and home solutions advice: www.managemyhome.com For repair - in your home - of all major brand appliances, lawn and garden equipment, or heating and cooling systems, no matter who made it, no matter who sold it! For the replacement parts, accessories and owner's manuals that you need to do-it-yourself. For Sears professional installation of home appliances and items like garage door openers and water heaters.