Operator's Manual CRRFTSMRH 21" LAWN MOWER Model No. 247.37110 o SAFETY ASSEMBLY OPERATION MAINTENANCE PARTS LIST o ESPArqOL, p. 33 CAUTION: Before using this product, read this manual and follow all safety rules and operating instructions. Sears Brands Management Corporation, Visit our website: Hoffman www.craftsman.com Estates, IL 60179, U.S.A. FORMNO.
WarrantyStatement .................................. Page2 Safetyinstructions .................................... Pages3-6 SlopeGuide.............................................. Page7 SafetyLabels............................................ Page9 Assembly .................................................. Pages10-13 Operation .................................................. Pages14-15 ServiceandMaintenance ......................... Pages16-19 Off-SeasonStorage ..................................
This machinewas builtto be operatedaccordingto the safeoperation practicesin this manual.As with anytype of powerequipment, carelessnessor error on the partof the operatorcan resultin serious injury.This machineis capableof amputatingfingers,hands,toes and feet and throwingdebris.Failureto observethe followingsafety instructionscouldresultin seriousinjuryor death. This symbolpointsout importantsafetyinstructionswhich,if not followed,couldendangerthepersonalsafetyand/orpropertyof yourselfand others.
• • The bladecontrolhandleis a safetydevice.Neverattemptto bypassits operation.Doingso makesthe safetydevice inoperative and may resultin personalinjurythroughcontactwith the rotatingblade.The bladecontrol handlemustoperateeasily in bothdirectionsand automaticallyreturnto the disengaged positionwhenreleased. Neveroperatethe mowerin wet grass.Alwaysbe sureof your footing. A slip and fall cancause seriouspersonalinjury.
• • • • Extinguishall cigarettes,cigars,pipesand othersources of ignition. Neverfuelmachineindoorsbecauseflammablevaporswill accumulatein the area. Neverremovegas cap or add fuel whileengineis hotor running. Allowengineto coolat leasttwo minutesbeforerefueling. Neverover-fillfuel tank.Toallowfor expansionof the fuel, do not fill abovethe bottomof the fueltank neck. • • Replacegasolinecapand tighten securely. If gasolineis spilled,wipe it off the engineand equipment.Move machineto anotherarea.
SAFETY SYMBOLS This pagedepictsand describessafetysymbolsthat mayappear on this product. Read,understand,and followall instructionson the machine beforeattemptingto assembleand operate. i READ THE OPERATOR'S MANUAL(S) Read, understand, i and follow all instructions in the manual(s) before attempting to assemble and operate DANGER -- ROTATING BLADES To reduce the risk of injury, keep hands and feet away. Do not operate catcher is in its proper place.
or a corner of a building... | | 15 ° Use this page as a guide to determine slopes where you may not operate safely. Do notoperateyour lawnmoweron such slopes.Donot mowon inclineswith a slopein excessof 15degrees(a riseof approximately2-1/2feet every 10feet). Operatewalkbehindmowersacrossthe face of slopes,neverup and downslopes.
This page left intentionally blank.
IMPORTANT:This unit isshippedwithoutgasolineor oil inthe engine. Be certain to serviceenginewithgasolineand oil as instructed inthe Operationsectionbeforestartingor runningyourmachine. f NOTE:Referenceto rightand left hand sideof the LawnMoweris observedfrom the operatingposition. OPENING CARTON 1. 2. Cut eachcornerof the cartonverticallyfromtop to bottom. Removeall looseparts. 3. Removeloosepackingmaterial. REMOVING UNIT FROM CARTON 1.
. Followthe stepsbelowto completehandleassembly: A. Pull upwardon the handle untilholesin lowerhandle (shown in Figure3 deck cutaway)line up with holesin handle bracket.See Figure4. NOTE:Whenpullingupwardon handle,makesureto not pull handle all the way out. B. Insertthe T-boltsremovedin stepearlier throughthe handle bracketsand lowerhandleand tightensecurelyto securethe handlein place.See Figure4. C. Reattachwing nutsand carriagebolts removedearlierinto lowerholesof handleas shownin Figure5. 4.
B. Place grass catcher intothe slotsin the handlebracketsas f shownin Figure8. Letgo of dischargedoor so that it rests on the grass catcher. To removegrasscatcher,liftrear dischargedoor on themower.Lift grasscatcherup and off the slotsinthe handlebrackets.Releaserear dischargedoor to allowitto close rearopeningof mower. Attaching Side Discharge Cover Yourmowerisshippedas a mulcher.Toconvertto side discharge, makesuregrass catcherisoff of the unitand reardischargedoor is closed. 1.
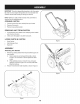
Grass Catcher Cutting Height Adjustment Lever Figure12 BLADE CONTROL the grass clippingsin a grasscatcheror usingthe side discharge chute,some mowermodels havethe optionof recirculatingthe clippingsback to the lawn.This is calledmulching. Theblade controlisattachedto the upper handleof the mower. Depressand squeezeit againstthe upper handleto operatethe unit. Releaseit to stop engineand blade. SIDE DISCHARGE Your moweris shippedas a mulcher.
GAS AND OiL FILL-UP f "_ IMPORTANT:This unit isshippedwithoutgasolineor oil inthe engine. Be certain to serviceenginewithgasolineand oil as instructed inthis sectionbeforestartingor runningyourmachine. Oil (one 18 ounce bottle shipped with unit) FirstTime Use 1. 2. Removeoil fill dipstick (G). See Figure13. Withthe moweron levelground,emptyentirecontentsof oil bottle providedintothe engineoil fill (H). 3. Replaceoil fill dipstickand tighten.
TO START ENGINE 1. 2. Standingbehindthe mower,squeezethe bladecontrolhandle againstupperhandle.See Figure14. Holdingthese two handlestogetherfirmly,grasprecoilstarter handleand pull ropeslowlyuntil resistanceis felt, then pull with a rapid,continuous,full arm stroke.See Figure14.Keepinga firm grip on the startercord handle,let the rope rewindslowly.Repeat untilenginecranks. Letthe rope rewindeachtime slowly.
MAINTENANCE SCHEDULE Followthe maintenanceschedulegivenbelow.This chart describes serviceguidelinesonly. Usethe ServiceLog columnto keeptrackof completedmaintenancetasks.To locate the nearest Sears Service Centeror to scheduleservice,simplycontactSears at 1-800-4-MY-HOME®. Beforeperforminganytypeofmaintenance/service, disengageall controlsand stoptheengine.Waituntilall movingpartshavecometo a completestop.Disconnectsparkplugwireandgrounditagainstthe enginetopreventunintendedstarting. = EachUse . 2. 3.
f Alwaysstop engine,disconnectspark plugwire, and groundagainst enginebeforeperformingany type of maintenanceon yourmachine. Electrode GENERAL RECOMMENDATIONS • • Alwaysobservesafetyruleswhenperformingany maintenance. Thewarrantyon this lawnmowerdoesnot coveritemsthat have been subjectedto operatorabuseor negligence.To receivefull valuefromwarranty,operatormustmaintainthe equipmentas instructedhere. • • Changingof engine-governedspeedwill voidenginewarranty.
Check Engine Oil Checkoil levelbeforeeachoperation.Be sureoil levelis maintained. 1. 2. Checkthe oil with the enginestoppedand level. Removethe oil fill dipstickand wipeit clean. 3. 4. Insertand tightendipstick.Removeitto checkthe oil level. If the oil levelisnear or belowthe lowerlimit mark on the dipstick, removethe oil fillercap/dipstick,and fill with the recommendedoil to the upperlimit mark.Do not overfill. Reinstallthe oil fill dipstick. 5.
CLEANING DECK f Cleanundersideof the mowerdeck once a seasonto preventbuild-up of grass clippingsor otherdebris. Followstepsbelowfor thisjob. 1. Runengine untilit stopsfrom lack of fuel. Disconnectsparkplug wire. 2. Tip mowersothat it restson the housing,keepingthe mufflerside down. Referbackto Figure17.Holdmowerfirmly. Nevertip the mowermorethan 900in any directionand do not leave the mowertippedfor any lengthof time. Oil candrain into the upper partof the enginecausinga startingproblem. 3.
Neverstorelawnmowerwith fuel in tank indoorsor in poorly ventilatedareaswherefuel fumesmay reachan openflame,spark, or pilot lightas on a furnace,water heater,clothesdryer,or gas appliance. PREPARING THE ENGINE PREPARING THE LAWN MOWER Forenginesstoredover30 days: 1. Topreventgum from formingin fuel systemor on carburetor parts,run engine untilit stopsfrom lack of fuel or add a gasoline additiveto thegas in thetank.
Beforeperforminganytype d maintenance/service, disengageall controlsandstoptheengine.Waituntilall movingpartshavecometo a completestop.Disconnectsparkplugwireand groundit againstthe engineto preventunintendedstarting.Alwayswearsafetyglassesduring operationor whileperforminganyadjustmentsor repairs. Enginefails to start 1. 2. Bladecontroldisengaged. Sparkplug bootdisconnected. 1. 2. Engageblade control. Connectwireto spark boot. 3. 4. Fueltank emptyor stale fuel. Faultyspark plug. 5. 6.
Craftsman Mower B Model No. 247.
Craftsman Mower B Model No. 247.37110 D = O O D = 1 747-05184A BladeControl 2 749-04681-0637 UpperHandle 24 942-0741A MulchingBlade 3 747-05450 25 710-1044 Screw, 3/8-24 x 1.50 747-05226-0637 Grass CatcherFrame-Black 26 731-07531 HubCap- Front 4 749-04608A-0637 LowerHandle 26a 731-07532 HubCap- Rear 5 720-0279 Wing Nut 27 738-04419A Sldr.Screw,.375x .
Craftsman [ Engine 48 SHORT BLOCK Model I No. 126L02=0864=F1 I 1058 OPERATOR'S For Craftsman MANUAL I Mower I 1329 REPLACEMENT Model ENGINE No. 247.37110 I [ 1330 REPAIR MANUAL 718 684 54_ 868 306 241_ 7 /5o5 o 287 _;_ 615 O 404 @ \ 616 741 _ 635 524 32_ 46_ 4 24 I
Craftsman Engine Model No. 126L02-0864-F1 For Craftsman Mower Model 121 CARBURETOR 104q:::% _ 38s 127 (_ No. 247.
Craftsman Engine Model No. 126L02=0864=F1 564 For Craftsman _ 65 2o 2 _=_ No. 247.
Craftsman Engine Model No. 126L02=0864=F1 697322 CylinderAssembly 2 399269 Kit-Bushing/Seal(MagnetoSide) 3 For Craftsman Mower Model No. 247.
Craftsman Engine Model No. 126L02=0864=F1 For Craftsman 795936 Shaft-Choke 117 498977 Jet-Main(Standard)(IncludesO-RingSeal) 118 694975 121 Mower Model No. 247.37110 690662 Nut (Flywheel) 333 799381 Armature-Magneto Jet-Main(HighAIt.
Craftsman Engine Model No. 126L02=0864=F1 497680 Starter-Rewind 613 790833 Screw(Muffler) 615 690340 616 For Craftsman Mower Model No. 247.
(Thispage applicablein the U.S.A.and Canadaonly.) Sears Brands Management Corporation (Sears), the California Air Resources Board (CARD) and the United States Environmental Protection Agency (U.S.
Look For Relevant Emissions Durability Period and Air index information On Your Engine Emissions Label Engines that are certified to meet the California Air Resources Board (CARB) Tier 2 Emission Standards must display information regarding the Emissions Durability Period and the Air Index. Sears Brands Management Corporation makes this information available to the consumer on our emission labels.
Congratulationson makinga smartpurchase.YournewCraftsman@ productis designedand manufacturedfor yearsof dependableoperation. But likeall products,it may requirerepairfrom time to time.That's whenhavinga RepairProtectionAgreementcansave youmoneyand aggravation.
Declaraci6n de garantia .................................................. 33 Instrucciones de seguridad ....................................... 34-38 Guia de cuesta ................................................................ 39 Etiquetas de seguridad ..................................................... 9 Montaje ..................................................................... 40-43 GARANTiA COMPLETA Operaci6n ..................................................................
Esta rn_.quinarueconstruidapara seroperadade acuerdocon las reglasde seguridadcontenidasen este manual.AI igualque concualquiertipo de equipo rnotorizado,un descuidoo error por partedel operadorpuedeproducirlesionesgraves.Estarn_.quina es capazde arnputarrnanosy piesy de arrojarobjetoscon gran fuerza.De no respetarlas instruccionesde seguridadsiguientesse puedenproducirlesionesgraveso la rnuerte.
• 1. Unacubiertade descargafaltanteo da_adapuede provocarel contactocon la cuchillao lesionesporobjetosarrojados. Muchaslesionesocurrencornoresultadode pasarla cortadora sobrelos piesduranteuna caida provocadapor derrapeso tropiezos.No se sostengade la podadorasi se est,. cayendo, sueltela rnanijainmediatarnente. Nuncatire haciausted la podadorarnientrascarnina.Si debe retrocederla podadorapara evitaruna paredu obst_.culo,mire prirneroabajoy atr_.
N QOS Puedenocurriraccidentestr_.gicossi el operadorno est,. atentoa la presenciade ni_os.Por Iogenerala los ni_osles atraenlas podadoras • y la actividadde podarel c_sped.Noentiendenlos riesgosni los peligros.Nuncad_ por sentadoque los ni_osperrnanecer_.n en el rnisrnolugardonde losvio por Oltirnavez. • • Mantengaa los ni_osfuera del Areade trabajoy bajo estricta vigilanciade un adultoresponsableadern_.sdel operador. • Est_alerta y apaguela podadorasi un ni_o ingresaal Area. Antesy rnientasse est,.
• • • • • • NO MODIFIQUE Despu_sde golpearcon algOnobjetoextrafio,detengael motor, desconecteel cablede la bujfay conecteel motora rnasa. Inspeccionerninuciosarnente la rn_.quinaparadeterrninarsi est,. da_ada.Repareel da_o antesde encenderlay operarla. Nuncatrate de ajustaruna ruedao la alturade corte rnientrasel motorest,. en rnarcha. Paraevitarlesionesgraveso la rnuerte,no rnodifiqueel motorbajo ningunacircunstancia.
SilVIBOLOS DE SEGURIDAD Esta p&ginarepresentay describela seguridadlos simbolosque puedenpareceren este producto.Lea,comprenda,y sigatodas instrucciones en la m_quinaantesprocurarpara reuniry operar. i i LEA EL MANUAL(S) DEL OPERADOR Lea, comprenda,y siga todas instrucciones en el manual (manuales) antes procurar para reunir y operar. PELIGRO-- GIRANDO HOJAS Para reducir el riesgo de herida, guarde de descarga o el receptor inmediatamente. manos y pies lejos.
Mirey mantenc3a estenive[conun_rbo[vertical Use esta pagina como guia para determinar en qu_ pendientes no puede operar eI tractor de manera segura. Noopere la cortadorade c_speden dichaspendientes.No corte en inclinacionesmayoresde 15grados(elevaci6naproximadade 2 1/2 piesper cada 10 pies).Opere las podadorasQUESE EMPUJANde maneraque crucenel frentede las pendientes,nuncahaciaarribay haciaabajo.
f IMPORTANTE: Esta unidad se envfa sin gasolina ni aceite en el motor. Antes de comenzar o correr ia ma.quinacargue el motor con gasolina y aceite como se indica en la secci6n de operaci6n de este manual. NOTA: Las referencias a los lados derecho e izquierdo de ia cortadora de cesped se hacen observando la ma.quinadesde la posici6n de operaci6n. APERTURA DE LA CAJA DE CARTON 1. Corte cada una de ias esquinas de la caja verticaimente, de la parte superior a la base. 2. 3.
Siga los siguientes pasos para completar conjuntodel mango: A. Tire hacia arriba en el asa hasta agujeros en la manija (que se muestra en la figura 3 corte de la cubierta) se alinean con los agujeros en el mango soporte. Vea la figura 4. 3, NOTA: AI tirar hacia arriba la palanca, aseg@ese de que no tire de manejar todo el camino. B. Inserte ei T-pernos quit6 anteriormente a traves dei mango corchetes y asa inferior y apriete bien para asegurar el mango en su lugar. Veaia figura 4. C.
B. Lugar de colecciHnde cesped en las ranuras en el mango entre corchetes come se muestra en ia figura 8. Suelte la puerta de descarga de mode que descanse sobre el colector de cesped. f Para quitar al receptor de hierba, levante ia puerta de descarga trasera en el cortacesped. Ascensor cesped y fuera de ias ranuras en el mango entre parentesis. El reverse de liberaciHndescarga ia puerta para permitir que ello cerrara la apertura trasera del cortacesped.
Arrancador de retroceso Tap6n de aceite/varUla de medici6n del nivel de aceite Colector de C_sped Palanca de ajuste de altura de corte Palanca de ajuste Canal de DescargaLateral pdn De Gasolina Clavija abono Figura12 CONTROL DE CUCHILLA El controlde la cuchillaest,. unidoa la rnanijasuperior.Presionela rnanijade controlde la cuchillacontra la rnanijasuperiorpara operarla unidad.Sueltela rnanijade controlde la cuchillapara detenerel motor y la cuchilla.
LLENADO DE GASOLINA f Y ACEITE Aceite (se envia una botella junto con la unidad) Primer uso 1. Saque la varilla del nivel de aceite (G). 2. 3. Con la cortadora de cesped ubicada en suelo nivelado, vierta el aceite bntamente pot dentro del tubo de Ilenadode aceite del motor (H) hasta la marca de limite alto en la varilla medidora del nivel de aceite (J). Vea la Figura 13. Vuelva a colocar la varilla de Ilenadode aceite y ajQstela.
PARA ENCENDER 1. 2. EL MOTOR Coi6quese detra.sde la podadora, apriete ia manija de control de la cuchilla y sostengala contra la manija superior. Vea la Figura 14. Sostenga firmemente las dos manijas juntas, tome la manija del arrancador de retroceso y tire de ia cuerda para sacarla con un movimiento ra.pidoy continuo. Vea la Figura 14. Mantenga firme la manija del arrancador, deje que la cuerda regrese lentamente al arrancador.Repita hasta que el motor este en marcha.
PROGRAMA DE iVlANTENllVllENTO Siga el cronograma de mantenimientoque se presenta a continuaci6n. Esta tabla s61odescribe pautas de servicio. Utiiice ia columna Registro de Servicio para hacer ei seguimiento de las tareas de mantenimiento completadas. Para ubicar el Centro de Servieio Sears m_s cercano o para programar un servieio, simplemente comun/quese con Sears al tel_fono 1-800-4-MY-HOME®. Antesde realizarcuaiquiertipo de mantenimientoo servicio,desenganche todos loscontrolesy detengael motor.
f Detengasiempreel motor,desconecteel cablede la bujiay hagamasa contrael motorantesde reaiizarcuaiquiertareade mantenimiento a su mfiquina. RECOiVIENDACIONES Electrodo GENERALES • Respetesiemprelasreglasde seguridadcuandorealicetareasde mantenimiento. • La garanfiadeestacortadoranocubreelementosquehan estadosujetosal malusoo la negligenciadeloperador.Para recibirel reembolsototalde la garantia,ei operadordeberfidar mantenimiento ai equipotai y comoseindicaen estemanual.
Comprobar el aceite del motor Comprobar el nivel de aceite antes de cada operaci6n. Aseg_resede que el nivei de aceite se mantiene. 1. 2. Revise el aceite con ei motor parade y nivelado. Quite ia tapa del dep6sito de aceite/varilla medidora del nivel de aceite y limpiela. 3. Coloque y ajuste la varilla indicadora. Luego quitela para revisar el nivel de aceite. 4. Si el nivel de aceite esta.
LUBRICACION Control de la cuchilla Lubrique con aceite ligero los puntos de pivote del control de la cuchilla al menos una vez cada estaci6n. Este controle debe funcionar libremente en ambas direcciones. Vea la Figura 18. LIMPIEZA DE LA PLATAFORIVIA Debe limpiar la parte inferior de la plataforma de la cortadora de cesped una vez una temporada para prevenir la acumulaci6n de recortes de cesped u otros desechos. Siga los pasosque aparecen debajo para realizar esta tarea. 1.
CUIDADO DE LA CUCHILLA "f _" Cuando saque la cuchilla de corte para afilarla o reemplazarla, protejase las manos usando un par de guantes para trabajo rudo o un trapo gruesc para sostener la cuchilla. Inspeccione peri6dicamente el adaptador de la cuchiiia en busca de rajaduras, especialmente cuando golpee un objeto extra_o. Realice los reemplazos que resulten necesarios. Siga los pasos que aparecen debajo para realizar el mantenimiento de la cuchilla. 1. Desconecte el capuch6n del cable de la bujia.
Nunca almacene la cortadora de cesped con combustible en el tanque en un espacio cerrado o en a.reascon poca ventilaci6n, donde los gases dei combustible puedan alcanzar el fuego, chispas o una luz piloto como ia que tienen algunos homos, calentadores de agua, secadores de ropa o aigQnotto dispositivo a gas. PREPARACI6N DEL MOTOR PREPARACI6N CO'SPED Ya que los motoresalmacenaronm_.sde 30 dfas: 1.
hayanvenidoa una paradacompleta.Desconecteel alambrede bujfay b_.selocontrael motorpara prevenirel comienzoinvolunSiempreIlevepuestoscristabs inastillablesdurantela operaci6no realizandocualquierajusteo reparaciones. El motor no arranca 1. Control de ia cuchilla desenganchado. 1. Engraneel control de ia cuchiila. 2. 3. Se ha desconectado el capuch6n de la bujia. El dep6sito de combustible esta.vacio o el combustible se ha echado a perder. 2. 3. Conecte el cable al capuch6n de la bujia.
(Esta p_.ginase aplica s61oen EE.UU. y Canada.).
Busque el periodo de duraci6n de emisiones importantes yla informaci6n la etiqueta de emisiones de su motor de clasificaci6n de aire en Los motores cuyo cumpiimiento con los estAndares de emisi6n Tier 2 de la Comisi6n de Recursos Ambientales de California (CARB) est6 certificado deben exhibir la informaci6n relacionada con el periodo de duraci6n de ias emisiones y la clasificaci6n de aire.
Felicitacionespor haberrealizadouna adquisici6ninteligente.El productoCraftsman@que ha adquiridoest_ dise_adoy fabricado para brindarrnuchosa_osde funcionarnientoconfiable.Perocorno todoslos productosa vecespuederequerirde reparaciones.Esen esernornentocuandoel disponerde un Acuerdode protecci6npara reparacionesle puedeahorrardineroy problernas.
Your Home For troubleshooting, product manuals and expert advice: managernylife www.managemylife.com For repair - in your home - of all major brand appliances, lawn and garden equipment, or heating and cooling systems, no matter who made it, no matter who sold it! For the replacement parts, accessories and owner's manuals that you need to do-it-yourself. For Sears professional installation of home appliances and items like garage door openers and water heaters.