
Owners manual


29
SERVICE AND MAINTENANCE
The battery is sealed and is maintenance-free. Acid levels cannot be checked.
• Always keep the battery cables and terminals clean and free of
corrosive build-up.
• After cleaning the battery and terminals, apply a light coat of
petroleum jelly or grease to both terminals.
• Always keep the rubber boot positioned over the positive terminal to
prevent shorting.
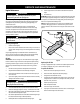
Removing the Battery
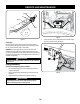
1. Locate the battery on the left side of the riding mower.
2. Remove the hex washer screw securing the battery hold-down rod to the
frame. See Figure 42.
Hex Washer Screw
Battery Hold-Down Rod
Battery Tray
Figure 42
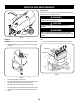
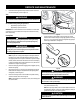
3. With the battery hold-down rod removed, lift the battery out of the battery
tray.
4. To re-install the battery, place it back in the battery tray and secure in place
with the battery hold-down rod and hex washer screw. See Figure 42.
IMPORTANT: If removing the battery for any reason, disconnect the NEGATIVE
(Black) wire from its terminal first, followed by the POSITIVE (Red) wire. When
re-installing the battery, always connect the POSITIVE (Red) wire to its terminal
first, followed by the NEGATIVE (Black) wire. Be certain that the wires are connected
to the correct terminals; reversing them could change the polarity and result in
damage to your engine’s alternating system.
Cleaning Battery
Clean the battery by removing it from the tractor and washing with a baking soda
and water solution. If necessary, scrape the battery terminals with a wire brush to
remove deposits. Coat terminals and exposed wiring with grease or petroleum jelly
to prevent corrosion.
Battery Failures
Some common causes for battery failure are:
• Incorrect initial activation
• Overcharging
• Freezing
• Undercharging
• Corroded connections
These failures are NOT covered by your tractor’s warranty.
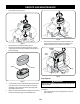
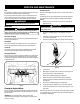
Jump Starting
WARNING
Never jump start a damaged or frozen battery. Be certain the vehicles
do not touch, and ignitions are off. Do not allow cable clamps to
touch.
1. Connect positive (+) cable to positive post (+) of your tractor’s discharged
battery.
2. Connect the other end of the cable to the positive (+) post of the jumper
battery.
3. Connect the second cable negative (–) to the negative post (–) of the jumper
battery.
4. Connect the other end of the negative cable to the engine block of the
tractor, away from the battery. Attach to an unpainted part to assure a good
connection.
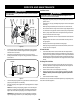
WARNING
If the jumper battery is installed on a vehicle (i.e. car, truck), do NOT start
the vehicle’s engine when jump starting your tractor.
5. Start the tractor (as instructed in the Operation section of this manual).
6. Set the tractor’s parking brake before removing the jumper cables, in reverse
order of connection.
Charging
WARNING
Batteries give off an explosive gas while charging. Charge the battery in
a well ventilated area and keep away from an open flame or pilot light
as on a water heater, space heater, furnace, clothes dryer or other gas
appliances.
CAUTION
When charging your tractor’s battery, use only a charger designed for 12V
lead-acid batteries. Read your battery charger’s Owner’s Manual prior to
charging your tractor’s battery. Always follow its instructions and heed its
warnings.
If your tractor has not been put into use for an extended period of time, charge the
battery as follows:
1. Set your battery charger to deliver a max of 10 amperes.
If your battery charger is automatic, charge the battery until the charger indicates
that charging is complete. If the charger is not automatic, charge for no fewer than
eight hours.