SH_ARS OWNERS MANUAL MODEL NO. 315.117151 CAUTION: Read Rules for Safe Operation and Instructions CRRI:TSMRH" 3 INCH DUSTLESS BELT SANDER Carefully DOUBLE SAVE THIS MANUALFOR FUTURE REFERENCE Warranty Introduction Operation Maintenance Repair 612547-53O 10-00 INSULATED Parts ® Sold only by SEARS, ROEBUCK AND CO,, Hoffman Estates, IL 60179 Prined nUS.
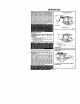
FULL ONE YEAR WARRANTY ON CRAFTSMAN BELT SANDER ff this Craftsman Belt Sander fails to ogn ive completa satistaction within one year from the date of purchase, RETURN IT TO THE NEAREST SEARS STORE IN THE UNITED STATES, and Sears will repair it. flee of charge¸ If this Craftsman Belt Sander the date of purchase, This warranty gives is used for commercial you specific Sears, or rental purposes, legal rights, and you may also Roebuck and CO.1 DEPT.
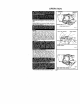
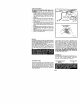
RULES FORSAFEOPERATION (Continued) 10. WEAR PROPER APPAREL. No loose clothing or jewelry to get caught in moving parts. Rubber gloves and non-skid footwear are recommended when working outdoors. Also, wear protective hair covering to contain long hair and keep it from being drawn into air vents. 1 t. ALWAYS WEAR SAFETY GLASSES. Everyday eyeglasses have only impact-resistant lenses; they are NOT safety glasses. 12. PROTECT YOUR LUNGS. Wear a face or dust KEEP HANDS AWAY FROM SANDING AREA.
THE FOLLOWING RECOMMENDED ACCESSORIES ARE CURRENT AND WERE AVAILABLE ATTHE TIME THIS MANUAL WAS PRINTED, CRRFTSMRN, 3in,x21in.Aluminum Oxide PlyweldBelts 3 in, x 21 in. "Sears Best" Zirconium Plyweld Belts The use of attachments or accessories not listed above might be hazardous.
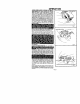
OPERATION DUST SAG TRACKING SCREW Make sure power supply is 110-120 volts, 60 HZ, AC only. Before attempting to use your Sander, familiarize yourself with all operating features (See Figure 1) and _ requirements. ANDING RELT_ FRONTIDLER PU Fig SWITCH The switch of your sander is equipped with a "lock on" feature which is convenient when sanding for extended periods of time.
OPERATION Selecting the correct size and type sanding bert is an important step in achieving a high quagty Sanded finish. Standard 3 Inch x 21 Inch sanding belts made of aluminum oxide, silicone carbide, and other synthetic abrasives are best for power sanding. In general, coarse grit will remove the most material and fine grit will produce the smoothest finish in all sanding operations. The condition of the surface to be sanded wig determine which grit belt wIJI do the job.
OPERATION ALWAYS WEAR SAFETY GOGGLES OR SAFETY GLASSES WITH SIDE SHIELDS WHEN OPERATING YOUR SANDER. TO adjust Sahding belt, connect Sander to power supply. Place Sander in upside down position as shown in Figure 7. NOTE: This position is for adjustments only. The Sander is not in an operating position, Pull switch trigger and release immediately, Observe tracking of sanding belt, If the sanding belt runs inward, turn the tracking screw clockwise.
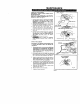
MAINTENANCE ir"lv_l-'l: I_11_ [e_l,&M _I=1_It_l;I; LTItO]I _tqqlIkl =lh] _lll¢iel: fzl =IILILv,F_I_U Ie]=l_|I [W_,IR _1=1 ".II,_TN=lLvli=_i m'J=,l:| i_le pp_ =1_Ol 1 TIMING BELT REPLACEMENT D(SCONNECT SANDER BEFORE SERVICING WHEN MENT Number 1 2 3 4. 5 6 SMALL PULLEY FROM POWER REPLACING TIMING BELT, BELT NUMBER 989368-000 5 on Parts List, Page SUPPLY USE REPLACE. ONLY. See Key 11 Remove sanding belt from sander. See installing and adiusting sanding belt, Page 5.
CORD REPLACEMENT DISCONNECT THE SANDER FROM POWER SUPP. LY WHILE REPLACING PARTS OR MAKING ADJUSTMENTS. 1 Ren_ove handle cover and screws as described on Page 7. Note the locations of all wiring in the handle and how each connection is made to the cord. Connections and wiring position must be identical when installing the new cord See Figure 14. 2. Remove the switch from the handle and disconnect the cord leads from the switch. See Figure 15 3. Removethebendrelieffromoldcordandplaeeit on the new one.
CRAFTSMAN 3 INCH DUSTLESS BELT SANDER -- MODEL NUMBER 315.
CRAFTSMAN 3 INCH DUSTLESS BELT SANDER _ MODEL NUMBER 315.117151 your Sander. Always mention the Model Number in all correspondence , regarding your CRAFTSMAN SANDER or when ordering repair parts. SEE BACK PAGE FOR PARTS ORDERING INSTRUCTIONS PARTS LIST KEY NO, 1 2 3 4 5 6 7 g 9 10 11 12 13 14 15 16 17 18 19 20 21 22 23 24 25 26 27 PART NUMBER 610122-003 g88367.001 607776002 728693-020 ggg3gg-g00 998386-004 703493-809 998423.002 726693-004 98936_000 998372.
For repair of major brand appliances in your own home... no matter who made it, no matter who sold it! 1-800-4-MY-HOME sMA.ytir_edayor night (1-800-469-4663) ,,_ www,sears.com : To bring in products such as vacuums, lawn equipment and electronics ! for repair, call for the location of your nearest Sears Parts & Repair Center. :; 1-800-488-1222 Aoytir_e dayor night www.sears.