
Instruction manual


OPERATION
Your Craftsman Power Planer has been designed to
do the many planing operations which cannot be per-
formed conveniently or efficiently with a larger
power planer. It is compact, lightweight, and equip-
ped with a depth adjusting knob located at the front
of your unit. This knob also serves as a front handle
When used properly, your planer should take the
guesswork out of planing, sizing, or beveling of
doors, windows, shutters, drawer slides and other
work. However, as with any powerful, high speed
tool, your Power Planer requires accurate set-ups
and handling. Practice cutting on scrap lumber
before attempting to plane finished lumber.
Make sure power supply is 120 volts, 60 Hz, AC only.
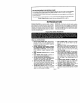
KNOW YOUR PLANER
See Figure 1
Before attempting to use your planer familiarize
yourself with all operatir features and safet
quirements.
ALWAYS OPERATE YOUR PLANER WITH THE CHiP
EXHAUST TURNED AWAY FROM YOUR FACE AND
EYES. ALL VISITORS SHOULD WEAR SAFETY
GLASSES AND BE KEPT A SAFE DISTANCE FROM
WORK AREA.
SWITCH
HOLD YOUR PLANER SO THAT THE BLADES DO
NOT CONTACT WORKPIECE BEFORE DEPRESS-
ING THE SWITCH. Start your planer by depressing
the switch trigger in the handle, To turn your planer
OFF, release the switch trigger.
PLANING TOO FAST INCREASES CHIP BUILD-UP
IN TH ECHIP EXHAUST. CHIP BUILD-UP RESTRICTS
AIRFLOW AND CAN CAUSE MOTOR OVERHEAT.
iNG.
SWITCH
REAR HANDLE
FRONT
HANDLE
ANDbEP_H
ALLEN ADJUSTING
WRENCH KNOB
ALLEN
WRENCH
HOLDER
CHIP
EXHAUST
Fig 1
Fig, 2
PREPARING FOR OPERATION
For ease of operation your planer has both a front
handle and a rear handle. See Figure 1. NOTE: The
front handle also serves as the depth adjusting knob.
This provides for two-hand operation, which is
necessary in order to maintain proper control of
your planer and keep both hands clear of the bfades
and cutting area. When operating your planer always
use both hands holding the depth adjusting knob
with your left hand and the rear handle with your
right hand as shown in Fig. 2. In this position, your
planer is easier to handle and you are clear of the
chip exhaust.
Page 5