
Instruction manual


MAINTENANCE (Cont.)
RLADE REPLACEMENT
THE BLADES IN YOUR PLANER ARE REVERSIBLE,
'THEREFORE, THEY CAN BE REVERSED WHEN
ONE EDGE BECOMES DULL,
ALWAYS REPLACE OR REVERSE BLADES IN
PAIRS,
DO NOT ATTEMPT TO SHARPEN BLADES.
NEVER ATTEMPT TO OPERATE YOUR PLANER
WITH ONLY ONE BLADE INSTALLED.
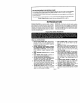
1 Place your planer in an upside down position on
workbench See Figure 10
2 Remove from storage area, the 1/8 inch allen wrench
provided with your planer See Figure 1, page 4.
NOTE: TO prevent rotation of the arbor whi_e
changing the blades, place a amal_ piece of wood
between the arbor at)d the base¸ See Figure 10
3, Using the allen wrench, remove the three (3)
screws securing blade. See Figure 11,
4. Remove blade clamp and cutter blade.
5 Clean any sawdust or wood particles from cutter
arbor and from aH parts you have removed
6. Place new cutter blade over plastic Iocators See
Figure 12. NOTE: Place front of cutter blade slots
so that they touch plastic Iocators. Do not move
or adjust plastic Iocators. They have been factory
adjusted to assure proper depth setting (s main-
tained and that blades remain parallel
7. Replace blade e_amp and screws
8. Securely tighten all screws with alie# wrench,
9. Remove the piece of wood from your planer.
10. Repeat the above procedure to change the other
blade.
11 Return allen wrench to storage area,
I_J 1/8 IN, ALLEN
BLADE
CLAMP
PIECE OF / WRENCH
CUTTER
BLADE
\
Fig 10
_P'_- _-_--i _--_-SCR EWS
I liP LP& ST' s
Fig. 11
CUTTER BLADE
SCREW
PLASTIc_CUTTER BLADE CLAMP
LOCATOR
Page 8