
Owner`s manual


OPERATION
AUXILIARY FENCE
Sse Figures 20.21.
When cuttingbiscuit slots in workptaces lass than 1-1/2 in.
wide. it isnecessary to make an8_iliew fenoe end mount it
to the bottom of the adjustable fence. Thb fence will pro-
vide a positive stop for the height setting of these small
workpieces.
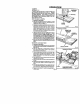
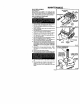
HOW TO MAKE AUXlUARY FENCE
1. Unplug your plate Joth_r.
2. Cofathlnpieceofwood3.5/81n.xS-1/4in. NOTE: The
thickness ofthe wood will0ause the scaleonthevertical
fence of yourp_ate_ *,0rte Ir_oneof. He_t _-
mant settingemustalk>wforthe thicknessofthe suxlliefy
fence when preparing to oof slots.
3. Cut a notch as shown in figure 20 for "Alwing indk'.ator
mark and canted(he markings on boards,
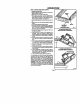
4. Place euxllleP/1ante against boEomofadJustat_efence.
SGeFigure 21.
5. Ustngscrewholes Inadjustable fence for aptatem, math
screw boie Iocatlor,s on auxilier/fence, NOTE: See
figure 20 forscrew hole lOCationsand dimensions.
6. Drill 3/16 In. screw hotasineux_lta_yter_e. Screw holes
must becountersunk on thebottom sothat sorewheeds
will he flush with or below the surface of the auxiliary
fence.
7. Secure auxilierj fence ta adjuetabie tanoe with3/16 In.x
3/4 in.fiat heart machine _Tews. washen_, and hex nuts
as shown Infigure 21.
8. Tighten screws securely, making sure screw heads are
flush orsubfiush with bottom surface of auxiliary fence.
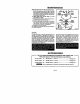
DUSTLESSFEATURE
see Figures 22.23.
The dust box Io_tad ¢n therstu of yourpintaJoinerprovides
s duet ¢olieoflon system. Wood particiel are drawn up
throughs tunne_inthe base and collectInthe rtustbox dudng
cuttingoheratione. For more efficientoperation, empty dust
box when half full,
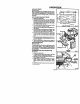
TO REMOVE DUST BOX FOR EMPTYING
see Figure 22.
1. Unplug your plate joiner.
2. TO reiease rtust box. depress tshe _ocatod on each side
of dust box as shown by the CHOWSin figure 22.
3. Slide dust box to the rear of platejoiner is shown by the
arrow in figure 22. and remove.
4. DO NOT press on the screen matadel withyour hand or
fingers. Screen rnatadel can be damaged. NOTE:
Screen matedal is locatedon the sides end reel of dust
box.
5. DO NOT break tabs that secure dust box to platejoiner.
6. Empty dust box.
.
1
HEX NUT(E)
WASHER(E)
SCREW(S)
AUXlUARY
FENCE Fig. 21
DUST
BOX
SCREEN
TO
_.REMOVE
DUST BOX