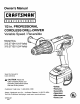
Owner's Manual iPR OFESSI 0 HAL i 112 in. PROFESSIONAL CORDLESS DRILL-DRIVER Variable Speed / Reversible Model Nos. 315.271241 (18 Volts) 315.271251 (24 Volts) Save this manual for future reference • IL CAUTION: Read and follow all Safety Rules and Operating Instructions before first use of this product. Customer Help Line: 1-800-932-3188 Sears, Roebuck and Co., Hoffman Estates, IL 60179 Visit the Craftsman web page: www.sears.
TABLE OF CONTENTS • General Safety Rules ................................................................................................................................................. 2-3 • Specific Safety Rules/Symbols 3-5 • Features ..................................................................................................................................................................... 5-7 • Assembly .................................................................................
Tool Use and Care • • • • • Use clamps or other practical way to secure and support the workpiece to a stable platform. Holding the work by hand or against your body is unstable and may lead to loss of control. Do not force tool. Use the correct tool for your application. The correct tool will do the job better and safer at the rate for which it is designed. Do not use tool if switch does not turn it on or off, A tool that cannot be controlled with the switch is dangerous and must be repaired.
Important • Safety Instructions Save these instructions. This manual contains Important safety and opereUng Instructions for battery charger part number _-11040 (g81399-001). Following this rule will reduce the risk of electric shock, fire, or serious personal injury. • Before using battery charger, read all InstrucUons and cautionary markings In this manual, on battery charger, and product using battery charger.
_IL WARNING: Some dust created by power sanding, sawing, grinding, drilling, and other construction activities contains chemicals known to cause cancer, birth defects or other reproductive harm. Some examples of these chemicals are: • lead from lead-based paints, • crystalline silica from bricks and cement and other masonry products, and • arsenic and chromium from chemically-treated lumber. Your risk from these exposures varies, depending on how often you do this type of work.
PRODUCT 315.271241 315.271251 Chuck 1/2 in. Keyless 1/2 in. Keyless Motor DC Motor 18 Volts DC Motor 24 Volts Gear Train Two Speed Two Speed Switch Variable Speed Variable Speed No Load Speed 0-400 RPM (Low) 0-1400 RPM (High) 0-400 RPM (Low) 0-1400 RPM (High) Clutch 24 Positions 24 Positions Maximum Torque 452 in./Ibs 555 in./Ibs Item No. 9-11040 Item No. _11040 (981399-001) (981399-001 Input 120 V, 60 Hz, AC only 120 v, 60 Hz, AC only Charging Voltage 9.6 - 24 Volts 9.
_ TWO SPEED GEARTRAIN(HI-LO) SCREWDRIVERBITS LEVEL AUXILIARY YELLOWLIGHT"ON" AND RED LIGHT FLASHING INDICATESDEFECTIVE BATTERYPACK KEYLESS CHUCK SIT STORAGE AREA DIRECTIONOF ROTATIONSELECTOR SE) PAC RED LIGHT"ON" INDICATESFAST CHARGINGMODE CHARGER GREEN LIGHT"ON" INDICATESFULLY CHARGEDANDSLOW CHARGING TO MAINTAINBATTERYPACK WRIST STRAP Fig. 1 CHARGER See Figure 2. Your charger has a "key hole" hanging feature for convenient, space saving storage.
AUXILIARYHANDLE INSTALLING See Figure 3. See Figure 4. An auxiliary handle is packed with your drill-driver for ease of operation and to help prevent loss of control. The handle can be rotated 360 °. • Lock the switch trigger'by placing the direction of rotation selector in center position. See Figure 11. • Open or close chuck jaws to a point where the opening is slightly larger than the bit size you intend to use.
TO A'n'ACH BATTERY PACK TO DRILL TO REMOVE BATTERY PACK FROM DRILL See Figure 6. See Figure 7. Note: Battery pack is shipped in a low charge condition. Therefore, it must be charged prior to use. Refer to page 10, "CHARGING BA'n'ERY PACK" for charging instructions. • Lock the switch trigger by placing the direction of rotation selector in center position. See Figure 11.
,_ _I, WARNING: If any parts are missing, do not operate your drill-driveruntil the missing parts are replaced. Failure to do so could result in possible serious personal injury. If battery pack is deeply discharged, red light should become steady after voltage has increased, normally within 60 minutes. WARNING: Always wear safety goggles or safety glasses with side shields when operating tools. Failure to do so could result in objects being thrown into your eyes, resulting in possible serious injury.
SWITCH SWITCH See Figure 9. See Figure 11. To turn your drill ON, depress the switch trigger. To turn it OFF, release the switch trigger. The switch trigger can be locked in the OFF position. This feature can be used to prevent the possibility of accidental starting when not in use. To lock switch trigger, place the direction of rotation selector in center position. FORWARD/REVERSE SELECTOR SELECTOR CENTERPOSITION (LOCK) REVERSE CENTERPOSITION (LOCK) FORWARD SWITCH TRIGGER VARIABLE Fig. 11 Fig.
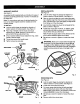
KEYLESS CHUCK ADJUSTINGRING TO DECREASE TORQUE See Figure 12. A keyless chuck has been provided with your drill to allow for easy installation and removal of bits. As the name implies, you can hand tighten or release drill bits in the chuck jaws. Arrows on the chuck indicate which direction to rotate the chuck sleeve in order to LOCK (tighten) or UNLOCK (release) the chuck jaws. Loosen the chuck sleeve by rotating it counterclockwise with one hand.
DRILLING APPLICATIONS See Figure 16. (Use drill-driver only for the purpose listed below) • Drilling in wood. • Drilling in ceramics, plastics, fiberglass, and laminates. • Drilling in both hard and soft metals. • Using driving accessories, such as driving screws with screwdriver bits. • Mixing paints. LEVEL END VIEW DRILLING See Figure 15. A convenient feature provided on your drill is a level. It is recessed in the motor housing on top and end of your drill.
CHUCK Insert hex key wrench in chuck and tighten chuck jaws securely. Tap sharply with a mallet in a counterclockwise direction. This will loosen chuck on the spindle. It can now be unscrewed by hand. See Figure 19. REMOVAL See Figures 17, 18, and 19. The chuck must be removed in order to use some accessories. To remove: • Lock the switch trigger by placing the direction of rotation selector in center position. See Figure 11.
,_ WARNING: When servicing use only identical Craftsman replacement parts. Use of any other parts may create a hazard or cause product damage. Avoid using solvents when cleaning plastic parts. Most plastics are susceptible to damage from various types of commercial solvents and may be damaged by their use. Use clean cloths to remove dirt, carbon dust, etc. ,_ Do not abuse power tools. Abusive practices can damage tool as well as workpiece.
Thefollowingrecommended accessories arecurrently available at Sears Retail Stores. • 6-Pc. Extra Length Magnite Power Bit Set • High Speed Bits ...... 1/2 in. Max. • 30-Pc. Power Screwdriver/Nutdriver Set and Case • Wood Boring Bits......1-1"/2 in. Max. • 17-Pc. Power Screwdriver/Nutdriver Set and Case _k WARNING: The use of attachments or accessories not listed might be hazardous.
CRAFTSMAN I 1/2 in. PROFESSIONAL CORDLESS DRILL-DRIVER MODEL NOS. 315.271241 / 315.2712151 The model number will be found on a plate attached to the motor housing. Always mention the model number in all correspondence regarding your CRAFTSMAN 1/2 In. PROFESSIONAL CORDLESS DRILL-DRIVER or when ordering repair parts. SEE BACK PAGE FOR PARTS ORDERING I INSTRUCTIONS 4 6 PARTS LIST PaM Number Description 1 616478-003 Screw (Special) ................................................................
For repair of major brand appliances in your own home... no matter who made it, no matter who sold it! 1-800-4-MY-HOME sMAnytime, day or night (1-800-469-4663) www.sears.com To bring in products such as vacuums, lawn equipment and electronics for repair, call for the location of your nearest Sears Parts & Repair Center. 1-800-488-1222 Anytime, day or night www.sears.