Owner's Manual iP R 0 FE S S I 0 NAL_ 3/8 in. PROFESSIONAL ELECTRIC DRILL Variable Speed / Reversible Double Insulated Model No. 315.269460 Ryobi Save this manual for future reference. _, • Safety • Features CAUTION: Read and follow all Safety Rules and Operating Instructions before first use of this product. • Operation • Maintenance • Parts List Customer Help Line: 1-800-932-3188 Sears, Roebuck and Co., 3333 Beverly Rd., Hoffman Visit the Craftsman web page: www.sears.
• Tableof Contents ..................................................................................................................................................... • General Safety Rules ............................................................................................................................................ • SpecificSafety Rules ...............................................................................................................................................
Tool Use and Care • Use clamps or other practical way to secure and support the workpiece to a stable platform. Holding the work by hand or againstyour body is unstable and may loadto loss of control. • Do not force tool. Use the correct tool for your application. The correcttool will do the job better and safer at the rate for which it is designed. Do not use tool if switch does not tom it on or off. Any tool that cannot be controlledwith the switch is dangerous and must be repaired.
Hold tool by insulated gripping surfaces when perfomning an operation where the cutting tool may contact hidden wiring or its cord. Contact with a "live" wire will make exposed metal parts of the tool "five" and shock the operator. Additional Rules for Safe Operation • Know your power tool. Reed operator's manuel carefully.
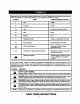
Important: Someofthe following symbolsmay be used on yourtool. Please studythem and leam their meaning. Proper interpretationof these symbols will allow you to operate the tool better and safer.
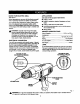
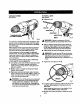
KNOWYOURELECTRICDRILL APPLICATIONS See Figure 1. (Use only for the purpose listed below) • Drillingin wood. Before attempting to use your drill, familiarize yourself with all operatingfeatures and safety requirements. Your drillhas many features for making drillingoperations more pleasant and enjoyable. Safety, performance, and dependability have been giventop priority in the design of this drill making it easy to maintain and operate.
_l WARNING: If any pars are missing, do not operate this tool untilthe missing parts am replaced. Failure to do so could result in possible serious personal injunj. WARNING: Always wear safety goggles or safety glasses with side shields when operating your drill. Failure to do so could result in duct, shavings, loose particles or foreign objectsbeing thrown into your eyes, causing possiblesedous injury, SWITCH See Figure 2.
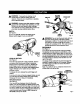
VARIABLESPEED TO INSTALL BITS See Figure 6. See Figure 5. • Unplugyour drill, DRILL•T CHUCKJAW$ CHUCKBODY CHUCKCOLLAR PULLSWITCHTRIGGER RIGHT Fig. 6 Fig. 5 _ Your ddfl has a variable speed switch designed to allow operatorcontrol of speed and torque limits. The speed and torque of your drill can be increased by depressing the switchtdgger. Note: Depress switch tdgger all the way for maximum speed and torque of your ddll. Depress switchtdgger only pad:of the way for less speed and torque.
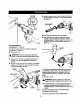
TO REMOVE BITS • _k • Unplug your drill. • WARNING: Failure to unplug your drill could result in accidental staring causing serious injury, • • Loosen the chuck jews from ddll bit, • To loosen: grasp and held the collar of the chuck with one hand, while rotatingchuck bodywith your other hand. • Note: Rotate the chuck body in the directionof the arrow marked RELEASE to loosen chuck jaws. Do not use a wrench to tighten or loosen the chuck jaws.
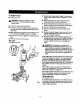
TOP VIEW • Open the chuckjaws and remove hex key. Remove the chuck screw bytuming it in a clockwise direction. Se_ Figure 11. SCREWDRIVER LEVEL Fig. 11 Note: The chuck screw has left hand threads. • Insert hex key intochuck and tighten chuck jaws securely, Tap sharply with a mallet in a counterclockwisedirection.This will loosen the chuck on the spindle. It can now be unscrewed by hand. See Figure 12. Fig. 9 CHUCK REMOVAL See RgureS 10, 11, and 12.
GENERAL Onlythepartsshownonpartslist,page13,am intended to berepaired or replaced bythecustomer. All otherparts represent an importantpart of the double insulationsystem and shouldbe serviced only at a Sears Service Center. Avoid using solventswhen cleaning plasticparts. Most plasticsare susceptibleto damage from various types of commemial solventsand may be damaged by their use. Use clean clothsto remove dirt, carbon dust, etc.
Thefollowing recommended accessories are currentlyavailable at Sears retail stores. • High Speed Bi_s(For wood or metal) 112in. Max. • Masonry Bits 3/4 in, Max. • Wood Boring Bits 1 in. Max. • Hole Saws 2 in. Max. • • Doweling Jig Drill Stand • Wire Brushes,All _1= WARNING: The use of attachmentsor accessoriesnot listedmightbe hazardous.
CRAFTSMAN I 3/8 in. PROFESSIONAL ELECTRIC MODEL NO. 315.269460 DRILL I The modelnumherwill befound on a plate attachedtothe motorhousing.Always men_ionthe model number in all correspondence regardingyour ELECTRIC DRILL or when ordedng repair parts. SEE BACK PAGE FOR PARTS ORDERING I J INSTRUCTIONS 4 2 PARTS lIST Key No. 1 2 3 4 PaN No. 981570-002 6611903 9411552 9411497 972000-957 Description Quan. 3/8 in. Chuck .................................................................................
For repair of major brand appliances in your own home... no matter who made it, no matter who sold it! il!i=i iiiiil 1-800-4-MY-HO M EsMAnytime, day or night iilI iir-i (1-800-469-4663) _ii!! www.sea rs.com To bring in products such as vacuums, lawn equipment and elecb'onics for repair, call for the location of your nearest Sears Parts & Repair Center 1-800-488-1222 iiii! Anytime, day or night www.sears.