
Manual


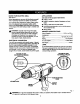

TOP VIEW
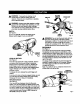
• Open the chuckjaws and removehex key. Remove
the chuckscrew bytuming itin a clockwisedirection.
Se_ Figure 11.
SCREWDRIVER
LEVEL
CHUCK REMOVAL
See RgureS 10, 11, and 12.
The chuckmustbe removed in order to usesome
accessories. To remove:
• Unplugyour drill.
Fig. 9
A WARNING: Failureto unplugyourddll could
result in accidental startingcausingserious Injury.
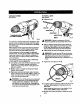
• Inserta 8 mm (5/16 in.)or larger hex key intothe
chuckofyour drilland tighten the chuckjaws
securely.
• Tap the hex key sharplywith a mallet in a clockwise
direction.See Figure t0. Thiswill loosenthe screw
in the chuckfor easy removal.
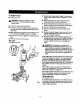
MALLET
CHUCKJAW6
Fig. 10
lO
HEXKEY CHUCK
Fig. 11
Note: The chuckscrew has lefthandthreads.
• Inserthex key intochuckand tightenchuckjaws
securely,Tap sharplywith a mallet ina counter-
clockwisedirection.This willloosenthe chuckon the
spindle.It can now be unscrewed by hand. See
Figure 12.
Fig. 12
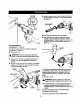
The chuck may at times become loose on the spindle
and developa wobble.Also, the chuckscrew may
become loose causing the chuckjaws to bindand
preventthemfrom closing.To tighten,follow these
steps:
• Unplugyourddll.
A WARNING: Failure tounplugyour drill could
resultin accidentalstartingcausingseflous injury.
• Inserthex key intochuckand tighten chuckjaws
securely. Tap hex key sharplywith a mallet ina
clcckwisedirection.This willtightenthe chuck onthe
spindle.
• Open the chuckjaws and remove the hex key.
• Tightenthe chuckscrew,
Note: The chuckscrewhas left handthreads.