Operator's Manual 2-Cycle MINI-TILLER & CULTIVATOR With Edger Attachment Model No. 316.292561 • • • • • CAUTION: Before using this product, read this manual and follow all .safety rules and operating instructions. Sears, Roebuck SAFETY ASSEMBLY OPERATION MAINTENANCE PARTS LIST Espa#o_ and Co., Hoffman Visit our website: Estates, www.sears.com/craftsman P/N 769-01527 (2/05) IL 60179, U.S.A. p.
TABLE OF CONTENTS Warranty Operating Instructions ................................. Service Information 2 ......................... Rules for Safe Operation 2 ..................... 3 Know Your Unit ............................ 6 Assembly Instructions 7 ...................... Maintenance and Repair Instructions ........... 12 Cleaning and Storage ....................... 15 Troubleshooting 16 Specifications Chart ...................... .............................
Thepurposeof safetysymbolsis toattractyour attentionto possibledangers.Thesafetysymbols, andtheirexplanations, deserveyourcarefulattention andunderstanding. Thesafetywarningsdo notby themselves eliminateanydanger.Theinstructions or warningstheygivearenotsubstitutes for proper accidentprevention measures. SYMBOL SYMBOL result in serious injury to yourself or to others. Always follow the safety precautions to reduce the risk of fire, electric shock and personal injury.
Alwaysstoptheengineandallowitto coolbeforefilling thefueltank.Neverremovethecapofthefueltank,or addfuel,whentheengineis hot.Neveroperatetheunit withoutthefuelcapsecurely inplace.Loosenthefuel tankcapslowlyto relieveanypressureinthetank. Mixandaddfuelina clean,well-ventilated outdoorarea wheretherearenosparksor flames.Slowlyremove the fuelcaponlyafterstoppingengine.Donotsmokewhile fuelingormixingfuel.Wipeupanyspilledfuelfromthe unitimmediately. Alwayswipeunitdrybeforeusing. Movetheunitatleast30feet(9.
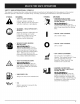
SAFETY AND iNTERNATiONAL SYMBOLS This operator's manual describes safety and international symbols and pictographs that may appear on this product. Read the operator's manual for complete safety, assembly, operating and maintenance and repair information. SYMBOL MEANING SYMBOL • THROWN OBJECTS AND ROTATING CUTTER CAN CAUSE SEVERE INJURY • SAFETY ALERT SYMBOL Indicates danger, warning, or caution. May be used in conjunction with other symbols or pictographs.
Applications Cultivating sod and light to medium Cultivating in garden areas, around soil trees, etc.
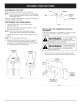
ASSEMBLING THE UNiT Hole Before operating, position the unit's handlebars. NOTE: You may also need to reposition the roller height before using the cultivator. Refer to the Adjusting Tine Depth section. Bolt Handlebar Knob Begin by carefully unpacking the contents and making sure that nothing is damaged. POSITIONING THE HANDLEBARS 1. Loosen the two knobs on the inside of the handlebars (Fig. 1). 2. With the unit upright, swing the handlebars up into the operating position (Fig. 1).
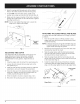
2. Install a carriage bolt through each of the slotted holes in the roller bracket and into the tine guard. 3. On the TOP side of the tine guard, install a lock washer and a wing nut onto each of the bolts (Fig. 3). 4. Make sure the square shoulder of the bolts is pushed through the slotted holes in the roller bracket. Tighten the wing nuts (Fig. 4). Up NOTE: Do not over-tighten the wing nuts. Loosen the wing nuts to adjust roller height. / Down f \\\\ Fig.
OiL AND FUEL MiXiNG iNSTRUCTiONS FUEL MIXTURE Old and/or improperly mixed fuel are the main reasons for the unit not running properly. Be sure to use fresh, clean unleaded fuel. Follow the instructions carefully for the proper fuel/oil mixture. Definition of Blended i , Fuels Today's fuels are often a blend of gasoline and oxygenates such as ethanol, methanol, or MTBE (ether). Alcohol-blended fuel absorbs water. As little as 1% water in the fuel can make fuel and oil separate.
IAIAE)I!I_|| l_,|tl__. Operate this unit only in a [] well- ventilated outdoor area. Carbon monoxide exhaust fumes can be lethal in a confined area. WARNING" Avoid accidental OFF (0) starting. [] Make sure you are in the starting position when pulling the starter rope (Fig. 10). To avoid serious injury, the operator and unit must be in a stable position while starting. STARTING Throttle Control INSTRUCTIONS , Mix gas with oil. Fill fuel tank with fuel/oil mixture.
OPERATING TiPS WARNING" [] Dress properly to reduce the risk of injury when operating this unit. Do not wear loose clothing orjewelry. Wear eye and ear/hearing protection. Wear heavy long pants, boots and gloves. Do not wear short pants, sandals or operate barefoot. Move the cultivator to the work area prior to starting the engine. Transport the cultivator by pushing it on its roller wheel or by carrying it by the transport grip.
MAINTENANCE SCHEDULE Perform these required maintenance procedures at the frequency stated in the table. These procedures should also be a part of any seasonal tune-up. NOTE: Some maintenance procedures may require special tools or skills. If you are unsure about these procedures, take your unit to a Sears or other qualified service dealer. Call 1-800-4-MYHOME® for more information. IA#aDR||R|I__.
AIR FILTER MAINTENANCE Removing the Air Filter/Muffler WARNING" Cover Toavoid se ioos [] personal injury, always turn the unit off and allow it to cool before you clean or service it. 6 1. Remove the four (4) screws securing the air filter/muffler cover (Fig. 13). Use a # T20 Torx bit screwdriver. 2. Air Filter Pull the cover from the engine. Do not force. Blue EZ Fire Lever Screws I Inside Muffler Cover Fig. 14 TM Screws ! Fig. 15 Fig. 13 SPARK Cleaning 1.
WARNING: If the exhaust deflector assembly Adjust Engine Slots / clothing and to prevent If after checking the fuel mixture and cleaning the air filter the engine still will not idle, adjust the idle speed screw as follows: 1. Start the engine and let it run for about 2-3 minutes at a high speed (full throttle) to warm up. Refer to the Starting/Stopping Instructions. NOTE: Ensure the tines are not in contact with the ground when adjusting the idle.
REPLACING THE SPARK PLUG LONG TERM STORAGE Use a Champion RDJ7Y spark plug. The correct air gap is 0.020 in. (0.5 mm). Remove the plug after every 25 hours of operation and check its condition. 1. Stop the engine and allow it to cool. Grasp the plug wire firmly and pull the cap from the spark plug. If you plan to store the unit for an extended time: 1. Drain all fuel from the fuel tank into a container. Do not use fuel that has been stored for more than 60 days.
ACTION CAUSE Empty fuel tank Fill fuel tank with new fuel Primer bulb wasn't pressed enough Press primer bulb fully and slowly 10 times Engine is flooded Squeeze the trigger and pull the starter rope Old fuel Drain gas tank and add fresh fuel Fouled spark plug Replace or clean the spark plug Plugged spark arrestor Clean or replace spark arrestor EZ Fire lever wasn't flipped/set Move lever to the starting position The outside temperature is below 40 ° F Pull the starter rope up to 10-15 time
Engine Type ........................................................................................................................................... Air-Cooled, 2-Cycle Displacement ........................................................................................................................................................... 31.5 cc Idle Speed RPM .........................................................................................................................................
California / EPA Emission Your Warranty Control Rights Warranty Statement and Obligations The California Air Resources Board, The Environmental Protection Agency and Sears are pleased to explain the emission control system warranty on your 2005 and later small off-road engine. New small off-road engines must be designed, built and equipped to meet stringent anti-smog standards. Sears, Roebuck and Co.
INDICE DE CONTENIDOS Instrucciones de operacion Garantia ................................. Llamadas a apoyo al cliente 19 ................. Normas para una operacion segura Conozca su unidad ........................ Instrucciones de ensamble .................. Informacion del aceite y del combustible Instrucciones 19 ........... 24 ....... de arranque y apagado .......... Garantia 20 23 26 27 .................. Instrucciones de mantenimiento y reparacion Limpieza y almacenamiento ..........
Los simbolos de seguridad se utilizan para Ilamar su atencion sobre posibles peligros. Los simbolos de seguridad y sus explicaciones merecen toda su atencion y comprension. Los simbolos de seguridad no eliminan ningun peligro por si mismos. Las instrucciones o advertencias que ofrecen no substituyen las medidas adecuadas de prevencion de accidentes.
Mezcle y cargue el combustible en un area exterior bien ventilada donde no haya chispas ni llamas. Quite lentamente la tapa del combustible solo despues de apagar el motor. No fume mientras carga o mezcla el combustible. Limpie de inmediato todo el combustible que se haya derramado. Aleje la unidad a por Io menos 9,1 m (30 pies) del lugar de carga de combustible antes de arrancar el motor. No fume, mantenga las chispas y las llamas abiertas lejos del area mientras carga el combustible u opera la unidad.
SIMBOLOS DE SEGURIDAD DE INTERCACIONALES Este manual del operador describe los simbolos y figuras de seguridad e internacionalesque pueden aparecer en este producto. Lea el manual del operador para obtener informacion completa acerca de la seguridad, ensamble, operacion y mantenimiento y reparacion. SIMBOLO SIGNIFICADO SIMBOLO SEGURIDAD • LOS OBJETOS DESPEDIDOS LA CUCHILLA ROTATIVA PUEDEN CAUSAR GRAVES LESIONES ;_,I_ peligro, DE advertencia •llndica SIMBOLO ALERTA o DE precaucion.
APLICACION Use esta unidad para cultivar tierra herbosa y tierra negra ligera a mediana. Tambien se utiliza para cultivar areas dejardines, alrededor de arboles, etc. PARADO/APAGADO (O) \ Mango Controldel regulador Manubrio Control de encendido y Bombilla del cebador \ Palanca EZ Fire TM ARRANQUE/ \ ENCENDIDO (I) apagado Mango de la cuerda de arranque -____.
ENSAMBLE DE LA UNIDAD Arandela Su cultivador parajardines ha sido completamente ensamblado. El manubrio debera colocarse en la posicion adecuada antes de la operacion. NOTA: Antes de su operacion, es posible que deba cambiar la posicion de la altura de la rueda. Lea A_juste de la Profundidad de/as Puas. Orificio Perno PeriBa del manubrio __:-T_: Manubrio Desembale con cuidado el contenido y verifique que no haya piezas dahadas. COLOCACION DEL MANUBRIO Fig. 2 1.
2. Instale un perno de carro a traves de cada uno de los orificios ranurados del soporte de la rueda y en la proteccion de las pt]as. 3. Instale una arandela de seguridad y una tuerca de mariposa en cada uno de los pernos de la parte superior de la proteccion de las puas (Fig. 3). 4. Verifique que el hombro cuadrado de los pernos haya atravesado los orificios ranurados del soporte de la rueda. Ajuste las tuercas de mariposa (Fig. 4). Arriba NOTA: No a]uste demasiado las tuercas de mariposa.
INSTRUCCIONES PARA MEZCLAR ACEITE Y EL COMBUSTIBLE EL El combustible viejo o mal mezclado son los motivos principales del mal funcionamiento de la unidad. Asegurese de usar combustible nuevo, limpio y sin plomo. Siga las instrucciones en detalle para mezclar correctamente el aceite y el combustible. Definicion de los combustibles de mezcla Los combustibles actuales con frecuencia son una mezcla de gasolina y oxigenantes como por ejemplo etanol, metanol o MTBE (eter).
ADVERTENCIA: Use esta unidad solo en un area Parado! Apagado (O) Q exterior bien ventilada. Los gases de escape de monoxido de carbono pueden set letales en un area cerrada. ADVERTENCIA. accidentales, Coloquese en cuando tire de la cuerda de operador y la unidad deben estable al arrancar la unidad lesiones personales, INSTRUCCIONES [] Evite los arranques posicion de inicio arranque (Fig, 10), El estar en una posm_on para evitar graves tue/ Encendido (I) Control del regulador Fig.
CONSEJOS PARA LA OPERACION ADVERTENCIA: Vista en forma adecuada para reducir el riesgo de lesiones cuando opere esta unidad. No use ropa holgada ni alhajas. Use proteccion ocular y auditiva. Use pantalones largos y gruesos, botas y guantes. No use pantalones cortos, sandalias ni trabaje descalzo. 1. Transporte el cultivador hacia el area de trabajo antes de arrancar el motor. Puede transportar el cultivador empujandolo sobre ruedas.
NOTA: Algunos procedimientos de mantenimiento pueden requerir el uso de herramientas o habilidades especiales. Si no esta seguro acerca de estos procedimientos, Ileve su uni_ad a un establecimiento de reparacion, persona o distribuidor de servicio autorizado de Sears que arregle motores para uso fuera de la carretera. PROGRAMA DE MANTENIMIENTO Estos procedimientos requeridos para el mantenimiento deben ser realizados con la frecuencia indicada en la tabla.
MANTENIMIENTO DEL FILTffO DE AlffE ADVERTENCIA: © Para evitar graves lesiones personales, apague siempre su recortador y espere que se enfrie antes de limpiarlo o realizar todo tipo de mantenimiento. Remocion de aire 1. 2. de la cubierta del silenciador / filtro Filtro de aire Saque los cuatro (4) tornillos que sostienen la cubierta del silenciador / filtro de aire (Fig. 13). Use un destornillador de broca Torx N° T20. _( _-'7_Tapa interior del silenciador Saque la cubierta del motor.
, , , 9. Reinstale la rejilla del parachispas, ajustandola en forma cehida de nuevo en la cubierta del parachispas. Reinstale las dos lengL_etas de la cubierta en las dos ranuras y cierre la cubierta del parachispas con un golpe rapido. Vuelva a colocar el tornillo que quito en el Paso 2 y aprietele firmemente.
CAMBIO DE LA BUJIA DE ENCENDIDO Use una bujia de encendido Champion RDJ7Y (o similar). La separacion correcta es de 0.020 pulgadas (0.5 mm). Retire la bujia luego de cada 50 horas de operacion e inspeccione su estado. 1. Apague el motor y espere que se enfrie. Tome el alambre de la bujia con firmeza y saquelo de la bujia de encendido. 2. Limpie alrededor de la bujia de encendido.
CAUSA ACCiON El tanque de combustible esta vac{o La bombilla de cebado no rue oprimida Io suficiente El motor esta inundado El combustible es viejo o esta mal mezclado Llene el tanque con combustible bien mezdado Oprima la bombilla de cebado total de 10 veces Use el procedimiento de arranque Drene el tanque de gasolina / Agregue mezcla de combustible nueva La bujia de encendido esta arruinada Parachispas obstruido La palanca EZ Fire TM no estaba en la posicion correcta La temperatura exterior es por de
Tipo de motor ......................................................................................................................... Enfriado por aire, de 2 ciclos Desplazamiento ...................................................................................................................................................... 31.5 cm 3 R.P.M. de velocidad minima ................................................................................................................ 2.600 - 3.600 r.p.m. R.P.M.
ENGINE PARTS: MODEL MINI-TILLER EDGER 2-CYCLE GAS \. 1 I I I Item 1 2 3 4 5 6 7 8 9 10 11 12 13 14 15 16 17 18 19 2O 21 22 23 24 25 26 27 28 29 3O Part No.
CULTIVATOR AND BOOM 2-CYCLE Item 1 2 3 4 5 6 Part No.
Declaracion de Garantia de Control de Emisiones Sus Derechos y Obligaciones de ia EPA / California de la Garantia La Junta de Recursos del Aire de California, la Agencia de Proteccion Ambiental y Sears se complacen en explicar la garantia del sistema de control de emisiones para su pequeho motor para uso fuera de la carretera del 2005 y posterior. Los nuevos motores pequehos para uso fuera de la carretera tienen que diseharse, construirse y equiparse para cumplir las normas contra smog mas estrictas.
Repair Protection Agreements Convenios de Cobertura de Gastos para Reparaciones Congratulations on making a smart purchase. Your new Craftsman _>product is designed and manufactured for years of dependable operation. But like all products, it may require repair from time to time. That's when having a Repair Protection Agreement can save you money and aggravation. Felicidades por haber hecho una compra inteligente.
Your Home For repair-in your home-of all major brand appliances, lawn and garden equipment, or heating and cooling systems, no matter who made it, no matter who sold it! For the replacement parts, accessories and owner's manuals that you need to do-it-yourself. For Sears professional installation of home appliances and items like garage door openers and water heaters. 1-800-4-MY-HOME Call anytime, ® (1-800-469-4663) day or night (U.S.A. and Canada) www.sears.com www.sears.