Operator’s Manual ® Electric CULTIVATOR Model No. 316.292601 • SAFETY • ASSEMBLY • OPERATION • MAINTENANCE • PARTS LIST • ESPAÑOL, P. 15 CAUTION: Before using this product, read this manual and follow all safety rules and operating instructions. Sears, Roebuck and Co., Hoffman Estates, IL 60179, U.S.A. Visit our website: www.sears.
RULES FOR SAFE OPERATION TABLE OF CONTENTS Safety Rules . . . . . . . . . . . . . . . . . . . . . . . . . . . . . . . . . . . .2 Warranty . . . . . . . . . . . . . . . . . . . . . . . . . . . . . . . . . . . . . . .4 Know Your Cultivator . . . . . . . . . . . . . . . . . . . . . . . . . . . . .5 Assembly Instructions . . . . . . . . . . . . . . . . . . . . . . . . . . . .6 Starting/Stopping Instructions . . . . . . . . . . . . . . . . . . . . . .8 Operating Instructions . . . . . . . . . . . . . . . . . . .
RULES FOR SAFE OPERATION protection and may be used for this measure of safety. • Never attempt to make any adjustments while motor is running. OPERATION • Avoid dangerous environment. Don’t use cultivator in damp or wet locations. • Don’t use the cultivator in the rain. • Do not operate cultivator on excessively steep slopes. • Avoid unintentional starting. Don’t carry plugged-in cultivator with your hands/fingers on the motor starting controls. • Do not abuse cord.
WARRANTY STATEMENT TWO YEAR FULL WARRANTY ON CRAFTSMAN ELECTRIC CULTIVATOR For two years from the date of purchase, when this Cultivator is used and maintained according to the operator’s manual, Sears will repair any defect in material or workmanship free of charge. This warranty excludes tines, which are expendable parts that can wear out from normal use in less than two years. This warranty is void if this Cultivator is used for commercial or rental purposes.
KNOW YOUR CULTIVATOR APPLICATIONS • Cultivating sod and light to medium soil • Cultivating in garden areas, around trees, etc.
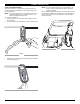
ASSEMBLY INSTRUCTIONS ASSEMBLING THE HANDLEBARS WARNING: To prevent serious personal injury, do not connect electric extension cord to unit until fully completing cultivator assembly. A Before you can operate the unit, you must install the handlebars. 1. When you unpack the unit, hold the handle bar in the position shown in Figure 1 and slide it onto the lower bars. 2. Align the holes in the handlebar with the holes in the lower bars and insert the bolts through those holes. 3.
ASSEMBLY INSTRUCTIONS USING THE CORD RETAINER There is an extension cord retainer to prevent the extension cord from disconnecting during use. The retainer hangs from the cord guide bar. NOTE: Do not plug the extension cord into the power source receptacle until the cord is connected to the cord retainer and plugged into the unit. To use the cord retainer: 1. Fold the extension cord in half, forming a tight loop near the receptacle. 2. Push the loop through the bottom hole in the retainer (Fig. 3).
STARTING / STOPPING INSTRUCTIONS STARTING INSTRUCTIONS WARNING: Avoid accidental starting. Make sure you are in the operating position behind the cultivator when using it. To avoid serious injury, the operator and unit should be in a stable position while starting. Connecting to an Electrical Power Source NOTE: Connect your extension cord to the cultivator as instructed on the previous page prior to plugging your extension cord into an electrical outlet. 1.
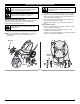
OPERATING INSTRUCTIONS ADJUSTING THE WHEEL SUPPORT BRACKET USING YOUR CULTIVATOR WARNING: Avoid accidental starting. Stop motor and disconnect extension cord prior to adjusting the wheel support bracket. To adjust the wheel support bracket, proceed as follows: 1. Remove cotter pin from the clevis pin and slide pin out of tailpiece bracket (Fig. 8). WARNING: Never pick up or carry the unit while the engine is running. Serious personal injury could result 1. 2. 3.
MAINTENANCE AND REPAIR INSTRUCTIONS WARNING: To prevent serious injury, never perform maintenance or repairs with unit running. Always service and repair a cool unit. WARNING: Do not wash cultivator with a hose. Avoid getting water on motor and electrical connections. 2. 3. Carefully remove each tine assembly from the tine shafts. Wipe each tine shaft clean with a damp cloth and apply a light coat of oil (i.e. 3-N-One) or silicon-based lubricant to each shaft. Do NOT use WD-40. 4.
TROUBLESHOOTING MOTOR WILL NOT START CAUSE Unit is unplugged ACTION Make sure that extension cord is securely plugged into cultivator's cord outlet receptacle on one end and a 110V outlet on the opposite end. Starter button or bail improperly used Press starter button and hold it in while squeezing bail against the handle. Overload protection switch has popped out Depress overload protection switch.
PARTS LIST REPLACEMENT PARTS - MODEL 316.
PARTS LIST REPLACEMENT PARTS - MODEL 316.292601 ELECTRIC CULTIVATOR Item Part No.
Manual del Operador ® CULTIVADORA Eléctrica Model No. 316.292601 • SEGURIDAD • MONTAJE • FUNCIONAMIENTO • MANTENIMIENTO • LISTADO DE PIEZAS PRECAUCIÓN: Antes de utilizar este producto, lea este manual y siga todas las reglas de seguridad y las instrucciones de funcionamiento. Sears, Roebuck and Co., Hoffman Estates, IL 60179, U.S.A. Visit our website: www.sears.
NORMAS PARA UNA OPERACIÓN SEGURA INDICE DE CONTENIDOS Normas para una operación segura . . . . . . . . . . . . . . . .E2 Garantía . . . . . . . . . . . . . . . . . . . . . . . . . . . . . . . . . . . . . E4 Conozca su unidad . . . . . . . . . . . . . . . . . . . . . . . . . . . . .E5 Instrucciones de ensamble . . . . . . . . . . . . . . . . . . . . . . .E6 Instrucciones de arranque y apagado . . . . . . . . . . . . . . .E8 Instrucciones de operación . . . . . . . . . . . . . . . . . . . . . . .
NORMAS PARA UNA OPERACIÓN SEGURA usarán para la cultivadora. Existen receptáculos disponibles que cuentan con protección GFCI incorporada y se pueden utilizar para esta medida de seguridad. • No intente nunca realizar ningún ajuste mientras el motor está en funcionamiento. FUNCIONAMIENTO • Evite los entornos peligrosos. No utilice la cultivadora en lugares húmedos o mojados. • No utilice la cultivadora si llueve. • No utilice la cultivadora en pendientes excesivamente pronunciadas.
DECLARACIÓN DE GARANTÍA DOS AÑOS DE GARANTÍA COMPLETA EN LA CULTIVADORA ELÉCTRICA CRAFTSMAN Durante do años a partir de la fecha de comproa, siempre que esta cultivadora se utilice y mantenga de acuerdo a las instrucciones del manual del operador, Sears reparará sin cargo cualquier defecto en materiales o mano de obra. Esta garantía excluye los dientes, que son piezas consumibles que se pueden desgastar debido a un uso normal en menos do dos años.
CONOZCA SU UNIDAD APLICACIONES • Cultivar tierra herbosa y tierra negra ligera a mediana. • Cultivar áreas de jardines, alrededor de árboles, etc.
INSTRUCCIONES DE ENSAMBLE ENSAMBLAJE DE LAS MANIJAS ADVERTENCIA: Para evitar lesiones A personales graves, no conecte prolongadores eléctricos a la unidad hasta terminar por completo el montaje de la cultivadora Antes de que pueda operar la unidad, debe instalar las manijas. 1. Cuando desempaque la unidad, sostenga la manija en la posición que se indica en la Figura 1 y deslícela hacia las barras inferiores. 2.
INSTRUCCIONES DE ENSAMBLE USO DEL RETENEDOR DEL CABLE En la barra de guía del cable situada en la manija superior se haya suspendido un retenedor del prolongador. NOTA: No enchufe el prolongador al receptáculo de la fuente de alimentación (salida) antes de dirigirlo a través del retenedor del cable y conectar el prolongador al receptáculo de salida del cable de la cultivadora. Para dirigir de forma adecuada su prolongador a través del retenedor del cable: 1.
INSTRUCCIONES DE ARRANQUE Y APAGADO INSTRUCCIONES DE ARRANQUE ADVERTENCIA: Evite arranques accidentales. Asegúrese de que está en posición de funcionamiento detrás de la cultivadora cuando la utilice. Para evitar lesiones graves, tanto el operador como la unidad deben estar en una posición estable durante el arranque.
INSTRUCCIONES DE OPERACIÓN AJUSTE DE LA MÉNSULA DE SOPORTE DE LA RUEDA USO DE SU CULTIVADORA ADVERTENCIA: Evite arranques accidentales. ADVERTENCIA: Nunca levante ni transporte la Detenga el motor y desconecte el prolongador antes de ajustar la ménsula de soporte de las ruedas. Para ajustar la ménsula de soporte de la rueda proceda de la siguiente manera: 1. Extraiga la chaveta de retén de la chaveta de horquilla y deslice la chaveta hasta extraerla de la ménsula de la pieza posterior (Fig. 8).
INSTRUCCIONES DE OPERACIÓN ADVERTENCIA: Para evitar lesiones graves, ADVERTENCIA: nunca realice el mantenimiento nunca realice el mantenimiento ni las reparaciones con la unidad en funcionamiento. Realice dichas tareas siempre con la unidad fría. ni con una manguera. Evite que el agua entre en las reparaciones con la unidad en contacto con el motor y las conexiones funcionamiento. Realice dichas tareas eléctricas ADVERTENCIA: Evite arranques accidentales. 2.
RESOLUCIÓN DE PROBLEMAS EL MOTOR NO ARRANCA CAUSA ACCION La unidad está desenchufada Asegúrese de que el prolongador está enchufado de iforma segura en el receptáculo de salida del cable de la cultivadora en un extremo, y en una salida de 120V. en el extremo contrario. Botón arrancador o gancho mal usados Oprima el botón arrancador y manténgalo oprimido mientras presiona el gancho contra la manija.
LISTADO DE PIEZAS MODELO 316.
LISTADO DE PIEZAS MODELO 316.292601 CULTIVADORA ELÉCTRICA Artículo 1 2 3 4 5 6 7 8 9 10 11 12 13 14 15 16 17 18 19 20 21 22 23 24 25 No.