Operator's Manual 4-Cycle Garden MiNi TILLER Model No. 316.292650 • SAFETY ASSEMBLY OPERATION MAINTENANCE PARTS LIST • ESPANOL, R E1 CAUTION: Before using this product, read this manual and follow all safety rules and operating instructions. Sears, Roebuck and Co., Hoffman Visit our website: Estates, www.sears.com/craftsman 769-04601 P00 IL 60179, U.S.A.
TABLE OF CONTENTS Service Information ................................. 1 Rules for Safe Operation ............................. 2 Warranty information ................................ 4 Know Your Unit .................................... 5 Assembly instructions ............................... 6 Oil and Gas Information .............................. 7 Starting/Stopping Instructions ......................... 8 Operating instructions ............................... 9 Maintenance and Repair Instructions ......
eyeprotection. Ifyouareapproached, stoptheunit immed iately. Squeeze thethrottle control andcheckthatitreturns automatically totheidleposition. Makealladjustments orrepairs before usingunit. SAFETY WARNINGS FORGASUNITS I _hb vapors can explode if ignited. Take the following IWARN'NG-" Gas°line is highly flammable, andits precautions: * Store fuel only in containers specifically designed and approved for the storage of such materials. * Avoid creating a source of ignition for spilled fuel.
• UNLEADED '_1 • WEAR EYE AND HEARING PROTECTION WARNING: Thrown objects and loud noise can cause severe eye injury and hearing loss. Wear eye protection meeting ANSI Z87.1-1989 standards and ear protection when operating this unit. Use a full face shield when needed. FUEL Always use ciean fresh unleaded fue I • OIL Jl Refertooperatorsmanua forthepr0pertypeofo. 1 A WARNING: KeeP all bystanders, eSpecially • children KEEP BYSTANDERS AWAY50 feet (!5 m)from the and pets, at least operating area.
APPLICATIONS • Cultivating sodandlighttomedium soil • Cultivating ingarden areas, around trees, etc.
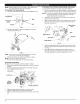
NOTE:Before setting upyourminitiller/ edger, disconnect the spark plug wire from the spark plug. POSiTiONiNG THE HANDLEBARS 1. Loosen the two knobs on the inside of the handlebars (Fig. 1). ATTACHING THE OPTIONAL EDGER WHEEL AND BLADE To convert the mini tiller to an edger, proceed as follows: 1. Push the On/Off switch to Off (O) position to stop engine and tines and disconnect spark plug to avoid accidental starting. NOTE: Handlebars 2. Bolt 3.
CAUTION: OVERFiLLiNG OiL CRANKCASE MAY CAUSE PRODUCT DAMAGE. Check and maintain the proper oil level in the crank case; it is important and cannot be overemphasized. Check the oil before each use and change it as needed. See Changing the Oil. RECOMMENDED OIL TYPE Using the proper type and weight of oil in the crankcase is extremely important. Check the oil before each use and change the oil regularly. Using incorrect or dirty oil can cause premature engine wear and failure.
ON (I) _ ventilated outdoor area. Carbon monoxide exhaust ARNING: Operate unit only fumes can be lethal in a this confined area.in a well- _ you are in the starting position when pulling the starter rope (Fig. 12). ToAvoid avoid accidental serious injury, the operator and ARNING" starting. Make sure unit must be in a stable position while starting. OFF (0) STARTING iNSTRUCTiONS 1. Check the oil level in the crankcase. Oil Level. 2. Fill the fuel tank with fresh, clean unleaded gasoline.
OPERATING TiPS __J 1. MAINTENANCE 2. 3. 4. perform maintenance or repairs with unit running. injury when operating this unit. Do not wear loose clothing or jewelry. Wear eye and ear/hearing protection. heavyproperly long pants, boots the andrisk gloves. ARNING:WearDress to reduce of Do not wear short pants, sandals or operate barefoot. __ Move the mini tiller to the work area prior to starting the engine. Transport the mini tiller by pushing or pulling it along on its wheels.
CHECKING THE OiL LEVEL damage to the unit, always maintain the proper oil level in the crankcase. Never operateengine the unit withand I CAUTION: To prevent extensive wear the o eve be ow the bottom of the d pst ck. j The importance of checking and maintaining the proper oil level inthe crankcase cannot be overemphasized. Check oil before each use: 1. Stop the engine and allow oil to drain into the crankcase. 2. Place the unit in a horizontal position to get a proper oil level reading (Fig. 9). 3.
AiRFILTER MAINTENANCE always turn the unit off and allow it to cool before you clean or service it. Cleaning the Air Filter Clean and re-oil the air filter every 10 hours of operation. It is an important item to maintain. Failure to maintain your air filter properly can result in poor performance or can cause permanent damage to your engine. 1. Open the air filter cover. Push the tab on the left side of the cover in, swing the air filter cover out and off the air filter housing (Fig. 19). 2.
ROCKER ARMCLEARANCE Thisrequires disassembly oftheengine. If you feel unsure or unqualified to perform this, take the unit to a qualified service dealer. NOTE: Inspect the valve to rocker arm clearance with a feeler gauge after the first 10 hours of operation and then every 25 hours of operation thereafter. • The engine must be cold when checking or adjusting the valve clearance. • This task should be performed inside, in a clean, dust free area. 1.
10. Reinstall therockerarmcoverusinganewgasket. Torque thescrewto20-30inolb(2.2-3.4 Nom). 11. Reinstall theengine cover.Check alignment ofthecover before tightening thescrews. Tighten screws. 12. Check thesparkplugandreinstall. SeeReplacing the SparkPlug. 13. Replace thesparkplugwire. 3. 4. REPLACING THE SPARK PLUG CLEANING 5. 6. Remove the spark arrestor cover. Remove the spark arrestor screen from the spark arrestor cover. Clean the spark arrestor screen with a wire brush or replace it.
CAUSE On/Off control intheSTOP position Turn On/Off control to ON Primer bulbwasn'tpressed enough Press primer bulb fully and slowly 10 times Fouled sparkplug Replace or clean the spark plug ACTION iiiiiiiiiiiiii iiii! ii !i i ! ii!i!i!;! i !i !i ii!iiii iiii ! i ili Engine is flooded Pull starter rope repeatedly with throttle control fully engaged and with the choke lever in Position 3 CAUSE ACTION Air filter is plugged Replace or clean the air filter improper carburetor adjustment Adjust acc
Engine Type................................................................................. Displacement ................................................................................ IdleSpeedRPM................................................................................ Operating RPM ................................................................................ Clutch Type......................................................................................... Ignition Type.......................
Manual del Operador CULTIVADORA para Jardines de 4 Ciclos Model No. 316.292630 o SEGURIDAD MONTAJE FUNCIONAMIENTO MANTENIMIENTO LISTADO DE PIEZAS PRECAUCI6N: Antes de utilizar este producto, lea este manual y siga todas las reglas de seguridad y las instrucciones de funcionamiento, Sears, Roebuck and Co., Hoffman Visit our website: Estates, IL 60179, U.S.A. www.sears.
INDICE DE CONTENIDOS Llamadas a apoyo al cliente ...................... Normas para una operaci6n segura ................ Garantia ...................................... Conozca su unidad ............................. Instrucciones de ensamble ....................... Informaci6n del aceite y del gasolina ............... Instrucciones de arranque y apagado ............... Instrucciones de operaci6n ....................... Instrucciones de mantenimiento y reparaci6n ......... Limpieza y almacenamiento .......
• Est6 consciente del riesgo de lesi6n en lacabeza, lasmanos y los pies. No permita ni_os, espectadores ni mascotas en el Area. Los ninos, los espectadores y las mascotas deben estar fuera de un radio de 50 pies (15 m.) como minJmo; de todas formas los espectadores correrAn el riesgo de ser golpeados por objetos lanzados por la unidad. Se debe exhortar a los espectadores a que usen protecci6n para los ojos. Si se le acerca alguien apague la unidad de inmediato.
USE PROTECCION '_ Use siempre combustible i_ilp_ _ "cOMBUSTIBLESINPLOMO. L,_ plomo. ° ND OADOR DEACEn'E " Consu!te el manual del operador para obtener " informaci6n acerca dei tipo correcto de aceitel OCULAR Y AUDITWA Los objetos arrojados per la unidad y el ruido fuerte pueden causar graves lesiones oculares y p6rdida auditiva. Utilice proteccbn ocular que cumpla con las normas ANSI Z87.1-1989 y proteccbn auditiva cuando opere esta unidad. Use una careta completa cuando la necesite.
APLICAClONES • Cultivar tierraherbosa ytierranegraligera a mediana. • Cultivar Areas dejardines, alrededor deb_rboles, etc. APAGADO (O) • Recortar los bordes.
NOTE: Desde la posici6n de funcionamiento, se observa la referencia a la derecha o a la izquierda de la cultivadora / bordeadora. COLOOACION DEL MANUBRIO 1. Afloje las dos perillas del lado interior del manubrio (Fig. 1). Manubrio CONEXION DE LA RUEDA Y DE LA CUCHILLA BORDEADORA OPCIONAL Para convertir la cultivadora en una bordeadora, siga los siguientes pasos: 1.
ADVERTENClA: EL LLENAR DEMASIADO EL CARTER PUEDE CAUSAR LESIONES PERSONALES GRAVES No podemos exagerar la importancia del control y mantenimiento del nivel correcto de aceite en el cigQer_al. Verifique el aceite antes de cada uso y cambielo cuando sea necesaric segQn se indica en la secci6n de Cambio del aceite. TIPO DE ACEITE RECOMENDADO El uso de un aceite del tipo y peso correctos en el cigQer_al es extremadamente importante. Verifique el aceite antes de cada uso y cambie el aceite con frecuencia.
ENCENDIDO (I) APAGADO (O) Area exterior bien ventilada. Los gases de escape de mon6xido de carbono pueden ser letales en un I ADVERTENClA: Use esta unidad s61o en un Area cerrada. __ ADVERTENCIA: Evite los arranques accidentales. Col6quese en posici6n de inicio cuando tire de la cuerda de arranque (Fig. 12). El operador y la unidad deben estar en una posici6n estable al arrancar la unidad para evitar graves lesiones personales. INSTRUCCIONES 1. 2. 3. 4. 5. 6.
CONSEJOS PROGRAMA PARA LA OPERACION ADVERTENClA: Vista en forma adecuada para reducir el riesgo de lesiones cuando opere esta unidad. No use ropa holgada ni alhajas. Use protecci6n ocular y auditiva. Use pantalones largos y gruesos, botas y guantes. No use pantalones cortos, sandalias ni trabaje descalzo. Mueva el cultivador al Area de trabajo antes de arrancar el motor. Puede transportar el cultivador empujandolo sobre las ruedas o Ilevandolo del tubo central de la manija.
5. Ubique un diente A y un diente Ben el arbol del diente (Fig. 13). 6. Asegure los nuevos dientes al arbol con chavetas de trinquete. INSPECCION DEL NIVEL DE ACEITE excesivo del motor siempre el nivel de cigQer_al. No opere RECAUCl6N: debajo del extremo _ y el dar_o de la unidad, mantenga aceite correcto en el carter del nunca la unidad con el aceite Para evitar un desgaste inferior de la varilla de medici6n.
MANTENIMIENTO _ DEL FILTRO DE AIRE personales, apague siempre su recortador y espere que se enfrie antes dePara limpiarlo realizarlesiones todo tipo evitar ograves deDVERTENClA: mantenimiento. Limpieza del fiitro de aire Limpie y vuelva a aceitar elfiltro de aire cada 10 horas de operaci6n. Es un elemento cuyo mantenimiento es importante. Si no realiza el mantenimiento del filtro de aire, su garantia sera ANULADA. 1. Abra la cubierta del filtro de aire.
destornillador Phillips o devastago pianoenelorificio dela cubierta delsilenciador / filtro de aire (Fig. 22). Gire el tornillo de marcha lenta en sentido horario, de a 1/8 de vuelta pot vez (segQn sea necesario) hasta que el motor funciona en minima. NOTA: Las p_as no deben girar cuando el motor esta en minima. 3. Si las pOas giran cuando el motor esta en minima, gire el tornillo de marcha lenta en sentido antihorario 1/8 de vuelta por vez (segQn sea necesario) para reducir la marcha lenta.
Tuercade ajuste Silenciador Balanc{n Cubierta del amortiguador de chispas 0,076-0,152 mm (,003-,006 pulg.) V_stago de la v_lvula de entrada Calibrador Fig. 27 _-- Tornillo 11. Vuelva a instalar la cubierta del motor. Verifique la alineaci6n de la cubierta antes de ajustar los tornillos. Ajuste los tornillos. 12. Inspeccione la bujia de encendido y vuelva a instalar. Lea Cambio de la Bujia de encendido. 13. Vuelva a colocar el cable de la bujia de encendido.
CAUSA E !ap6nde acete/var ACClON ademedc6nestafojoo La separaci6n entre los electrodos CAUSA pequeda/cerrada Si necesita E14 asistencia efatae de la bujia es demasiado adicional, comuniquese Ajustee 1 tap6nde acete/var ademedc6n, cooqueun Ajuste la separaci6n a 0.025 de pulgada (0.635 mm) ACCION con su Sears o otra proveedor de servicio cualificado.
Tipo de motor ........................................................................... Desplazamiento ..................................................................... R.RM. de velocidad minima ..................................................................... R.RM. de operaci6n ........................................................................... Tipo de embrague ................................................................................... Tipo de encendido ...........................
E16
REPLACEMENT PARTS - MODEL 316.
REPLACEMENT PARTS - MODEL 316.292650 4-CYCLE GAS CULTIVATOR item 1 2 3 4 5 Part No.
REPLACEMENT item Part No. PARTS - MODEL 316.
Your Home For expert troubleshooting and home solutions advice: www.managemyhome.com For repair- in your home - of all major brand appliances, lawn and garden equipment, or heating and cooling systems, no matter who made it, no matter who sold it! For the replacement parts, accessories and owner's manuals that you need to do-it-yourself. For Sears professional installation of home appliances and items like garage door openers and water heaters.