Operator’s Manual 4-Cycle CULTIVATOR / EDGER Model No. 316.292710 CAUTION: Before using this product, read this manual and follow all safety rules and operating instructions. • SAFETY • ASSEMBLY • OPERATION • MAINTENANCE • PARTS LIST Sears, Roebuck and Co., Hoffman Estates, IL 60179, U.S.A. Visit our website: www.sears.
INTRODUCTION Maintenance and Repair Instructions . . . . . . . . . . .12 TABLE OF CONTENTS Warranty . . . . . . . . . . . . . . . . . . . . . . . . . . . . . . . . .2 Service Information . . . . . . . . . . . . . . . . . . . . . . . . .2 Rules for Safe Operation . . . . . . . . . . . . . . . . . . . . .3 Know Your Unit . . . . . . . . . . . . . . . . . . . . . . . . . . . .6 Assembly Instructions . . . . . . . . . . . . . . . . . . . . . . .7 Oil and Fuel Information . . . . . . . . . . . . . . . . . . . .
RULES FOR SAFE OPERATION The purpose of safety symbols is to attract your attention to possible dangers. The safety symbols, and their explanations, deserve your careful attention and understanding. The safety warnings do not by themselves eliminate any danger. The instructions or warnings they give are not substitutes for proper accident prevention measures. SYMBOL MEANING Indicates danger, warning or caution. Attention is required in order to avoid serious personal injury.
RULES FOR SAFE OPERATION • Always stop the engine and allow it to cool before filling the fuel tank. Never remove the cap of the fuel tank, or add fuel, when the engine is hot. Never operate the unit without the fuel cap securely in place. Loosen the fuel tank cap slowly to relieve any pressure in the tank. • Add fuel in a clean, well-ventilated outdoor area where there are no sparks or flames. Slowly remove the fuel cap only after stopping engine. Do not smoke while fueling or mixing fuel.
RULES FOR SAFE OPERATION SAFETY AND INTERNATIONAL SYMBOLS This operator's manual describes safety and international symbols and pictographs that may appear on this product. Read the operator's manual for complete safety, assembly, operating and maintenance and repair information. SYMBOL MEANING SYMBOL MEANING • THROWN OBJECTS AND ROTATING CUTTER CAN CAUSE SEVERE INJURY • SAFETY ALERT SYMBOL Indicates danger, warning, or caution. May be used in conjunction with other symbols or pictographs.
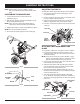
KNOW YOUR UNIT KNOW YOUR CULTIVATOR Applications • Cultivating sod and light to medium soil • Cultivating in garden areas, around trees, etc.
ASSEMBLY INSTRUCTIONS NOTE: Before setting up your cultivator / edger, disconnect the spark plug wire from the spark plug. ADJUSTING TINE DEPTH POSITIONING THE HANDLEBARS To adjust the wheel support bracket proceed as follows: 1. Stop engine and disconnect spark plug to avoid accidental starting. 1. Loosen the two knobs on the inside of the handlebars (Fig. 1). 2. Remove cotter pin from the clevis pin and slide clevis pin out of tailpiece bracket (Fig. 3). 2.
OIL AND FUEL INFORMATION CAUTION: OVERFILLING OIL CRANKCASE MAY CAUSE PRODUCT DAMAGE. Check and maintain the proper oil level in the crank case; it is important and cannot be overemphasized. Check the oil before each use and change it as needed. See Changing the Oil. Funnel Spout RECOMMENDED OIL TYPE Using the proper type and weight of oil in the crankcase is extremely important. Check the oil before each use and change the oil regularly.
OIL AND FUEL INFORMATION RECOMMENDED FUEL TYPE Old fuel is the primary reason for improper unit performance. Be sure to use fresh, clean, unleaded gasoline. NOTE: This is a four cycle engine. In order to avoid damage to the unit, do not mix oil with gasoline. Definition of Blended Fuels Today's fuels are often a blend of gasoline and oxygenates such as ethanol, methanol or MTBE (ether). Alcohol-blended fuel absorbs water. As little as 1% water in the fuel can make fuel form acids when stored.
STARTING/STOPPING INSTRUCTIONS ON (I) Operate this unit only in a well- ventilated outdoor area. Carbon monoxide exhaust fumes can be lethal in a confined area. WARNING: OFF (O) WARNING: Avoid accidental starting. Make sure you are in the starting position when pulling the starter rope (Fig. 12). To avoid serious injury, the operator and unit must be in a stable position while starting. Throttle Control STARTING INSTRUCTIONS 1. Check the oil level in the crankcase. Refer to Checking the Oil Level. 2.
OPERATING INSTRUCTIONS OPERATING TIPS Dress properly to reduce the risk of injury when operating this unit. Do not wear loose clothing or jewelry. Wear eye and ear/hearing protection. Wear heavy long pants, boots and gloves. Do not wear short pants, sandals or operate barefoot. WARNING: 1. Move the cultivator to the work area prior to starting the engine. Transport the cultivator by pushing or pulling it along on its wheels.
MAINTENANCE AND REPAIR INSTRUCTIONS MAINTENANCE SCHEDULE Perform these required maintenance procedures at the frequency stated in the table. These procedures should also be a part of any seasonal tune-up. NOTE: Maintenance, replacement, or repair of the emission control devices and system may be performed by a Sears or other qualified service dealer. Call 1-800-4-MY-HOME® for more information. NOTE: Some maintenance procedures may require special tools or skills.
MAINTENANCE AND REPAIR INSTRUCTIONS CHECKING THE OIL LEVEL To prevent extensive engine wear and damage to the unit, always maintain the proper oil level in the crankcase. Never operate the unit with the oil level below the bottom of the dipstick. CAUTION: The importance of checking and maintaining the proper oil level in the crankcase cannot be overemphasized. Check oil before each use: 1. Stop the engine and allow oil to drain into the crankcase. 2.
MAINTENANCE AND REPAIR INSTRUCTIONS AIR FILTER MAINTENANCE Cleaning the Air Filter Clean and re-oil the air filter every 10 hours of operation. It is an important item to maintain. Failure to maintain your air filter properly can result in poor performance or can cause permanent damage to your engine. 4. Apply enough clean SAE 30 motor oil to lightly coat the filter (Fig. 21). To avoid serious personal injury, always turn the unit off and allow it to cool before you clean or service it. WARNING: 1.
MAINTENANCE AND REPAIR INSTRUCTIONS NOTE: Ensure the tines are not in contact with the ground when adjusting the idle. 2. Release the throttle trigger and let the engine idle. If the engine stops, insert a small phillips or flat blade screwdriver into the hole in the air filter/muffler cover (Fig. 22). Turn the idle speed screw in, clockwise, 1/8 of a turn at a time (as needed) until the engine idles smoothly. 0.025 in. (0.655 mm.) NOTE: The tines should not rotate when the engine idles. 3.
MAINTENANCE AND REPAIR INSTRUCTIONS Cleaning the Unit To avoid serious personal injury, always turn the unit off and allow it to cool before you clean or perform any maintenance on it. WARNING: • • Use a small brush to clean off the outside of the unit and to keep the air vents free of obstructions. Do not use strong detergents or petroleum based cleaners, such as kerosene. Some household cleaners contain aromatic oils such as pine and lemon that can damage the plastic housings or handles.
TROUBLESHOOTING ENGINE WILL NOT START CAUSE ACTION Empty fuel tank Fill fuel tank with new fuel Primer bulb wasn't pressed enough Press primer bulb fully and slowly 10 times Engine is flooded Pull starter rope repeatedly with throttle control fully engaged and with the choke lever in Position 3 Old fuel Drain gas tank and add fresh fuel Fouled spark plug Replace or clean the spark plug Plugged spark arrestor Clean or replace spark arrestor On/Off Control is in the OFF (O) position Move switch
TROUBLESHOOTING ROCKER ARM CLEARANCE The rocker arm clearance may need adjustment if your unit suffers a loss of performance power or has trouble starting. Adjusting the rocker arm clearance requires disassembly of the engine. If you feel unsure or unqualified to perform this, take the unit to a Sears or other qualified service dealer. NOTE: Inspect the valve to rocker arm clearance with a feeler gauge after the first 10 hours of operation and then every 25 hours of operation thereafter.
TROUBLESHOOTING 7. Pull the starter rope slowly to bring the piston to the top of its travel, (known as top dead center). Check that: • The piston is at the top of its travel while looking in the spark plug hole (Fig. 27) • Both rocker arms move freely, and both valves are closed If these statements are not true, repeat this step. 8. Slide the feeler gauge between the rocker arm and the valve return spring. Measure the clearance between the valve stem and rocker arm (Fig. 29).
SPECIFICATIONS ENGINE* Engine Type . . . . . . . . . . . . . . . . . . . . . . . . . . . . . . . . . . . . . . . . . . . . . . . . . . . . . . . . . . . . . . . . . Air-Cooled, 4-Cycle Displacement . . . . . . . . . . . . . . . . . . . . . . . . . . . . . . . . . . . . . . . . . . . . . . . . . . . . . . . . . . . . . . . . . 1.6 cu. in. (26.2 cc) Idle Speed RPM . . . . . . . . . . . . . . . . . . . . . . . . . . . . . . . . . . . . . . . . . . . . . . . . . . . . . . . . . . . . . . . . .
NOTES 21
California / EPA Emission Control Warranty Statement Your Warranty Rights and Obligations The California Air Resources Board, The Environmental Protection Agency and Sears are pleased to explain the emission control system warranty on your 2005 and later small off-road engine. New small off-road engines must be designed, built and equipped to meet stringent anti-smog standards. Sears, Roebuck and Co.
Manual de Operador 4-Ciclos CULTIVADORA / BORDEADORA Modelo No. 316.292710 PRECAUCION: Lea el manual del operador y siga todas las advertencias e instrucciones de seguridad. Sears, Roebuck and Co., Hoffman Estates, IL 60179, U.S.A. Vaya a: www.sears.
INTRODUCCION Instrucciones de operación . . . . . . . . . . . . . . . . .E11 INDICE DE CONTENIDOS Garantía . . . . . . . . . . . . . . . . . . . . . . . . . . . . . . . . .E2 Instrucciones de mantenimiento y reparación . . .E12 Llamadas a apoyo al cliente . . . . . . . . . . . . . . . . . .E2 Limpieza y almacenamiento . . . . . . . . . . . . . . . . .E16 Normas para una operación segura . . . . . . . . . . . .E3 Cuadro de solución de problemas . . . . . . . . . . . .E17 Conozca su unidad . . . . . .
NORMAS PARA UNA OPERACION SEGURA Los símbolos de seguridad se utilizan para llamar su atención sobre posibles peligros. Los símbolos de seguridad y sus explicaciones merecen toda su atención y comprensión. Los símbolos de seguridad no eliminan ningún peligro por sí mismos. Las instrucciones o advertencias que ofrecen no substituyen las medidas adecuadas de prevención de accidentes.
NORMAS PARA UNA OPERACION SEGURA • Mezcle y cargue el combustible en un área exterior bien ventilada donde no haya chispas ni llamas. Quite lentamente la tapa del combustible sólo después de apagar el motor. No fume mientras carga o mezcla el combustible. Limpie de inmediato todo el combustible que se haya derramado. • Aleje la unidad a por lo menos 9,1 m (30 pies) del lugar de carga de combustible antes de arrancar el motor.
NORMAS PARA UNA OPERACION SEGURA SIMBOLOS DE SEGURIDAD DE INTERCACIONALES Este manual del operador describe los símbolos y figuras de seguridad e internacionales que pueden aparecer en este producto. Lea el manual del operador para obtener información completa acerca de la seguridad, ensamble, operación y mantenimiento y reparación. SIMBOLO SIGNIFICADO SIMBOLO • SIMBOLO DE ALERTA DE SEGURIDAD IIndica peligro, advertencia o precaución. Puede ser utilizado junto con otros símbolos o figuras.
CONOZCA SU UNIDAD APLICACION CONOZCA SU UNIDAD Use esta unidad para cultivar tierra herbosa y tierra negra ligera a mediana. También se utiliza para cultivar áreas de jardines, alrededor de árboles, etc.
INSTRUCCIONES DE ENSAMBLE NOTE: Desde la posición de funcionamiento, se observa la referencia a la derecha o a la izquierda de la cultivadora / bordeadora. COLOCACIÓN DEL MANUBRIO 1. Afloje las dos perillas del lado interior del manubrio (Fig. 1). 2. Con la unidad en posición vertical, gire el manubrio hacia arriba hasta la posición de operación (Fig. 1). NOTA: Tenga cuidado de no pellizcar el cable del regulador o los cables del interruptor cuando coloque el manubrio. 3.
INFORMACION DEL ACEITE Y DEL COMBUSTIBLE EL LLENAR DEMASIADO EL CÁRTER PUEDE CAUSAR LESIONES PERSONALES GRAVES No podemos exagerar la importancia del control y mantenimiento del nivel correcto de aceite en el cigüeñal. Verifique el aceite antes de cada uso y cámbielo cuando sea necesario según se indica en la sección de Cambio del aceite. ADVERTENCIA: Tapón de relleno de aceite/ varilla de medición Fig.
INFORMACION DEL ACEITE Y DEL COMBUSTIBLE TIPO DE COMBUSTIBLE RECOMENDADO El combustible viejo es la causa principal del mal funcionamiento de la unidad. Asegúrese de usar combustible nuevo, limpio y sin plomo. NOTA: Este es un motor de cuatro ciclos. Para evitar dañar su unidad, no mezcle el aceite con la gasolina. Definición de los combustibles de mezcla Los combustibles actuales con frecuencia son una mezcla de gasolina y uno o más oxigenantes como el etano, el metanol o el MTBE (éter).
INSTRUCCIONES DE ARRANQUE Y APAGADO ENCENDIDO / ON Use esta unidad sólo en un área exterior bien ventilada. Los gases de escape de monóxido de carbono pueden ser letales en un área cerrada. ADVERTENCIA: APAGADO/ OFF Evite los arranques accidentales. Colóquese en posición de inicio cuando tire de la cuerda de arranque (Fig. 12). El operador y la unidad deben estar en una posición estable al arrancar la unidad para evitar graves lesiones personales. ADVERTENCIA: INSTRUCCIONES DE ARRANQUE 1.
INSTRUCCIONES DE OPERACION CONSEJOS PARA LA OPERACIÓN en ADVERTENCIA: Vista forma adecuada para reducir el riesgo de lesiones cuando opere esta unidad. No use ropa holgada ni alhajas. Use protección ocular y auditiva. Use pantalones largos y gruesos, botas y guantes. No use pantalones cortos, sandalias ni trabaje descalzo. 1. Mueva el cultivador al área de trabajo antes de arrancar el motor. Puede transportar el cultivador empujándolo sobre las ruedas o llevándolo del tubo central de la manija.
INSTRUCCIONES DE MANTENIMIENTO Y REPARACION NOTA: Algunos procedimientos de mantenimiento pueden requerir el uso de herramientas o habilidades especiales. Si no está seguro acerca de estos procedimientos, lleve su unidad a un establecimiento de reparación, persona o distribuidor de servicio autorizado que arregle motores para uso fuera de la carretera.
INSTRUCCIONES DE MANTENIMIENTO Y REPARACION INSPECCIÓN DEL NIVEL DE ACEITE Para evitar un desgaste excesivo del motor y el daño de la unidad, mantenga siempre el nivel de aceite correcto en el cárter del cigüeñal. No opere nunca la unidad con el aceite debajo del extremo inferior de la varilla de medición. No podemos exagerar la importancia de verificar y mantener el nivel correcto de aceite en el cárter del cigüeñal. Inspeccione el nivel de aceite antes de cada uso: 1.
INSTRUCCIONES DE MANTENIMIENTO Y REPARACION MANTENIMIENTO DEL FILTRO DE AIRE Limpieza del filtro de aire 4. Aplique suficiente aceite limpio de motor SAE 30 para recubrir ligeramente el filtro (Fig. 21). Limpie y vuelva a aceitar el filtro de aire cada 10 horas de operación. Es un elemento cuyo mantenimiento es importante. Si no realiza el mantenimiento del filtro de aire, su garantía será ANULADA.
INSTRUCCIONES DE MANTENIMIENTO Y REPARACION unidad ADVERTENCIA: La funcionará limpie PRECAUCION: No con chorro durante los ajustes del carburador. Use ropa que lo proteja y cumpla con todas las instrucciones de seguridad para prevenir graves lesiones personales. de arena, ni raspe ni limpie los electrodos. El motor podría dañarse si penetran pequeñas partículas en el cilindro. 2. Suelte el gatillo del regulador y deje que el motor funcione en marcha lenta.
INSTRUCCIONES DE MANTENIMIENTO Y REPARACION Limpieza de la Unidad evitar ADVERTENCIA: Para graves lesiones personales, apague siempre su unidad y espere que se enfríe antes de limpiarla o realizar cualquier tipo de mantenimiento. 2. Arranque el motor y déjelo funcionar hasta que se ahogue. Esto asegura que toda la gasolina se haya drenado del carburador. 3. Deje enfriar el motor. Saque la bujía de encendido y coloque 1 onza (30 ml) de aceite de motor de buena calidad en el cilindro.
RESOLUCION DE PROBLEMAS EL MOTOR NO ARRANCA CAUSA El interruptor de encendido está APAGADO El tanque de combustible está vacío La bombilla del cebador no fue oprimida lo suficiente El motor se ha inundado La gasolina es vieja La bujía de encendido está sucia ACCION Mueva el interruptor a Encendido Llene el tanque de combustible Oprima la bombilla del cebador completa y lentamente 10 veces Hale el cordón de arranque repetidas veces con el control del obturador enteramente activado y con la palanca del estr
RESOLUCION DE PROBLEMAS HUELGO DEL BRAZO OSCILANTE El espacio libre del brazo oscilador pudiera necesitar ajuste si su unidad experimenta una pérdida de potencia de rendimiento o tiene problemas al arrancar. Para ajustar el espacio libre del brazo oscilador se requiere desarmar el motor. Si usted siente que no está seguro o que no está calificado como para realizar esto, lleve la unidad a un centro de servicio autorizado.
RESOLUCION DE PROBLEMAS 7. Tire lentamente de la cuerda de arranque para traer el pistón hacia la parte superior de su recorrido (conocido como punto muerto superior). Verifique que: • El pistón se encuentre en la parte superior de su recorrido mientras mira dentro del orificio de la bujía de encendido (Fig. 27). • Ambos brazos oscilantes se mueven con libertad, y ambas válvulas están cerradas De no ser así, repita este paso. 8.
ESPECIFICACIONES MOTOR* Tipo de motor . . . . . . . . . . . . . . . . . . . . . . . . . . . . . . . . . . . . . . . . . . . . . . . . . . . . . . . . . . . . . . . . Enfriado por aire, 4 ciclos Desplazamiento . . . . . . . . . . . . . . . . . . . . . . . . . . . . . . . . . . . . . . . . . . . . . . . . . . . . . . . . . . 26,2 cc (1.6 pulgadas cúbicas) Tipo de embrague . . . . . . . . . . . . . . . . . . . . . . . . . . . . . . . . . . . . . . . . . . . . . . . . . . . . . . . . . . . . . . . . . . . . . .
PARTS LIST ENGINE PARTS - MODEL SEARS CULTIVATOR 4-CYCLE GAS CULTIVATOR Part Numbers On Following Page 2 1 58 3 4 5 18 19 20 6 23 21 22 7 24 25 27 26 8 10 13 48 30 20 31 9 12 44 29 28 11 43 42 14 34 32 33 35 37 41 36 15 39 45 46 39 47 50 17 49 51 40 38 16 55 54 56 57 52 59 91 53 58 88 60 64 90 88 63 89 61 80 79 87 62 81 68 78 66 77 67 65 76 85 86 75 73 82 70 74 83 84 69 72 71 E21
PARTS LIST ENGINE PARTS - MODEL SEARS CULTIVATOR 4-CYCLE GAS CULTIVATOR Item Part No.
PARTS LIST LOWER CULTIVATOR PARTS - MODEL SEARS CULTIVATOR 4-CYCLE GAS CULTIVATOR 1 3 4 2 5 6 13 7 8 11 4 14 11 17 16 10 18 12 15 33 9 20 19 25 22 24 23 21 34 31 20 28 30 32 36 27 26 29 31 Item Part No.
DECLARACIÓN DE LA GARANTÍA DE CONTROL DE EMISIONES DE CALIFORNIA / EPA SUS DERECHOS DE GARANTÍA Y OBLIGACIONES La Junta de Recursos del Aire de California, EPA (Agencia de Protección del Medio Ambiente), y Sears tienen el gusto de explicar la garantia del sistema de control de emisions de su pequeño motor todo-terreno del año 2005 y años ppsteriores.
Repair Protection Agreements Convenios de Cobertura de Gastos para Reparaciones Congratulations on making a smart purchase. Your new Craftsman® product is designed and manufactured for years of dependable operation. But like all products, it may require repair from time to time. That’s when having a Repair Protection Agreement can save you money and aggravation. Felicidades por haber hecho una compra inteligente.
Get it fixed, at your home or ours! Your Home For repair – in your home – of all major brand appliances, lawn and garden equipment, or heating and cooling systems, no matter who made it, no matter who sold it! For the replacement parts, accessories and owner’s manuals that you need to do-it-yourself. For Sears professional installation of home appliances and items like garage door openers and water heaters. 1-800-4-MY-HOME® (1-800-469-4663) Call anytime, day or night (U.S.A. and Canada) www.sears.