
Operator`s manual


MAINTENANCE SCHEDULE
These required maintenance procedures should be
performed at the frequency stated in the table. They
should also be included as part of any seasonal tune-up.
NOTE: Some maintenance procedures may require
special tools or skills. If you are unsure about
these procedures take your unit to any nonroad
engine repair establishment, individual or
authorized service dealer.
I WARNING: To prevent serious injury, never do I
'_ k maintenance or repairs with unit running.
I
Always do maintenance and repairs on a cool
unit. Disconnect spark plug wire to ensure the
unit will not start.
NOTE: Maintenance, replacement, or repair of the emission
control devices and system may be performed by
any nonroad engine repair establishment, individual
or authorized service dealer.
In order to assure peak performance of your engine,
inspection of the engine exhaust port may be necessary
after 50 hours of operation, if you notice lost RPM, poor
performance or general lack of acceleration, this service
may be required. If you feel your engine is need of this
inspection, refer service to any nonroad engine repair
establishment, individual or authorized service dealer for
repair. DO NOT attempt to perform this process yourself
as engine damage may result from contaminants
involved in the cleaning process for the port.
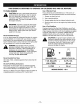
FREQUENCY MAINTENANCE REQUIRED REFER TO:
Before Starting Engine Check for loose or damaged parts.
Fill fuel tank with correct oil and fuel mixture. Page 13
Every 10 Hours Clean and re-oil air filter. Page 17
Every 25 Hours Check spark arrestor and clean. Page 22
Check spark plug condition and gap. Page 18
Every 50 Hours Inspect exhaust port and spark arrestor screen for clogging Page 22
or obstruction to assure maximum performance levels.
GENERAL RECOMMENDATIONS
WARNING: To prevent serious injury, never
perform maintenance on the unit while it is
running. Shut off the unit and allow it to cool
down before doing any maintenance.
Disconnect the spark plug wire to prevent the
Unit from starting.
The warranty on this line trimmer does not cover items
that have been subjected to operator abuse or
negligence. To receive full value from the warranty, the
operator must maintain the unit as instructed in this
operator's manua!.
These required maintenance procedures should be
performed at the frequency stated in the table. They
should also be included as part of any seasonal tune-up.
CHECK FOR DAMAGED/WORN PARTS
Inspect the unit for any worn or damaged parts. Repair
or replace damaged parts before operating.
CHECK FOR LOOSE FASTENER PARTS
• Cutting Attachment
• Assist Handle Hex Nuts/Screws
• Cutting Attachment Shield Screws
• Spark Plug Wire
CLEAN UNIT AND LABELS
• Clean the unit and label s using a damp cloth with a
mild detergent.
• Wipe off the unit with a clean dry cloth.
• Keep air vents free from debris at all times.
AIR FILTER MAINTENANCE
NOTE: Clean and re-oil the air filter every 10 hours of
operation. Your unit's air filter is one of the most
important areas to maintain. If it is not maintained, you
will VOID the warranty. Before cleaning, make sure the
unit is turned off.
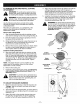
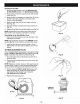
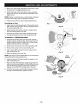
Removing the Air Filter/Muffler Cover
1. Place the choke lever in the PARTIAL choke position (B).
NOTE: The choke lever must be in the PARTIAL choke
position (B) (Fig. 23) to remove the air -'liter/muffler cover.
2. Remove the four (4) screws securing the air
filter/muffler cover (Fig. 23). Use a flat blade or
T-20 Torx bit screwdriver.
3. Pull the cover from the engine. Do not force.
Choke Lever
Partial Choke
O Position (B]
Screws _0_0_ Screws
Fig. 23
-17-