Operator’s Manual ® 2-Cycle WEEDWACKER® GAS TRIMMER Model No. 316.791890 with • SAFETY • ASSEMBLY • OPERATION • MAINTENANCE • PARTS LIST • ESPAÑOL, P. 13 CAUTION: Before using this product, read this manual and follow all safety rules and operating instructions. Sears, Roebuck and Co., Hoffman Estates, IL 60179, U.S.A. Visit our website: www.sears.
RULES FOR SAFE OPERATION SPARK ARRESTOR NOTE NOTE: For users on U.S. Forest Land and in the states of California, Maine, Oregon and Washington. All U.S.
RULES FOR SAFE OPERATION • Adjust the D-handle to your size in order to provide the best grip. • Be sure the cutting attachment is not in contact with anything before starting the unit. • Use the unit only in daylight or good artificial light. • Avoid accidental starting. Be in the starting position whenever pulling the starter rope. The operator and unit must be in a stable position while starting. Refer to Starting/Stopping Instructions (p. 6). • Use the right tool.
WARRANTY STATEMENT TWO YEAR FULL WARRANTY ON CRAFTSMAN GAS TRIMMER When used and maintained according to the operator’s manual, if this gas trimmer fails due to a defect in material or workmanship within two years from the date of purchase, return it to any Sears store, other Craftsman outlet, or Sears Parts & Repair Center in the United States for free repair (or replacement if repair proves impossible).
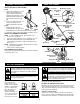
ASSEMBLY INSTRUCTIONS KNOW YOUR TRIMMER INSTALL AND ADJUST THE D-HANDLE Install 1. Place the D-handle down on to the shaft housing and the bottom clamp so that the handle slants toward the shaft grip (Fig. 1). Place handle and clamp a minimum of 6 inches from the end of the shaft grip. 2. Start screws with a flat-head or T25 Torx screwdriver. Do not tighten until handle is adjusted. Adjust 3. While holding the unit in the Fig. 2 operating position (Fig.
fuel and oil separate and leads to formation of acids during storage. When using alcohol-blended fuel, use fresh fuel. Using Blended Fuels If you choose to use a blended fuel, or its use is unavoidable, follow recommended precautions: • Always use the fresh fuel mix explained in the operator's manual • Always shake the fuel mix before fueling the unit • Drain the tank and run the engine dry before storing the unit NOTE: Dispose of the old fuel/oil mix in accordance to Federal, State and Local regulations.
OPERATING INSTRUCTIONS WARNING: Do not remove or alter the line cutting WARNING: To avoid serious personal injury and blade assembly. Excessive line length will make the clutch overheat. This may lead to serious personal injury or damage to the unit. damage to the unit, shut the unit off before removing or installing add-ons. 90˚ Edging Hole USING THE TWIST AND EDGE™ (Trimmer Only) FEATURE You can convert this unit to edge grass. Coupler 1. Make sure the unit is turned completely off. 2.
MAINTENANCE & REPAIR INSTRUCTIONS MAINTENANCE SCHEDULE 3. Wash the filter in detergent and water (Fig. 16). Rinse the filter thoroughly. Squeeze out excess water. Allow it to dry completely. 4. Apply enough clean SAE 30 oil to lightly coat the filter (Fig. 17). 5. Squeeze the filter to spread and remove excess oil (Fig. 18). 6. Replace the air filter inside the air filter/muffler cover (Fig. 15). WARNING: To prevent serious injury, never perform maintenance or repairs with unit running.
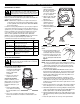
MAINTENANCE & REPAIR INSTRUCTIONS plate with the To Engine Spark Arrestor Slots “raised” side up Hood and the opening facing AWAY from the engine (Fig. 19). Verify that the exhaust will be Spark Arrestor directed AWAY Screw Muffler Tabs Screen from the engine. Fig. 19 8. Replace the screw you removed in Step 2 and tighten securely. 9. Reinstall the air filter/muffler cover (Fig. 14). REPLACING THE SPARK PLUG Use a Champion RDJ7Y spark plug or equivalent.
TROUBLESHOOTING PROBLEM SOLUTION ENGINE WILL NOT START Empty fuel tank Primer bulb wasn't pressed enough Engine is flooded Old or improperly mixed fuel Fouled spark plug Plugged spark arrestor The outside temperature is below 40º F The outside temperature is above 90º F Fill fuel tank with properly mixed fuel Press primer bulb fully and slowly 10 times Pull the starter rope Drain gas tank and add fresh fuel mixture Replace the spark plug Clean or replace spark arrestor Pull the starter rope up to 10-15 t
Convenios de Cobertura de Gastos para Reparaciones Felicidades por haber hecho una compra inteligente. Su nuevo producto Craftsman está diseñado y fabricado para que opere de manera confiable durante años. Pero como todos los productos, pudiera necesitar una reparación cada cierto tiempo. Por eso el tener un Convenio de Cobertura de Gastos para Reparaciones puede ahorrarle dinero y disgustos. Adquiera un Convenio de Cobertura de Gastos para Reparaciones ahora y protéjase de problemas y gastos inesperados.
NOTES 12
NORMAS PARA UNA OPERACION SEGURA PARACHISPAS NOTA: Para los usuarios en tierras forestales de los EE.UU. y en los estados de California, Maine, Oregon y Washington. Todos los terrenos forestales de los EE.UU.
NORMAS PARA UNA OPERACION SEGURA • IMPORTANTE INFORMACION DE SEGURIDAD • LEA TODAS LAS INSTRUCCIONES ANTES DE LA OPERACION • Lea todas las instrucciones con cuidado. Conozca bien los controles y el uso correcto de la unidad. • No opere esta unidad si está cansado, enfermo, o bajo los efectos del alcohol, drogas o medicamentos. • Los niños y los adolescentes menores de 15 años no deben operar las unidades, excepto por los adolescentes guiados por un adulto. • Inspeccione la unidad antes de utilizarla.
NORMAS PARA UNA OPERACION SEGURA • Apague siempre el motor cuando demore el corte o mientras camina entre zonas de corte. • Si golpea o se enreda con algún objeto extraño, apague el motor de inmediato y verifique si hay daños. Repare todos los daños antes de volver a intentar operar la unidad. No opere la unidad si tiene piezas flojas o dañadas. • Apague el motor para realizar todo el mantenimiento, reparaciones o cambio del accesorio de corte u otros accesorios.
NORMAS PARA UNA OPERACION SEGURA GARANTÍA LIMITADA POR DOS AÑOS EN EL RECORTADOR DE GASOLINA CRAFTSMAN Por dos años a partir de la fecha de compra, cuando se use y se dé mantenimiento a este Recortador según el manual del operador, Sears reparará cualquier defecto en material o mano de obra sin cargo alguno. Esta garantía excluye la bujía, el filtro de aire y la bolsa de la aspiradora, las cuales son piezas fungibles que se pueden gastar debido al uso normal en menos de dos años.
INSTRUCCIONES DE ENSAMBLE INSTRUCCIONES DE ENSAMBLAJE CONOZCA SU UNIDAD Tapa del combustible INSTALACIÓN Y AJUSTE DE LA MANIJA EN D Instalación 1. Coloque la manija en D por encima del bastidor del eje y sobre la abrazadera inferior (Fig. 1). Colóquela a un mínimo de 15,24 cm (6 pulgadas) desde el extremo del puño del eje.
INFORMACION DEL ACEITE Y DEL COMBUSTIBLE (éter). El combustible mezclado con alcohol absorbe agua. Una cantidad tan pequeña como el 1% de agua en el combustible puede causar la separación del combustible y el aceite. Forma ácidos cuando está almacenado. Cuando use combustible mezclado con alcohol, use combustible nuevo (de menos de 60 días). Uso de combustibles de mezcla un aditivo en el combustible que ayudará a inhibir la corrosión y a reducir la formación de depósitos de goma.
INSTRUCCIONES DE OPERACION COMO SOSTENER EL RECORTADOR través de los túneles de Línea contra posicionamiento (Fig. 9). el cubo 6. La línea que esté instalada correctamente Túnel de Posicionamiento tendrá la misma longitud en ambos lados. Fig. 9 NOTA: No apoye la perilla percuisva sobre el suelo mientras la unidad esté en funcionamiento.
INSTRUCCIONES DE OPERACION Instalación del accesorio de corte u otros accesorios NOTA: Para hacer la instalación más fácil, ponga la unidad en la tierra o en un banco de trabajo. 1. Cerciórese de que la unidad esté completamente apagada. 2. De vuelta a la perilla a la izquierda para aflojar el acoplador (Fig. 11). 3. Mientras que firmemente sostiene el accesorio, empújelo derecho en el acoplador hasta el botón liberador (Fig. 12) se encaja a presión hacia el agujero primario (Fig. 12).
INSTRUCCIONES DE MANTENIMIENTO Y REPARACION PROGRAMA DE MANTENIMIENTO Estos procedimientos requeridos para el mantenimiento deben ser realizados con la frecuencia indicada en la tabla. Deben ser incluidos como parte de toda puesta a punto de cada temporada. NOTA: Algunos procedimientos de mantenimiento podrían requerir herramientas o habilidades especiales. Si no está seguro de estos procedimientos, lleve su unidad a Sears o a otra agencia de servicio calificada. Llame al 1-800-4MY-HOME®.
INSTRUCCIONES DE MANTENIMIENTO Y REPARACION NOTA: Si opera la unidad sin el filtro de aire y el ensamble de la cubierta del silenciador / filtro de aire, su garantía quedará ANULADA. Reinstalación de la cubierta del silenciador/ filtro de aire 1. Coloque la cubierta del silenciador / filtro de aire sobre la parte posterior del carburador y del silenciador. Fig. 16 Alinee los orificios de los tornillos. 2. Inserte los cuatro (4) tornillos en los orificios de la cubierta del silenciador / filtro de aire (Fig.
INSTRUCCIONES DE MANTENIMIENTO Y REPARACION TRANSPORTE • Espere que el motor se enfríe antes de su transporte. • Drene el combustible de la unidad. • Ajuste la tapa del combustible antes del transporte. • Asegure la unidad durante su transporte. LIMPIEZA Si luego de verificar la mezcla del combustible y limpiar el filtro de aire el motor aún no funciona en mínima, ajuste el tornillo de velocidad lenta de la siguiente manera. 1.
RESOLUCION DE PROBLEMAS EL MOTOR NO ARRANCA CAUSA El tanque de combustible está vacío La bombilla de cebado no fue oprimida lo suficiente El motor está inundado El combustible es viejo o está mal mezclado La bujía de encendido está arruinada Parachispas obstruido La temperatura exterior es por debajo de 4º C (40º F) La temperatura exterior es de más de 32º C (90º F) ACCIÓN Llene el tanque con combustible bien mezclado Oprima la bombilla de cebado total de 10 veces Use el procedimiento de arranque Drene el
PARTS LIST ENGINE PARTS - MODEL 316.791890 2-CYCLE GAS TRIMMER 37 3 15 13 14 4 33 8 34 35 2 1 37 17 3 10 5 6 7 38 18 51 39 9 16 11 36 20 21 29 12 40 28 49 37 47 26 50 25 22 23 27 52 53 48 45 43 46 24 32 30 44 31 42 41 Item Part No.
PARTS LIST BOOM & TRIMMER PARTS - MODEL 316.791890 2-CYCLE GAS TRIMMER 5 8 1 9 4 7 2 3 1 6 11 10 14 13 12 15 Item Part No.
Convenios de Cobertura de Gastos para Reparaciones Felicidades por haber hecho una compra inteligente. Su nuevo producto Craftsman está diseñado y fabricado para que opere de manera confiable durante años. Pero como todos los productos, pudiera necesitar una reparación cada cierto tiempo. Por eso el tener un Convenio de Cobertura de Gastos para Reparaciones puede ahorrarle dinero y disgustos. Adquiera un Convenio de Cobertura de Gastos para Reparaciones ahora y protéjase de problemas y gastos inesperados.
Get it fixed, at your home or ours! Your Home For repair—in your home—of all major brand appliances, lawn and garden equipment, or heating and cooling systems, no matter who made it, no matter who sold it! For the replacement parts, accessories and owner’s manuals that you need to do-it-yourself. For Sears professional installation of home appliances and items like garage door openers and water heaters. 1–800–4–MY–HOME® (1–800–469–4663) Call anytime, day or night (U.S.A. and Canada) www.sears.com www.