Operator's Manual M UNIVERSAL CURVED-SHAFT TRIMMER ATTACHMENT Model No. 316.792520 o SAFETY o ASSEMBLY CAUTION: Before using this product, read this manual and follow all its Safety Rules and Operating instructions. Sears Brands Management o PARTS LIST o ESPANOL, R 15 Corporation, Visit our website: 769-07353 P00 o OPERATION Hoffman Estates, IL 60179 U.S.A. www.craftsrnan.
TABLEOFCONTENTS Safety............................................... 2 Warranty............................................. 5 KnowYourUnit........................................ 6 Specifications ......................................... 6 Assembly ............................................. 7 Operation ............................................. 9 Maintenance ......................................... 10 Cleaning andStorage.................................. 12 Troubleshooting .........................
• iMPORTANT SAFETY iNSTRUCTiONS READ ALL iNSTRUCTiONS BEFORE OPERATING SAFETY WARNINGS WARNING: WARNING: When using the unit, all safety rules must be followed. Please read these instructions before operating the unit in order to ensure the safety of the operator and any bystanders. Please keep these instructions for later use.
,i, Always hold the unit with both hands when operating. Keep a firm grip on both handles or grips. Do not overreach. Always keep proper footing and balance. Take extra care when working on steep slopes or inclines. Keep hands, face, and feet away from all moving parts. Do not touch or try to stop moving parts. Do not operate the unit faster than the speed needed to do the job. Do not run the unit at high speed when not in use. Use extreme caution when reversing or pulling the unit towards you.
CRAFTSMAN TWO YEAR FULL WARRANTY FOR TWO YEARS from the date of purchase, this product is warranted against any defects in material or workmanship. A defective product will be replaced free of charge. For warranty details to obtain free replacement, visit the web site: www.craftsman.com This warranty does not cover the cutting line, which is an expendable part that can wear out from normal use within the warranty period.
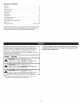
APPLiCATiONS Asatrimmer: • Cutting grassandlightweeds. Edging Decorative trimming around trees,fences, etc. NO ASSEMBLY TOOLS REQUIRED Hanger Shaft Housing Cutting Line Cutting Approximate Unit Weight (attachment only) .................................................................... Trimmer Mechanism ....................................................................................... Trimming Line Diameter ...........................................................................
iNSTALLiNG THE CUTTING HEAD SHIELD Cutting Head Shield _ operate the unitTowithout cuttingpersonal head shield place. WARNING: preventthe serious injury,innever Slot / ] Use the following instructions if the cutting head shield is not installed. Use only the instructions that apply to the type of shaft and shield equipped with this unit. 1. Remove the wing nut and washer from the cutting head shield.
OPERATING THE CONVERTIBLE TM COUPLER SYSTEM 90° Edging Hole | [__J damage to the unit, shut the unit off before removing or WARNING: To avoid serious personal injury and installing an attachment. NOTE: To make installing or removing the attachment the unit on the ground or on a work bench. installing 1 _ Only) | easier, place the Attachment NOTE: Remove the protective cap and gray spacer from the upper and lower shafts prior to assembling the attachment. 1.
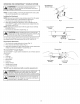
HOLDING THE TRIMMER body protection to reduce the risk of injury when operating| WARNING: Always wear eye, hearing, hand, foot and I this unit. J • Stand in the operating position (Fig. 6). Hold the shaft grip with the right hand. Keep the right arm slightly bent. Hold the handle with the left hand. Keep the left arm straight. Hold the unit at waist level. Keep the cutting head parallel to the ground so that it easily contacts the grass without the need for bending over. ADJUSTING THE TRiMMiNG Fig.
WARNING: To prevent serious injury, never perform maintenance or repairs while the unit is running. Always allow the unit to cool before servicing or repairing the unit. Prevent the unit from starting accidentally. For gaspowered units, disconnect the spark plug wire. For batterypowered units, remove the battery. For corded electric units, disconnect the unit from the power source.
Part 2 - Winding New Trimming Line onto the inner Reel = • A B If using single line, refer to Winding Single Line. If using split line, refer to Winding Split Line. If using a prewound inner reel, proceed to Part 3 - Installing the Inner Reel. Winding Single Line 1. Cut two 8-foot (2.4 m) lengths of new single trimming line. 2. Insert the end of one line into the top hole in the inner reel (Fig. 12A).
CLEANING STORAGE • _ the unit and allow it to cool before cleaning or maintaining theARNING: unit. To avoid serious personal injury, always stop J Use a small brush to clean the outside of the unit. Do not use strong detergents. Household cleaners that contain aromatic oils such as pine and lemon, and solvents such as kerosene, can damage plastic. Wipe off any moisture with a soft cloth. Never store a fueled unit where fumes may reach an open flame or spark. Allow the engine to cool before storing.
PROBLEM SOLUTION Thecuttingheadisboundwithgrass Clean thecuttinghead Theinnerreelisboundup Rewind theline Thelineiswelded Openthecuttingheadandremove thewelded section iiiiiiiiiiii_i/i/liiii_iiiiil_iiiiiiiiiiiiiiiiiiiiiiiiiiiiiiiiiiiiiiiii _ _iiiiiiiiiiii_ii[iiiiiii_ Notenough lineisextended Stop the unit, push the bump knob and pull the line until 4 inches (102 mm) is outside of the cutting head There isoil,cleaner orlubricant inthecuttinghead Clean and thoroughly dry the cutting head HELP? _
Congratulations on making a smart purchase. Your new Craftsman@ product is designed and manufactured for years of dependable operation. But like all products, it may require repair from time to time. That's when having a Repair Protection Agreement can save you money and aggravation.
Manual del Operador M ACCESORIO UNIVERSAL PARA RECORTADOR DE EJE CURVO Modelo No. 316.792520 o SEGURIDAD PRECAUCION: Antes de utilizar, este producto lea este manual y siga todas las reglas de seguridad e instrucciones de operaci6n. Sears Brands Management Corporation, Visite nuestro 769-07353 P00 o ENSAMBLAJE o OPERACION o LISTA DE PIEZAS Hoffman Estates, IL 60179 U.S.A. sitio web: www.craftsrnan.
TABLA DE CONTENIDO Seguridad ........................................... Garantia ............................................. Conozca su unidad .................................... 16 19 20 Especificaciones ...................................... Ensamblaje .......................................... Operaci6n ........................................... Mantenimiento ........................................ 20 21 23 24 Limpieza y almacenamiento .............................
• INSTRUCCIONES LEA TODAS LAS INSTRUCCIONES LA UNIDAD _ • DE SEGURIDAD ANTES DE OPERAR ADVERTENCIAS ELECTRICAS PARA LAS UNIDADES Para reducir el riesgo de descarga electrica, use s61o cables de extensi6n aprobados para uso en exteriores, como un cable de extensi6n con cable tipo SW-A, SOW-A, STW-A, STOW-A, SJW-A, SJOW-A, SJTWW o SJTOW-A. Puede adquirir cables de extensi6n en su distribuidor local. Use s61o cables de extensi6n de camisa cilindrica aprobados para su uso al exterior.
• Usepantalones largos y gruesos, botas,guantes y camisa de mangas largas. Nouseropaholgada, alhajas, pantalones cortos, sandalias niandedescalzo. Asegure sucabello por encima delniveldeloshombros. Elprotector delaccesorio delarecortadora debeestarsiempre ensusitiomientras seoperelaunidad. Nooperelaunidad sinlas doslineas decorteextendidas ylalineacorrecta instalada. No extienda lalineadecortemasaliadelaIongitud delprotector. Ajusteelmangoparafacilitar elmejoragarre.
GARANTiA TOTAL POR DOS ANOS CRAFTSMAN Este producto se garantiza POR DOS ANOS a partir de la fecha de compra, contra cualquier defecto de materiales o mano de obra. Un producto defectuoso sera sustituido sin cargo alguno. Para conocer los detalles de la cobertura a fin de obtener el reemplazo gratuito, visite el sitio web: www.craftsman.com Esta garantia no cubre la I{nea de corte, que es una pieza consumible que se desgasta debido al uso normal dentro del per{odo de garant{a.
usos Como recortadora: • Cortar cesped y malas hierbas escasas. Orillar (bordear) Hacer recortes decorativos alrededor de arboles, cercas, etc. NO SE REQUIERE DE HERRAMIENTAS PARA EL ENSAMBLAJE Asa para coJgar Cuerpo deJ eje Protector deJ cabezaJ de corte CabezaJ de corte CuchilJa Peso aproximado de la unidad (s61o el accesorio) ............................................................. Mecanismo de corte .......................................................................................
INSTALACI()N DEL PROTECTOR DEL CABEZAL DE CORTE Protector del cabezal de corte I_ graves, no opere nunca la unidad sin el protector del _ADVERTENClA: Para evitar lesiones personales cabezal de corte colocado. RanlLira Soporte de montaje S ] Si el protector del cabezal de corte no esta instalado, siga las instrucciones a continuaci6n. Siga solamente las instrucciones que correspondan al tipo de eje y protector con que esta equipada esta unidad. 1.
OPERAR EL SISTEMA DE ACOPLADOR CONVERTIBLE TM Orificio de 90 ° para bordeadora (solo recortadora) y dados a la unidad, apague la unidad antes de quitar o DVERTENClA: Para evitar lesiones personales grave 1 instalar cualquier accesorio. [_J NOTA: Para facilitar la instalaci6n o remoci6n de un accesorio, coloque la unidad sobre el suelo o sobre un banco de trabajo. Instalaci6n del accesorio NOTA: Para ensamblar el accesorio, quite la tapa protectora y el espaciador gris de los ejes superior e inferior.
SOSTENER LA RECORTADORA puesta protecci6n para los ojos, oidos, pies y cuerpo a fin ADVERTENCIA: AI lesiones. operar esta unidad, Ileve siempre de reducir el riesgo de • J Parese en la posici6n de operaci6n (Fig. 6). Sostenga la empufiadura del eje con la mano derecha. Mantenga el brazo derecho ligeramente flexionado. Sujete el mango con la mano izquierda. Mantenga el brazo izquierdo recto. Sujete la unidad a la altura de la cintura.
ADVERTENClA: Para evitar lesiones graves, no haga nunca ningQn mantenimiento ni reparaci6n con la unidad funcionando. Siempre deje que la unidad se enfrie antes de darle mantenimiento o repararla. Evite que la unidad arranque pot accidente. Para las unidades que funcionan con gasolina, desconecte el cable de la bujia. Para las unidades que funcionan con baterias, saque la bateria de la unidad. Para las unidades electricas con cable, desconecte la unidad de la fuente de alimentaci6n electrica.
Parte 2 - Enrollar la nueva I{nea de corte en el carrete interior = • A Si usa una sola linea, consulte Enrollar una Ifnea sola. Si usa una linea dividida, consulte Enrollar una Ifnea dividida. Si esta usando un carrete interior prebobinado, pase a la Parte 3 - Instalar el carrete interior. B Pared separadora Enrollar una linea sola 1. Corte aproximadamente linea de corte sola. 2. 8 pies (2.41 m) de largo de una nueva Inserte el extremo de la linea en el agujero superior del carrete interior (Fig.
LIMPIEZA ALMACENAMIENTO • _ apague siempre el motor y deje que se enfrie antes de DVERTENClA: Para evitar limpiar o dar mantenimiento a la lesiones unidad. personales graves, j Use un cepillo pequedo para limpiar la unidad pot fuera. No utilice detergentes fuertes. Los limpiadores caseros que contienen aceites esenciales, por ejemplo, de pino y lim6n, y los solventes como el queroseno, pueden dadar el plastico. Seque la humedad con un pado suave.
PROBLEMA SOLUCION El cabezal de corte esta atascado de hierba Limpie el cabezal de corte El carrete interior esta trabado Rebobine la linea La linea esta soldada Abra el cabezal de corte y quite la secci6n soldada No hay suficiente linea extendida Detenga la unidad, empuje la perilla percusiva y hale la linea hasta que 4 pulgadas (102 mm) esten fuera del cabezar de corte Hay aceite, limpiador o lubricante en el cabezal de corte Limpie y seque bien el cabezal de corte SITA AYUDA? _ BusqueenInte
Felicitaciones por haber hecho una compra inteligente. Su nuevo producto Craftsman@ fue dise_ado y fabricado con vistas a una operaci6n confiable por a_os. Pero como todos los productos, es posible que sea necesario repararlo alguna vez. Ahi es cuando tener un Convenio de Protecci6n de Reparacidn puede ahorrarle dinero y problemas.
REPLACEMENT PARTS - MODEL 316.792520 UNIVERSAL CURVED-SHAFT TRIMMER ATTACHMENT I item Part No. Description 1 2 3 753-04508 753-04282 753-04283 Lower Shaft Housing Assembly Shield Mounting Hardware Shield Assembly (includes 4) 4 5 6 791-180553 753-04284 791-610660 Blade Assembly Outer Spool Assembly (includes 6) Retainer 7 8 791-610317B 753-1155 Spring inner Reel 9 791-153066B Bump Knob Assembly * * 753-1156 791-180920 Reel & Line Assembly 0.
Your Home product manuals and expert advice: For troubleshooting, managemylife www.managernylife.com For repair - in your home - of all major brand appliances, lawn and garden equipment, or heating and cooling systems, no matter who made it, no matter who sold it! For the replacement parts, accessories and owner's manuals that you need to do-it-yourself. For Sears professional installation of home appliances and items like garage door openers and water heaters.