Operator's Manual 2-Cycle GAS BACKPACK BLOWER Model No. 316.794991 _TM UNBELIEVABLE with MAX S TA R TiN _ EA $ E_ FIRE'_ IGNITION'_ • SAFETY ASSEMBLY OPERATION MAINTENANCE PARTS LIST CAUTION: Before using this product, read this manual and follow all safety rules and operating instructions. Sears, Roebuck and Co., Hoffman Visit our website: Estates, IL 60179, U.S.A. www.sears.
Warranty Page 2 Operation Page Safety Rules Pages 3 - 7 Maintenance Pages 13 - 15 Oil and Fuel information Page 8 Troubleshooting Page 16 Assembly Page 9 Repair Parts Page 18 Pages 10 - 11 Spanish Pages 21 - 40 Starting / Stopping TWO YEAR instrustion LIMITED WARRANTY ON CRAFTSMAN GAS BACKPACK BLOWER For two years from the date of purchase, when this Blower is used and maintained according operator's manual, Sears will repair any defect in material or workmanship free of
Thepurposeof safetysymbolsis to attractyourattentionto possibledangers.Thesafetysymbols,andtheir explanations, deserveyourcarefulattentionandunderstanding.Thesafetywarningsdo notby themselves eliminateanydanger.Theinstructions or warningsthey givearenotsubstitutesforproperaccidentprevention measures. SYMBOL MEANING SAFETY ALERT: I SYMBOL ] DANGER: Failure to obey a safety warning will result in serious injury to yourself or to others.
WHILE OPERATING ® Never start or run the unit inside a closed room or building. Breathing exhaust fumes can kill. Operate this unit only in a well-ventilated outdoor area. • Wear safety glasses or goggles that are marked as meeting ANSI Z87.1 standards and are marked as such. Wear ear/hearing protection when operating this unit. • Do not operate the engine faster than the speed needed to do the job. Do not run the engine at high speed when not in use.
OTHER SAFETY WARNINGS ® Always disconnect the spark plug before performing maintenance or accessing movable parts. + Never store the unit, with fuel in the tank, inside a building where fumes may reach an open flame (pilot lights, etc.) or sparks (switches, electrical motors, etc.). ® Allow the engine to cool before storing or transporting. Be sure to secure the unit while transporting. + Store the unit in a dry place, secured, or at a height to prevent unauthorized use or damage.
SAFETY AND iNTERNATiONAL SYMBOLS This operator's manual describes safety and international symbols and pictographs that may appear on this product. Read the operator's manual for complete safety, assembly, operating and maintenance and repair information. SYMBOL MEANING SYMBOL MEANING • ON/OFF CONTROL Indicates ALERT danger, SYMBOL warning, or caution. ,, SAFETY May be used in conjunction with other symbols or pictographs.
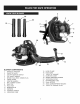
1 22 5 6 21 8 9 10 2O 11 18 14 17 BLOWER 1. 2. 3. 4. 5. 6. 7. 8. 9. 10. 11. 12. 13. 14. 16 15 24 COMPONENTS THROTTLE TRIGGER THROTTLE LOCK ON/OFF IGNITION SWITCH TOP ASSIST HANDLE SPARK PLUG WIRE / SPARK PLUG CHOKE LEVER STARTER HANDLE AIR CLEANER COVER FUEL CAP FUEL TANK PRIMER BULB HARNESS CONTROL HANDLE OPERATING TUBE 15. 16. 17. 18. 19. 20. 21. 22. 23. 24.
OiL AND FUEL MiXiNG iNSTRUCTiONS Old and/or improperly mixed fuel are the main reasons for the unit not running properly. Be sure to use fresh, (less than 60 days old) clean unleaded fuel. Follow the instructions carefully for the proper fuel/oil mixture. Definition of Blended Fuels Today's fuels are often a blend of gasoline and oxygenates such as ethanol, methanol, or MTBE (ether). Alcohol-blended fuel absorbs water.
ATTACH FLEX TUBE Put the hose clamp(C) on the flex tube before connecting the flex tube and the fan's outlet tube together. Connect the flex tube (B) to the fan's outlet tube (A) (Fig. 1) with a hose clamp (C) (Fig. 2) and tighten securely (Fig. 2). D B Fig, 3 Fig. 1 Fig. 4 THROTTLE LINKAGE CLIPS \ Fig, 2 ATTACH OPERATING TUBE NOTE: keep the throttle cable as straight as possible when connecting the blower tubes. 1. Place the unit on flat surface during assembly.
ATTACH iNTERMEDIATE CENTRATOR NOZZLE TUBE AND CON- ADJUST BACK PACK HARNESS CONTROL HANDLE 1. Connect the intermediate tube (H) and air nozzle (I). Push the tubes together and turn them clockwise so that they lock together. (Fig. 7) 2. 3. °O 0 . Place blower on your back by slipping arms through the shoulder straps as if you were putting on a jacket (Figure 8).
NOTE: The unit uses the INCREDt-PULL TM starting system with MAX FiRE IGNITION TM, which significantly reduces the effort required to start the engine. You must pull the starter rope out far enough to hear the engine attempt to start. There is no need to pull the rope briskly--there is no harsh resistance when pulling. Be aware that this starting method is vastly different from (and much easier than) what you may be used to. 4.
OPERATION BLOWER OPERATIONS 1. Use the blower for trees, shrubs, flower beds, and hard-to-clean areas. 2. Use the unit around buildings and for other normal cleaning procedures. 3. Use the blower around walls, overhangs, fences, and screens. Because of flying debris, always wear American National Standards Institute approved shielded safety glasses or face shield when operating blower.
MAINTENANCE SCHEDULE NOTE: Maintenance, replacement, or repair of the emission control devices and system may be perormed by a Sears or other qualified service dealer. Perform these required maintenance procedures at the frequency stated in the table. These procedures should also be a part of any seasonal tune-up. NOTE: Maintenance, replacement, or repair of the emission control devices and system may only be performed by a Sears or other qualified service dealer.
AiR FILTER 1. Completely remove fuel cap from fuel tank (B) to be able to remove fuel filter (C) from tank. Use a piece of wire (C) with a hook formed at the end to pull filter out of tank. (Figure 23) 2. Pull filter (D) off with a twisting motion. (Figure 24) 3. Replace fuel filter (D). (Figure 24) CAUTION: er without the airblowfilNEVER operate ter. The air filter must be kept clean. If it becomes damaged, install a new filter.
SPARK PLUG STORAGE 1. To remove spark plug (B) (Fig. 26) for cleaning or replacement: make sure engine is off, spark plug is cool, then grasp spark plug boot firmly and remove from spark plug. Remove spark plug with correct spark plug tool. Inspect, clean or replace as needed. 2. 3. 4. Failure to follow these steps may cause varnish to form in the carburetor which can cause difficult starting or permanent damage following storage. 1.
CAUSE 1. Incorrect starting procedures ACTION 1. Follow instructions in the Starting/Stopping 2. Incorrect carburetor mixture adjustment setting 2. Have carburetor adjusted by a Sears or other qualified service dealer 3. Fouled spark plug 3. Clean/gap or replace plug 4. Empty fuel tank 4. Fill fuel tank with properly mixed fuel 5. Primer bulb was not pressed enough 5. Press primer bulb fully and slowly 10 times CAUSE 1. Fuel filter is plugged ACTION 1. Replace the fuel filter section 2.
Engine Type ................................................................................................................................................. Air-Cooled, 2-Cycle Displacement ................................................................................................................................................. (30 cc) (1.83 cu in.) Idle Speed RPM ..........................................................................................................................................
I No. Parts No. Description No. Parts No. Descr_tion No. Parts No. Descri#tion 1 9295-310801 SPARK PLUG 31 9SGEB-05-52 SCREW 57 9WFZ-8.4-32 WASHER 2 9SGEB-05-10 SCREW 32 9228-334520 FILTERASS'Y 58 9NAC-08 NUT 3 4 5 9211-320601 9SRCB-05-22 9SXMBJ05-50 PLATE,SPARK SIDE SCREW SCREW 33 34 35 9287-334501 9014-334505 9SKKB-05-19 CARBURETOR CARBURETORGASKET SCREW 59 80 81 9038-320602 9SKKBY8/16-0.
EPA Emission Control Warranty Your Warranty Rights Statement and Obligations The U.S. Environmental Protection Agency (EPA) and the Sears are pleased to explain the emission control system warranty on your 2007 small off-road engine. In California, new small off-road engines must be designed, buiUt and equipped to meet the State's stringent anti-smog standards.
Repair Protection Agreements Congratulations on making a smart purchase. Your new Craftsman ® product is designed and manufactured for years of dependable operation. But like all products, it may require repair from time to time. That's when having a Repair Protection Agreement can save you money and aggravation. Purchase a Repair Protection Agreement now and protect yourseff from unexpected hassle and expense.
Manual del usuario 2 Tiempos SOPLADOR Modelo A GASOLINA DE MOCHILA N. 316.794991 TM UNBELIEVABLE STARTING EA SE TM Con MAXFIRE_IGNITI[3N '_ • SEGURIDAD ENSAMBLAJE FUNCIONAMIENTO MANTENIMIENTO LISTA DE COMPONENTES PRECAUCION: Antes de utilizar este producto, lea este manual y siga todas las reglas de seguridad e instrucciones de funcionamiento. Sears, Roebuck Visite and Co., Hoffman nuestra pagina Estates, IL 60179, U.S.A. web: www.sears.
Garantia Pagina 22 Funcionamiento Pagina 32 Reglas de seguridad Paginas 23-27 Mantenimiento Pagina 33 - 35 Informaci6n sobre Aceite y Combustible Pagina 28 Resolucion de Problemas Pagina 36 Ensamblaje Pagina 29 Reparacion de componentes Pagina 38 Instrucciones de Arranque/Parada DOS AltOS DE GARANTJA CRAFTSMAN Paginas 30-31 LIMITADA SOBRE EL SOPLADOR DE MOCHILA A GASOLINA Durante dos a_os desde la fecha de compra, siempre que se utilice y mantenga este Soplador segOn el manual del
El prop6sito de los simbolos de seguridad es atraer su atenci6n sobre posibles peligros. Los simbolos de seguridad y su explicaci6n merecen su atenci6n y comprensi6n. Las advertencias de seguridad no eliminan el peligro por s[ mismas. Las instrucciones o advertencias que ofrecen no son sustitutas de ninguna medida de prevenci6n de accidentes. S{MBOLO SIGNIFtCADO SIMBOLO pl_||__Dt_, si no se obedece una =--=,==,_,AI1_,!. advertencia pueden producirse danos personajes a usted o a terceros.
EN FUNCIONAMIENTO • Nunca arranque ni utilice la unidad en el interior de una habitaci6n o edificio cerrado. Respirar los vapores del tubo de escape pueden causar la muerte. Opere la unidad Onicamente en una zona exterior bien ventilada. • ® No coloque ningun ice si algun objeto unidad suciedades, que pueda reducir Utilice gafas de seguridad certificadas por la norma ANSI Z87.1 y etiquetadas como tales. Utilice protecci6n para los ojos y oidos al operar la unidad.
OTRAS PRECAUCJONES DE SEGURIDAD ,, Desconecte siempre la bujia antes de Ilevar a cabo el mantenimiento o acceder a componentes m6viles. • No guarde la unidad, con combustible en el tanque, en el interior de un edJficio donde los vapores puedan alcanzar una llama (D,mparas pilotos, etc.) o chispa (Jnterruptores, motores el6ctricos, etc.). • Deje que el motor se enfrfe antes de guardar o transportar. Asegurese de que la unidad este firme al transportarse.
SEGURIDAD Y S{MBOLOS INTERNACIONALES Este manual del usuario describe los simbolos de seguridad internacionales que pueden aparecer en este producto. Lea el manual del usuario para obtener informaci6n sobre seguridad, ensamblaje, funcionamiento y mantenimiento. S{MBOLO SINGIFICADO S{MBOLO SINGIFICADO • CONTROL ENCENDIDO/APAGADO ENCEN DIDO/INICIO/MARCHA Indica peligro, advertencia o precau• SiMBOLO ALERTA DE SEGURtDAD cidn. Puede utilizarse en conjunto con otros simbolos o pictogramas.
4 1 22 5 3 21 6 8 9 10 2O 11 18 14 17 COMPONENTES 16 15 24 DEL SOPLADOR 15. ABRAZADERA DE MANGUERA 16. TUBO FLEXIBLE 17. ENLACE DE ACELERADOR 18. CUBIERTA DE SlLENCIADOR 19, PANTALLA DE ASPIRADOR DE CHISPAS 20. PANEL POSTERIOR VENTILADO 21. TUBO INTERMEDIO 22. NOZZLE DE 56 mm. 23. NOZZLE CONCENTRADOR DE 45 mm. 24. CLIPS DE ENLACE DE ACELERADOR 1. GATILLO DE ACELERADOR 2. BLOQUEO DE ACELERADOR 3. CONMUTADOR DE ARRANQUE/PARADA 4. ASA DE AYUDA SUPERIOR 5. CABLE DE BUJiA / BUJIA 6.
MEZCLA DE GASOLINA Y ENGRASE Para conseguir Combustible: La gasolina vieja y/o mal mezclada son las principales rezones de que la unidad no funciona correctamente. Asegurese de utilizar gasolina fresca (menos de 60 dias) sin plomo. Siga las instrucciones para administrar la gasolina y el aceite correctamente. Definici6n de combustibles mezclados Correcta de Mezcle la proporci6n adecuada de aceite para motor de 2 tiempos con gasolina sin plomo en un recipiente separado.
CONEXION DEL TUBO FLEXIBLE Coloque la abrazadera de manguera (C) en el tubo flexible antes de conectar el tubo flexible y el tubo de salida de ventilaci6n. Conecte el tubo flexible (B) en el tubo de salida de ventilaci6n (A) (Fig. 1) con la abrazadera (C) (Fig. 2) y apri6telo con seguridad (Fig. 2) B D Fig. 3 Fig. 1 Fig. 4 CLIPS DE ENLACE DE ACELERADOR Fig. 2 CONEXION DE TUBO OPERATIVO NOTA: Mantenga en cable de aceleraci6n Io mAs recto posible al conectar los tubos de soplador. Fig. 5 1.
CONECTE INYECTOR EL TUBO INTERMEDIO CONCENTRADOR AJUSTE DEL ARNi_S JA DE CONTROL Y EL DE MOCHILA 1. Col6quese el soplador en la espalda deslizando los brazos a trav6s de las correas como si estuviera poniendo una chaqueta (Figura 8). Conecte el tubo intermedio (H) y el inyector de aire (I). Presione para conectar los tubos y girelos en el sentido de las agujas del reloj para bloquearlos en su lugar. (Fig. 7) 2.
NOTA: La unidad utiliza el sistema de arranque INCREDIPULL TM con MAX FIRE IGNITION TM, que reduce significativamente el esfuerzo necesado para arrancar el motor. Debe tirar de la cuerda de arranque Io suficiente para oir el intento de arranque. No es necesario tirar rb,pidamente de la cuerda -no encontrarb, resistencia al tirar. Tenga cuidado ya que este m@todo de arranque es muy diferente (y mucho mb,s sencillo) que los m@todos a los que podria estar acostumbrado. 4.
OPERACIONES DE SOPLADO INSTRUCCIONES 1. Utilice el soplador para &rboles, arbustos, flores y zonas de dificil limpieza. 2. Utilice la unidad en edificios y para otros procedimientos de limpieza normales. 3. Utilice el soplador en paredes, salientes, vallas y pantallas. Nacional Antes de utilizar su soplador, revise la secci6n Precauciones de Seguddad del Manual del Usuario, y todas las reguladones de funcionamiento de la unidad. Estas regulaciones y precauciones son para su propia protecci6n.
AGENDA DE MANTENIMIENTO NOTA: El mantenimiento, reemplazo o reparaci6n debe de los dispositivos de control debe ser realizado por Sears u otro personal cualificado. Lleve a cabo los procesos de mantenimiento necesarios con la frecuencia de la tabla. Estos procesos deben formar parte de la puesta a punto de temporada. ADVERTENClA: NOTA: El mantenimiento, reemplazo o reparaci6n de los dispositivos de control de emisiones debe ser realizado por el personal de Sears u otro personal cualificado.
FILTRO DE AIRE A FUtro de Combustible: " PRECAUCION: NUNCA utilice el soplador sin el 1. Quite completamente la tapa de combustible del tanque (B) para poder quitar el filtro de combustible (C) del tanque. Utilice un trozo de cable (C) con un gancho formado en su extremo para retirar el filtro del tanque (Figura 23) filtro de aire. El filtro de aire debe estar limpio. Si se da_a, instale uno nuevo. Para limpiar el Filtro de Aire: 1.
BUJ|A ALIVlACENAMIENTO 1. Para retirar la bujia (B) (Fig. 25) para limpiada o cambiarla: asegQrese de que el motor est& detenido y que la bujia est_ fria. Tire entonces firmemente de la bujia y refirela. Quite la bujia con la Ilave de bujia correcta. Inspeccione, limpie o cambie la bujia, segun Si no sigue las siguientes instrucciones pueden formarse dep6sitos en el carburador que pueden provocar dificultades al arrancar o dados permanentes. sea 1.
CAUSA 1.Proceso dearranque incorrecto 2.Ajusteincorrecto demezcla decombustible encarburador 3.Falloenla bujia 4.Tanque decombustible vacio 5.Lav&lvula principalnohasidopresionada ACCION 1.Sigalasinstrucciones delasecci6nArranque/Parada 2.Permita queundistribuidor deservicioSearsajusteel carburador desuunidad. 3.Limpie/separe o cambielabujia 4.Lleneeltanquedecombustible concombustible bien mezclado 5.Presione lav&lvulaprimaria lentamente 10veces ACCION CAUSA 1. Filtro de combustible 2.
Tipo de Motor ............................................................................................................................ Refrigerado por aire, 2 Tiempos Desplazamiento ............................................................................................................................................... (30 cc)(1,83 cu in.) Velocidad al ralenti RPM ....................................................................................................................................
_o io 72 ; Elemento N. Componenle 1 9295-310801 2 9SGEB-05-1O 3 9211-320601 4 9SRCB-05-22 5 9SXMBJO5-5O 6 9228-334503 7 9014-GP0102 8 9211-334501 9 9017-334501 10 9SGEB-O4-10 11 9017-334502 Deseri ci6n Elemenle N. Componenle Descri#ci6n N. Componenle Descripcidn BUJfA 31 9SGEB-05-52 TORNILLO 57 9WFZ-8.
Declaraci6n de Garantia Sus derechos de Control y obligaciones de Emisiones EPA de garantia La Agencia de Protecci6n medioambiental de los EE.UU. (EPA) y Sears se complacen de e×plicar la garantia de sistema de control de emisiones de su pequeSo motor todo terreno de 2007. En Califorma deben diseSarse, construirse y equiparse los motores todo terreno nuevos con un sistema de control de emisiones que cumpla con las normativas anti smog del Estado.
Acuerdo de Protecci6n de Reparaciones Le felicitamos por su compra inteligente. Su nuevo producto Craftsman® ha sido dise_ado y fabricado para durar aSos en funcionamiento. Pero como todos los productos, puede necesitar reparaciones de vez en cuando. Es el momento de que un Acuerdo de Protecci6n de Reparaciones le ahorre dinero y problemas. Compre un Acuerdo de Protecci6n de Reparaciones ahora y prot6jase de problemas y gastos inesperados.
Para reparaciones -en su domicilio- de electrodomesticos de marcas conocidas y equipamiento de jardin, o sistemas de calefacci6n o refrigeraci6n, no importa quien Io haya fabricado o quien se Io haya vendido. Para componentes de repuesto, accesorios y manuales de usuario que necesite para hacerlo usted mismo. Para instalaci6n de electrodom6sticos y otros elementos como puertas de garaje o calefactores de agua. 1-800-4-MY-HOME ® (1-800-469-4663) Llamea cualquier hora,de dia o de noche (EE.UU.
Your Home For repair- in your home -of all major brand appliances, lawn and garden equipment, or heating and cooling systems, no matter who made it, no matter who sold it! For the replacement parts, accessories and owner's manuals that you need to do-it-yourself. For Sears professional installation of home appliances and items like garage door openers and water heaters. 1-800-4-MY-HOME Call anytime, ® (1-800-469-4663) day or night (U.S.A. and Canada) www.sears.com www.sears.