
Instruction manual


ASSENBL¥ CONTINUED
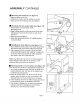
B Hounting the backstop (see figure 9)
l Align backstop with hole
2, Install lock washer and flat washer on screw
3 insert screw into backstop hole and tighten,
Mounting the belt sander table (see figure 10)
1, Insert washer on belt sander table
fastening screv¢.
ZAlign holding bracket index and screw hole with
indexing and screw hole located on side of the
belt bed,
3_Insert screw and tighten.
4_Slide table adjusting bracket on holding brackeL
Lock and adjust.
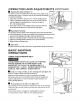
8la Installing the dust deflector (see figure I I)
1, Insert deflector index pins in the tracks located on
the side housing of the dust collecting assembly.
2. Slide upward to lock vertically, Li_ up and pull
downward allowing the dust collector to slide out
of the way when not needed or when using the
disc table at the end of the belt bed.
Note: Dust deflector can not be in vertical position
when using the disc table on the belt bed Dust
deflector must be lowered or removed,
IFastening sander to work surface (see figure 12)
1 ,To mount your sander in a permanent location such
as a sturdy workbench, bolt the base of sander to a
solid workbench top The base of the sander has 2
predrilled mounting holes,
2 Place the sander where you desire on the work
surface, marl( the holes on the work surface, drill
3/8 inch holes. Use bolts, washer; nuts to secure.
3. ff the workbench moves or shakes during operation,
the workbench must be fastened to the floor.
4.Your sander is designed to be used on horizontal
surfaces only. Motor damage may result when
mounted on a non-horizontal surface
Page l t
@
Fig. 9
Fig. i 0
Fig. It
¢
Fig. 12