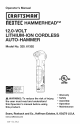
Operator's n Manual T HAMMERHEAD TM 12.0-VOLT LITHIUM-ION CORDLESS AUTO-HAMMER Model No. 320. 61352 Powered by an ENERGY STAR" quaJified battery charger for a better environment * Warranty WARNING: the user must this Operator's this product. To reduce the risk of injury, read and understand manual before using Sears, Roebuck www,craftsman,com IB-61352 and Co., Hoffman Estates, * Safety * Assembly * Operation * Maintenance IL 60179 U.S.A.
Warranty Page 2 Safety Symbols Page 3 Safety Instructions Pages 5-10 Description Pages 11-12 Assembly Page 12 Operation Pages 13-16 Maintenance Page 17 Troubleshooting Page 17 Exploded Pages 18-19 View and Parts List Sears Repair Parts Phone Number ONE YEAR FULL WARRANTY ON CRAFTSMAN® Back Cover TOOL If this Craftsman tool fails to give complete satisfaction within one year from the date of purchase, return it to any Sears store or parts & repair center or other craftsman outlet in th
The purpose of safety symbols is to attract you attention to possible dangers. The safety symbols, and the explanations with them, deserve your careful attention and understanding. The symbol warnings do not, by themselves, eliminate any danger. The instructions and warning they give are no substitutes for proper accident prevention measures.
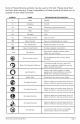
Some of these following symbols may be used on this tool. Please study them and learn their meaning. Proper interpretation of these symbols will allow you to operate the tool better and safer. SYMBOL NAME DESIGNATION/EXPLANATION V Volts Voltage A Amperes Current Hz Hertz Frequency W Watt Power min Minutes Alternating Direct no Class .../min Current Current Rotational Per Minute Read The Operator's Double-insulated at no load construction Alert Manual Do not expose locations.
GENERAL SAFETY RULES WARNING: Read and understand all instructions. Failure to follow all instructions listed below may result in electric shock, fire, and/or serious personal injury. The term "power tool" in all of the warnings listed below refer to corded power tools or battery-operated (cordless) power tools. READ AND SAVE THESE INSTRUCTIONS Know your Auto=Hammer. Read the operator's manual carefully.
Keep the Auto-Hammer dry, clean, and free from oil and grease. Always use a clean cloth when cleaning. Never use brake fluids, gasoline, petroleumbased products or any strong solvent to clean the hammer. Do not expose the Auto=Hammer to rain or wet conditions. entering the tool will increase the risk of electric shock. Water Do not overreach. Keep proper footing and balance at all times. This enables better control of the Auto-Hammer in unexpected situations. Do not use on a ladder or unstable support.
Use safety equipment. Always wear eye protection. Safety equipment, such as dust masks, non-skid safety shoes, hard hat and hearing protection, used for appropriate conditions will reduce personal injuries. Avoid accidental starting. Ensure that the switch is in the off position before plugging in. Carrying power tools with your finger on the switch or plugging in power tools that have the switch on invites accidents. Remove any adjusting key or wrench before turning the power tool on.
Disconnect the plug from the power source and/or the batter pack from the power tool before making any adjustments, changing accessories, or storing power tools. Such preventive safety measures reduce the risk of starting the power tool accidentally. Store idle power tools out of the reach of children and do not allow persons unfamiliar with the power tool or these instructions to operate the power tool. Power tools are dangerous in the hands of untrained users. Maintain power tools.
When the battery pack is not in use, keep it away from other metal objects, such as paper clips, coins, keys, nails screws or other small metal objects that can make a connection from one terminal to another. Shorting the battery terminals together may cause burns or a fire. Under abusive conditions, liquid may be ejected from the battery. Avoid contact, if contact accidentally occurs, flush with water. If liquid contacts eyes, additionally seek medical help.
SERVICE = Have your power tool identical replacement tool is maintained. • When = Follow serviced by a qualified repair person using only parts. This will ensure that the safety of the power servicing a power instructions tool, use only identical in the Maintenance unauthorized parts or failure to follow risk of shock or injury. SPECiFiC SAFETY section Maintenance RULES FOR CORDLESS replacement parts. of this manual.
KNOW YOUR HAMMER (Fig. 1) Fig. 1 Battery pack release button Battery pack Trigger switch Magnetic sleeve Hammerhead (recessed within magnetic PRODUCT SEPCIFICATION Clamp 7/16-in. Motor 12 Volt DC Hammer Weight (without battery) 1.1 Ibs Battery Type Lithium-Ion Battery Voltage 12.
HAMMERHEAD Fig. 2 The hammerhead nails automatically tool is turned on. Magnetic Sleeve impacts the when the Magnetic Sleeve MAGNETIC SLEEVE The magnetic sleeve holds the head of the inserted nail against the recessed hammerhead for the beginning of nail driving. The sleeve retracts at the end of nail driving to allow the hammerhead to drive the nail head flush to the workpiece. LED WORKMGHT The LED worklight, located on the front of the hammer, illuminates when the trigger switch is depressed.
LOW BATTERY CAPACITY iNDiCATOR • If the LED begins to rapidly flash when the trigger switch is depressed, the battery pack's power has run out, and the battery pack should be recharged. Unlike other battery pack types, Lithium-Ion battery packs deliver fade-free power for their entire run time. The tool will not experience a slow, gradual loss of power as you work. To signal that the battery pack is at the end of its run time and needs to be charged, power to the tool will drop quickly.
2. Make sure that the latch on the battery pack snaps into place and the battery pack is secured to the tool before beginning operation. TO DETACH ,_ CAUTION: BATTERY PACK (Fig. 3} Avoid the possibility not to activate the trigger adjustment to the tool. of accidental switch when attaching 1. Depress both battery-release buttons pack to release the battery pack. 2.
HAMMERING NAILS (Fig. 6) 1. Attach the battery pack to the Auto-Hammer. 2. Secure the material to Fig. 6 be nailed with clamps to keep it from turning when hammering. 3. Insert the head of the nail into the magnetic sleeve and up against the hammerhead, where it will be held in place by magnetism. Place the tip of the nail against the workpiece. 4.
Recommended Nails to Use The Auto-Hammer is versatile for use with a variety of nails. Nails with diameters less than 7/16-in and lengths equal to or less than 2-1/2 in. are recommended for use with this Auto-Hammer. Refer to below table for recommended NO. Nail Type nails to use with: Size Shank Diameter Head Diameter Length 1 Bright Common 4d 0.1" 1/4" 1 1/2-in 2 Bright Finish 6d 0.091" 9/64" 2-in 3 Bright Finish 4d 0.072" 7/64" 1 1/2-in 4 Coated 4d 0.
,_, WARNING: To avoid serious personal pack from the tool when cleaning WARNING: When servicing, injury, always remove the battery or performing any maintenance. use only identical Craftsman Use of any other parts may create a hazard or cause product WARNING: It is not recommended to use compressed replacement parts. damage. dry air to clean the Auto-Hammer.
12.0 VOLT LITHIUM-ION 320.61352 CORDLESS AUTO-HAMMER MODEL NUMBER The Model Number will be found on the Nameplate attached to the handle of the Auto-Hammer. Always mention the Model Number when ordering parts for this tool.
12.0 VOLT LITHIUM-ION 320.61352 CORDLESS AUTO-HAMMER MODEL NUMBER The Model Number will be found on the Nameplate attached to the handle of the Auto-Hammer. Always mention the Model Number when ordering parts for this tool.
Your Home For expert troubleshooting and home solutions advice: manage home www.managemyhome.