Owner's Manual mm_ CRFIFTSMFIN° DELUXE ROUTER PANTOGRAPH Model No. 335.25187 Caution: Before using this product, read this manual and follow all its Safety Rules and Operating Instructions. Sears, Roebuck P/N REV 4/00 15881 and Co.
Read and understand all instructions. Failure to follow all instructions listed below, may result in electric shock, fire and/or serious personal injury. SAVE THESE INSTRUCTIONS Work Area Personal Safety Keep your work area clean and well lit. Cluttered benches and dark areas invite accidents. Stay alert, watch what you are doing and use common sense when operating a power tool. Do not use tool while tired or under the influence of drugs, alcohol, or medication.
in the hands of untrained users. Service Maintain tools with care. Keep cutting tools sharp and clean. Properly maintained tools, with sharp cutting edges are less likely to bind and are easier to control. Any alteration or modification is a misuse and may result in a dangerous condition. Tool service must be performed only by qualified repair personnel. Service or maintenance performed by unqualified personnel could result in a risk of injury.
ASSEMBLY 1, REAR PIVOT Locate the REAR TUBE ASSEMBLY and remove the two PIVOT CAPS which are not holding a tube. With set of (3) HOLES up, place the end of the GUIDE ARM on REAR PIVOT, making sure LOCATING HOLE in tube is on PROJECTING PIN of pivot. Secure tube by replacing pivot cap and SCREWS. With set of (3) holes up, place the end of LEFT SIDE TUBE on the other PIVOT and secure as you did GUIDE ARM. (FIG. 1) REAR TUBE ASSEMBLY PROJECT,.G P'N/ LOCATING i HOLE _ _ ', / OU,DEA.
REAR SUPPORT 6. Screw a 3/8-16 HEX NUT on both of the REAR SUPPORT SCREWS. Assemble both screws through the REAR PIVOT BOLTS until the ball end protrudes 1/2", Snap SLIDE BUTTON on ball of screw which is on guide arm side, (FIG. 4) Snap HOLD DOWN SOCKET on ball of screw which is on left side. (FIG. 5) SCREWS OT BOLTS 7. This ROUTER PANTOGRAPH can be used for engraving designs, animals, signs and other flat work, also three dimensional wood sculpturing. These can be done on a workbench or table.
11. Adjust support screw on guide arm corner until guide arm is parallel. Now left side tube and guide arm are parallel to work bench. Secure in place with nut. 12. Square pantograph frame so corners are at 90 °. Fasten hold down socket to work surface through three holes. (Router bit is still on center of location to be engraved.) Secure work piece to work surface. Use wedges provided (FIG. 6) or C-clamps. 13.
MAKING SIGNS USING CAPITAL LETTERS "Modern Writing Style" 16. Locate stencil of first letter against inside fold of stencil cover and up against tack. (Locating each stencil the same results in straight work.) Be sure cutter bit is on center of work board when stylus is on center of stencil sheet. Rout first letter. Switch router off. Pick up handle bar and place stylus on SPACING DOT at right of stencil sheet, allowing bit cutter to rest on wood. (This properly spaces letters.
21. Remove stencil just routed and locate next stencil in place. (Leave bit cutter in groove.} 22. Loosen work piece and move work piece to felt until stylus is on STARTING POINT. Reclamp work piece. Switch router on and proceed. (Repeat until sign is completed.) __SHADED AREA OTHER FOUR STYLES 23. To rout a sign using "Old English", "Script", or "Far East" follow same method as capital letters of "Modern Writing", (Step 16-17-18) for set up and spacing between letters.
THREE DIMENSIONAL ENGRAVING 25. After selecting a pattern you will need a work piece thick enough to accept the engraving plus 1/4" to 1/2". (Redwood is very easy to rout.) Maximum pattern size you can use is 1 1/4" thick and 13" high by 24" long. PLASTER SUPPORT FINISHED WORK ENGRAVING SCREW \F 26. The 1/8" veining router bit is needed to get good detail in 3D routing. Install cutter leaving it above router base. (Veining bit has a spherical end.
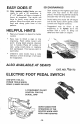
EASY DOES IT 3D ENGRAVINGS 30. After reading helpful hints you are ready to rout a 3D sculpture. A 6" x 6" pattern will take a couple of hours to complete. The stylus will have to touch every place on the pattern. Move the stylus with an even feed and along grain lines of the pattern. HELPFUL • HINTS Start routing at the highest point-and work your way down to the lower places, Avoid leaving tall thin sections because they will chip away easily.
For in-home major brand repair service: Call24 hours a day, 7 days a week 1-800-4-1VIY-HOME sM(1-800-469-4663) Para pedir servicio de reparaci6n a domicilio - 1-800-676-5811 In Canada for all your service and parts needs call -1-800-665-4455 Au Canada pour tout le service ou les pi_ces Forthe repair or replacement parisyou need: Call 6 am - 11 pm, 7 days a week PartsDirect sM 1-800-36B-PART (1-800-366-7278) Para ordenar piezas con entrega a domicilio - 1-800-659-7084 For the locationof a Sears Parts and