II IIIIIII Save This Manual For Future Reference Owner's Manual MODEL NO. 338.17920 338.17921 338.17922 338.17929 II ICR.FTS...I WET/DRY VACUUM Model Number The model number may be found on the nameplate. You should record the model number in a safe place for future use. _lb • • • • • Safety Assembly Operating Repair parts EspaSol p. 6 CAUTION: Before using this vacuum, read this manual and follow all its Safety Rules and Operating Instructions. Sears, Roebuck 87523-67 and Co.
Item • Do not put any object into openings. Do not use with any openings blocked; keep free of dust, lint, hair and anything that may reduce air flow. • Keep hair, loose clothing, fingers and all parts of body away from openings and moving parts. • Do not pick up anything that is burning or smoking, such as cigarettes, matches or hot ashes. • • • Do not use without dust bag and/or filters in place. Turn off all controls before unplugging. Use extra care when cleaning on stairs.
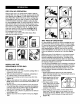
This appliance is for use on a nominal 120-volt circuit, and has a grounded plug that looks like the plug illustrated in sketch A. A temporary adapter that looks like the adapter illustrated in sketches B and C may be used to connect this plug to a 2-pole receptacle as shown in sketch B if a properly grounded outlet is not available. The temporary adapter should be used only until a properly grounded outlet (sketch A) can be installed by a qualified electrician.
DRY PICK-UP OPERATION With the tank cover in an upside down position, slide the cartridge filter down over the lid cage, pushing until the filter seals against cover (Figure 7). Foam sleeve will remain in place. Place filter retainer into the top of the cartridge filter, and holding the tank cover with one hand, turn the handle on the filter retainer clockwise to tighten, locking the filter into place (Figures 8 & 9).
EMPTYING LIQUID FROM THE TANK WASTE Your Craftsman Wet'Dry Vacuum can be emptied of liquid waste by removing the drain cap. To empty, turn unit off and remove plug from wall receptacle. Remove the drain cap, located on front of vacuum at bottom of tank, and deposit the liquid waste contents into a suitable drain. After the tank is empty, return the drain cap to its original position. To continue use, plug the cord into the wall receptacle and turn unit on. Model No. 17920 does not have a drain cap.
Artfculo Pdgina • Informaci6n sobra garantfa ...................... 6 Instrucciones de seguridad ...................... 6,7 Contenidos del cart6n desempaquetado ............ 7 Montaje .................................... 7 Funcionamiento .............................. 8 Almacenamiento .............................. 10 Soluci6n de problemas ......................... 10 Piezas de repuesto ......................
INSTRUCCIONES DE CONEXION A TIERRA Este aparato esta equipado con un cable que cuenta con un conductor a tierra para el equipo y un enchufe a tierra. Si por algOn motivo falla o se descompone, la conexi6n a tierra proporciona una vfa de menor resistencia para la corriente electrica reduciendo el riesgo de una descarga el_ctrica. El enchufe debe ser insertado en el tomacorriente adecuado que est_ debidamente instalado y conectado a tierra de acuerdo con todos los c6digos y reglamentos locales. motor.
trotornillos.Elmodelo17920 incluyes61o cuatroroldanas pivotantes. 6. Conlacubiertadeldep6sito extrafda, de vuelta el dep6sito de tal forma que el fondo est_ haciaarriba. 7. Inserte los soportes de las roldanas pivotantes en las ranuras y asegerelas con tornillos. (Figure 3). direcci6n contraria alas agujas del reloj para aflojarlo y quitarlo, a continuaci6n, deslice el filtro de cartucho fuera del alojamiento de la tapa (Figuras 10 y 11).
. 4, Sostenga el manguito bajo el agua corriente enjuag_.ndoIo desde el interior. No siempre se requiere un lavado con agua, dependiendo de la condici6n del manguito. Elimine el exceso de agua y seque el manguito con una toalla limpia El manguito de espuma est_ listo para ser reinstalado en el alojamiento de la tapa. NOTA: El fondo del manguito debe ser INSERTADO en la ranura entre el aiojamiento de la tapa y la tapa del dep6sito. (Figura 16).
S(ENTOMA Faltanpiezas/ aecesorios _1_ ADVERTENCIA: Utilice siempre protecciOnocular para prevenir el ingreso de piedrecillas o residues en los ojos o la cara, ya que podda sufrir lesiones graves. UNION DE LA ESCOBILLA UNA BOQUILLA DE GOMA P rdida de 1. Conexi n de la manguera floja. 2. P rdida de aire del motor de la tapa 3. P rdidade aire deldrenaje (no en lodes los modelos) 4. El filtro est atascado 5. El dep site est Ileno 6, La manguem Ueneun agujero 7.
Your Home For repair-in your home-of all major brand appliances, lawn and garden equipment, or heating and cooling systems, no matter who made it, no matter who sold it! For the replacement parts, accessories and owner's manuals that you need to do-it-yourself. For Sears professional installation of home appliances and items like garage door openers and water heaters. 1-800-4-MY-HOME ® (1-800-469-4663) Call anytime, day or night (U.S.A. and Canada) www.sears.com www.sears.