Instruction Manual I CRRFTSMRN°I 2.5 HP Motor ELECTRIC CHAIN Model No. 358.341141 SAW - 14 in. Bar • Safety • Assembly • Operation • Maintenance • Espa_ol ® & WARNING: Read and follow all Safety Rules and Operating Instructions before first use of this product. For answers Call 7 am-7 to your questions about this product: pm, Mon-Sat; Sun, 10 am-7 pm 1-800-235-5878 Sears, Roebuck 530088822 7/10/01 (Hours listed are Central Time) and Co., Hoffman Estates, IL 60179 U.S.A.
Warranty Safety Rules Assembly Operation Maintenance 2 2 6 7 11 Service and Adjustments 13 Storage 14 Troubleshooting Table 15 Spanish 16 Parts Ordering Back Cover FULL ONE YEAR WARRANTY ON CRAFTSMAN ELECTRIC CHAIN SAW If this Craftsman Electric Chain Saw fails to perform properly due to a defect in material or workmanship within (1) year from the date of purchase, Sears will repair or replace it, free of charge.
• Donotstartcutting untilyouhavea standers. UseonlyCraftsman accesclear workarea, secure footing, and sories andreplacement parts asrecespecially ifyouarefelling atree,a ommended. Never modify yoursaw. chain sawwithcare. retreat path.Keep work areaclean. • Maintain OPERATE YOUR SAW SAFELY • Keep unitsharp andclean forbetter • Donotoperate withonehand. Seri- andsaferperformance. instructions forlubricating and ousinjury totheoperator, helpers, or • Follow bystanders mayresult fromonechanging accessories.
plug. Iftheplugstilldoes notfit,obtain damaged, haverepaired byaSears Service Center. acorrect polarized extension cord. A AGAINST KICKBACK polarized extension cord willrequire GUARD all safety rules to help avoid kicktheuseofapolarized walloutlet. This Follow plugwillfitintothepolarized walloutlet back and other forces which can result onlyoneway. Ifplugdoes notfitfully in serious injury. Kickback Path intothewalloutlet, reverse theplug.
REDUCE THECHANCE OF MAINTAIN CONTROL KICKBACK • Recognize thatkickback canhappen. Stand to the left of the s_._ Withabasic understanding ofkickback, youcanreduce theelement of surprise which contributes toaccidents. Thumb on Y'_h_/_;_ underside / _'_ • Never letthemoving chain contact of handlebar _ \ anyobject atthetipoftheguide bar. • Keep working areafreefromobstructionssuchasother trees, branches, rocks, fences, stumps, etc.
worktogether togivebalance and resistance incontrolling thepivotof thesawbacktoward theoperator if kickback occurs. • Reduced-Kickback Guide Bar:designed withasmallradius tipwhich reduces thesizeofthekickback danger zoneonthebartip.Thistype barhasbeendemonstrated tosignificantly reduce thenumber andseriousness ofkickbacks when tested in accordance withANSIB175.1. .
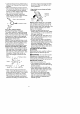
KNOW YOUR SAW READ THIS INSTRUCTION MANUAL AND SAFETY RULES BEFORE OPERATING YOUR CHAIN SAW. Compare the illustrations with your unit to familiarize yourself with the location of the various controls and adjustments. Save this manual for future reference. Oiler Actuator/ Bar Oil Cap Chain Adjustment Screw Lock-out Button ---. Chain Trigger Switch Power Cord TRIGGER SWITCH The TRIGGER SWITCH is used to turn on the unit.
BEFORE STARTING _ILWARNING: SAW Be sure to read the electrical safety information in the SAFETY RULES section of this manual before you begin. If you do not understand the electrical safety information do not attempt to use your unit. Seek help from someone that does understand the information or call the customer assistance help line at 1-800-235-5878. GUIDE BAR AND CHAIN OIL The bar and chain require lubrication. The manually-operated chain oiler provides lubrication to the chain and guide bar.
• Look fordecay androt.Ifthetrunkis rotted, itcansnap andfalltoward the operator. • Make surethereisenough room for thetreetofall.Maintain adistance of 2-1/2 treelengths fromthenearest person orother objects. Motor noise candrown outawarning call. • Remove dirt,stones, loose bark, nails, staples, andwirefromthetree where cutsaretobemade. _'_#e Plan aclear retreat path _, .... U_45° /,_ Direction ofFall FELLING LARGE TREES (6 inches in diameter or larger) The notch method is used to fell large trees.
BUCKING TECHNIQUES WARNING: Ifsawbecomes pinched orhunginalog,don'ttryto forceitout.Youcanlosecontrol ofthe saw,resulting ininjury and/or damage tothesaw.Stopthesaw;drive a wedge ofplastic orwood intocutuntil thesawcanberemoved easily. Restartsawandcarefully reenter thecut. Donotuseametal wedge. Donotattempt torestart yoursawwhen itis pinched orhunginalog. Use a wedge to remove pinched saw. • Roll the log over and finish with a second overcut. • Watch for logs with a compression side.
IMPORTANT POINTS PRUNING • Watch outforspringpoles. Spring- _IkWARNING: Limit pruning to limbs poles aresmall sizelimbs which can whiptoward youorpullyouoffbal- shoulder height or below. Do not cut if ance.Useextreme caution when branches are higher than your shoulcutting small sizelimbs. der. Get a professional to do the job. • Bealertforspringback fromany • Make your first cut 1/3 of the way branches thatarebentorunder through the bottom of the limb. This pressure.
NOTE: Itisnormal forasmall amount Adjusting Screw ofoiltoappear under thesawafter motor stops. Donotconfuse thiswitha leaking oiltank. • Trigger Switch - Ensure thetrigger switch functions properly bysqueezingandholding thetrigger switch. Make suremotor starts andstops. Check the tension by lifting the • OilTank- Discontinue useofchain chain from the guide bar. Remove sawifoiltankshows signs ofdamsome of the stiffness in the chain ageorleaks.
• Loosen andremove barmounting nuts.Remove bar,barclamp plate andchain fromsaw. • Clean theoilholes andbargroove aftereach 5hours ofoperation. Remove Sawdust From Guide Bar Groove burring of the rails occurs. If replacement is necessary, use only the guide bar specified for your saw in the repair parts list or on the decal located on the chain saw. LUBRICATION Bar Sprocket Bar Oil Fill Cap Sprocket Hole O, o,es • Add lubricant to sprocket hole after each use.
5, pin almost as far as it will go to the rear. Do not remove the adjusting screw from the unit. Hold chain with cutters facing as shown. clamp plate is toward the rear of bar. Adjusting Pin Slot Tip of Clamp Plate / Bar IP _ II Bar Nuts__/._'-'_ '' 8. Secure the guide bar and bar clamp plate with the bar nuts; tighten finger tight only. CAUTION: If saw chain is installed backwards, the saw will vibrate excessively and will not cut wood.
TROUBLESHOOTING TABLE WARNING: Always stopunitanddisconnect fromthepower source beforeperforming alloftherecommended remedies below except remedies thatrequire unittobeoperating. TROUBLE CAUSE REMEDY Chain does 1.Chain tension incorrect. 1. See "Check Chain Tension" in not move when trigger switch is engaged. Chain clatters or cuts roughly. 2. Guide bar rails pinched. 3. Trigger switch failure. 4. Circuit breaker tripped/ fuse failure. 1. Chain tension incorrect. 2. Cutters damaged. 3. Chain worn. 4.
Garantia Reglas deSeguridad Montaje Uso Mantenimiento 16 16 21 22 27 Servicio yAjustes 29 Almacenamiento 31 Tabla Diagn6stica 32 Repuestos yEncargosContratapa GARANTIA COMPLETA DEUNAI_O PARA LA SIERRA DE CADENA ELECTRICA DE LA MARCA CRAFTSMAN. Si esta Sierra de Cadena Electrica de la marca Craftsman dejara de funcionar apropiadamente debido a defectos en el material o mano de obra, dentro de un (1) aSo a partir de la fecha de compra, Sears la reparar& o repondr& gratuitamente.
conelcable deextensi6n. Todos los • Uselaherramienta correcta, corte t3nicamente. Nouselasierra espectadores deber&n mantenerse madera alejados porIomenos 10metros (30 demadera paraprop6sitos queno pies) delazona trabajo.
otrapieza queseencuentre daSada No cambie el enchufe de ninguna deber& serinspeccionada cuidado- forma. samente para determinar sipueden • Para reducir el riesgo de choque electrico, use cables de extensi6n esusarse deforma apropiada ypara vierificar sipuede efectuar elfuncio- pecificamente marcados como comnamiento paraelcueal fuedise_ada.
PROTEJASE CONTRA LAS RECULADAS Ud.debeseguir todas lasprecauclones einstrucciones deseguridad para ayudar aevitar lasreculadas y lasdem&s fuerzas quepueden causar graves heridas. Trayectoria delaReculada Evite las Obstrucciones A _1_ ADVERTENClA: Evite reculada le pueden causar graves heridas.
radeReculadas recomendadas parasusierra. EvitelaReculada porPresion: • Mantengase siempre altantode todasituaci6n uobstrucci6n que pueda apretar lacadena enlaparte superior delabarra odetener lacadenadecualquier forma. • Nocortem&sdeuntronco a lavez. • AIseccionar troncos concorteascendiente, notuerza lasierraalsacarlavarradelcorte. Evite la Impulsion: • Siempre empiece a cortar con el motor acelerado a fondo y la caja de la sierra apoyada en el madera.
rasdeCadena aGasolina) enprue- quehacen usocontinuo y basconunamuestra representativaprolongando delasherramientas de deben fiscalizar atentamente su deSierras decadena condesplaza-fuerza miento demenos de3,8pulgadas, estado fisicoyelestado delaparato. DEDOBLE como seespecifica enANSI B175.1. CONSTRUCClON Cadena Minimizadora deReculadas AISLAMIENTO aparato tiene undoble aislamiento Marcador deProfundidad PerfiladoEste ayudar aproteger elmismo en ...........
CONOZCA SUAPARATO LEA ESTE MANUAL DEINSTRUCCIONES YLAS REGLAS DESEGURIDAD ANTES DE USAR LASIERRA DECADENA. Compare lasilustraciones consuaparato para faniliarizarse conlaubicaci6n delosvarios controles yajustes. Guarde este manual parausofuturo. Lubricador/Tapa del Tanque de Aceite de Barra Tornillo de Ajuste de la Cadena Bot6n de la Traba --.
ATEELCABLE DEEXTENSION AL APARATO Asegure lacabledeextensi6n esconectados alcable delaparato electrico segQn Ioilustracion paraprevenir la desconexi6n deaparato. Cable del Aparato ANTES DE PONER EN MARCHA _ILADVERTENClA: EL MOTOR Lea toda la in- formaci6n sobre la seguridad eletrica en la secci6n de REGLAS DE SEGURIDAD de este manual antes de comenzar. Si no comprende la informaci6n o Ilame al telefono de ayuda al consumidor al 1-800-235-5878.
• Detenga elmotor antes deapoyar la sierra alfinalizar uncorte. TECNICAS PARA TUMBAR ARBOLES alambre que pueda haber en el &rbol en el lugar del corte. Planifique una ruta predeterminada y despejada de retroceso x_, x _'o,_ _ILADVERTENClA: Vea que no haya ramas rotas o muertas que podrian caerle encima mientras corta, causando heridas graves.
unabisagra. Esta bisagra ayudar& a evitar queel&rbol ciagaenladirecci6nequivocada. La bisagra sostiene el arbol en el toc6n y ayuda a controlar la calda. Abertura del corte de caida / j Cerradura de muesoa usted corta, ni sostenga el tronco con la piema o el pie. • No corte en lugares donde hays troncos, amas y raices entrelazadas. Arrastre los troncos hasta un lugar despejado antes de corarlos, empezando por los troncos expuenstos y la retirados.
donde lapresi6n delpeso deltronco seconcentra. Primer corte dellado deltronco bajo compresi6n ....... Primer Corte SecgUr_d °_/_ Sequndo corte PARA CORTAR ..j-Segundo corte Y PODAR ,_ILADVERTENCIA: Este alerta y tenga cuidado con los reculada. Cuando cortar ramas y podar, nunca permita que la cadena en movimiento toque ningQn objeto en la punta de la barra guia. Permitir tal contacto puede causar graves heridas.
PRUNING _KADVERTENClA: • Finalice la maniobra de podar dando un cote de manera que el toc6n de la rama sobresalga de 3 a 5 cm (1 a 2 pulgadas) desde el tronco del &rbol. Pode 5nica- mente las ramas que se encuentren a la altura del hombro o m&s abajo. No corte las ramas que se encuentren m&s arriba de sus hombros. Busque una persona profesional para que efectue este tipo de trabajo. • Haga el primer corte en forma ascendiente atravesando 1/3 del di&metro de la rama.
Tornillo de Ajuste motor seponga enmarcha ysedetenga. • Tanque deAceite - Deje deusarla sierra decadena sihayseSales de daSos ofugas eneltanque delaceite. • Cable deAparato - Dejedeusarde lasierra decadena sihayseSales dequeesteseencuentra daSado o 5. Levante la cadena de gastado. para verificar la tensidn la barra guia de la misma. Para eliminar alguna de la rigidez de la cadena, tire de la cadena hacia abajo y luego sueltela. Repita esto varias veces.
rieles. Si es necesario cambiar la barPara mantener labarra guia: • Desconecte lasierra decadena del ra, use exclusivamente la barra guia recurso deenergia. especificada para su sierra en la lista • Afloje yretire lastuercas delabarra. de repuestos, especificada tambien en Retire labarra, laplaca delaabrazad-la calcomania de repuesto de barra y eraylacadena delaparato. cadena que se encuentran en la sier• Limpie losorificios delaceite y elra- ra.
PARA REEMPLAZAR LACADENA: 1. Desconecte lasierra decadena del recurso deenergia. 2. Ponga el aparato boca arriba en una 7, superficie plana. Estire la cadena y luego p6ngala en una superficie plaha. Sostenga la barra guia en contra del marco de la sierra e instale la placa de la abrazadera de la barra.
_ADVERTENCIA: Realice lossiguientes pasos despues decada uso: • Dejequeelmotor seenfrie y fije bienelaparato antes deguardarlo o transportarlo. • Guarde lasierra yelcable deextensi6nenunlugarbienventilado. • Guarde elaparato contodos losprotectores ensulugar ycoloque elaparatodemodo quelaspiezas confilo nopuedan causat heridas poraccidente. • Guarde elaparato enunlugar seguroycompletamente fueradelalcance delosnifios. ESTAClONAL ALMACENAJE Prepare elaparato alfinaldelatemporadaosinoIovaausarpor30diaso m&s.
TABLA DIAGNOSTICA ADVERTENCIA: Siempre apague el aparato y desconecte del recurso de energia antes de hacer cualquiera de las reparaciones recomendadas a continuaci6n excepto reparaciones que requieran que el aparato funcionar. PROMBLEMA La cadena no se mueve al oprimir el interruptor en forma de gatillo. La cadena golpetea o co_a desparejo. CAUSA 1. La cadena est& incorrectamente tensionada. 2. Los deles de la barra est_.n apretados. 3. Falla en el interruptor en forma de gatillo. 4.