
Instruction manual


IMPORTANTPOINTS TO REMEMBER
When pulling the starter rope, do not
use the full extent of the rope as this
can cause the rope to break. Do not
let starter rope snap back. Hoid the
handte and let the rope rewind slowly.
For cold weather starting, start the unit
at FULL CHOKE; a!low the engine to
warm up before squeezing the throttle
trigger.
NOTE: Do not cut material with the
choke/fast idle lever at the FULL
CHOKE position.
STARTING A COLD ENGINE (or a
warm engine after running out of
fuel)
NOTE: In the following steps, when
the choke/fast idle lever is pulled out to
the full extent, the correct throttle set-
ting for starting is set automatically.
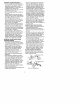
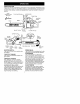
ON/STOP SWITCH
(SIDE VIEW)
_ ON
STOP
1. Move ON/STOP switch to the ON
position.
2. Pull choke/fast idle lever out to the
full extent (to the FULL CHOKE posi-
tion).
3. Slowly press primer bulb 6 times.
4. Pull the starter rope quickly with
your right hand 5 times. Then, pro-
ceed to the next step.
NOTE: If the engine sounds as if it is
trying to start before the 5th pull, stop
pulling and immediately proceed to the
next step.
5. Push the choke/fast idle lever in to
the HALF CHOKE position.
CHOKE/FAST IDLE LEVER
o_,lEW)
I I
Ch It
fast idle lever OFF HALF FULL
6. Pull the starter rope quickly with
your right hand until the engine
starts.
7. Allow the engine to run for approxi-
mately 5 seconds. Then, squeeze
and release throttle trigger to allow
engine to return to idle speed.
STARTING A WARM ENGINE
1. Move ON/STOP switch to the ON
position.
2. Pull the choke/fast idle lever out to
the HALF CHOKE position.
3. Slowly press primer bulb 6 times.
4. Pull the starter rope quickly with
your right hand until the engine
starts.
5. Squeeze and release throttle trig-
ger, allowing engine to return to
idle speed.
DIFFICULT STARTING (or starting a
flooded engine)
The engine may be flooded if it has not
started after 10 pulls.
Flooded engines can be cleared of ex-
cess fuel by pushing the choke/fast
idle lever in completeiy (to the OFF
CHOKE position) and then following the
warm engine starting procedure listed
above. Ensure the ON/STOP switch is
in the ON position.
Starting could require many pulls de-
pending on how badly the unit is
flooded. If engine still fails to start, refer
to the TROUBLESHOOTING TABLE or
call 1-800-235-5878.
CHAIN BRAKE
z% _____=__
*_IbWARNING: Ifthe brake band is
worn too thin it may break when the
chain brake is triggered. With a broken
brake band, the chain brake will not stop
the chain. The chain brake must be re-
placed if any part is worn to less than
0.020 inch (0.5 mm) thick. Repairs on a
chain brake should be made by your
Sears Service Center. Take your unit to
the place of purchase or to the nearest
Sears Service Center.
• This saw is equipped with a chain
brake. The brake is designed to stop
the chain if kickback occurs.
• The inertia-activated chain brake is
activated if the front hand guard is
pushed forward, either manually (by
hand) or automatically (by sudden
movement).
• If the brake is already activated, it is
disengaged by pulling the front hand
guard back toward the front handle
as far as possibie.
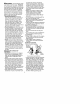
• When cutting with the saw, the chain
brake must be disengaged.
Disengaged