Instruction Manual I CRRFTSlVlRN°I 5.5 Amp Motor 17 Inch Cutting Path/0.080 In. Line ELECTRIC WEEDWACKER ® Model No. 358.745170 • • • • Safety Assembly Operation Maintenance • Espa_ol ® Read and follow all Safety Rules and Operating WARNING: Instructions before first use of this product. _) • Sears, 530088998 For to your questions this product: Call answers 7 am-7 pm, Mon-Sat; Sun,about 10 am-7 pm 1-800-235-5878 Roebuck I/9/03 <.ou,slisted are CentraI Time) and Co.
Limited Warranty Statement Safety Rules Assembly Operation Maintenance Service & Adjustments 2 2 4 5 7 8 Parts Available Storage Troubleshooting 8 9 9 Table Spanish Parts Ordering 10 Back Cover FULL ONE YEAR WARRANTY ON CRAFTSMAN ELECTRIC WEEDWACKER ® LINE TRIMMER If this Craftsman Electric Weedwacker ® Line Trimmer fails to perform properly due to a defect in material or workmanship within (1) one year from the date of purchase, Sears will replace it free of charge, This warranty does not cover the
faceordustmaskifoperation is dusty. Always wearheavy, long pants,longsleeves, boots,and gloves. Donotgobarefoot orwear sandals. • Secure hairaboveshoulder length. Secure orremove looseclothing andjewelryorclothing withloosely hanging ties,straps, tassels, etc. Theycanbecaught inmoving parts. • Beingfullycovered alsohelpsprotectyoufromdebrisandpieces of toxicplants thrownbyspinning line. • StayAlert.Donotoperate unit whenyou aretired,ill,upset,orunderinfluence ofalcohol, drugs,or medication.
• Use only 0.080 inch (2 ram) diameter recommended trimmer line (see SERVICE AND ADJUSTMENTS). Never use wire, rope, string etc. • Use specified trimmer spool. Make sure spool is properly installed and the cover is securely fastened. • Use only Craftsman replacement parts and accessories as recommended. CUTTING SAFETY • Inspect area to be cut. Remove objects (rocks, broken glass, nails, wire, string, etc.) which can be thrown or become entangled in cutting head.
ASSEMBLY ATTACHING THE SHIELD _ WARNING: If received assembled, review all assembly steps to ensure your unit is properly assembled and all fasteners are secure. ATTACHING THE ASSIST HANDLE _ WARNING: The shield must be properly installed. The shield provides partial protection from the risk of thrown objects to the operator and others. Your unit is equipped with a line limiter blade, which cuts excess line to the proper length while running.
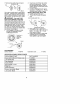
ADVANCING THE CUTTING LINE OPERATING INSTRUCTIONS Use only a voltage supply as specified on your unit. SELECT AN EXTENSION CORD Extension Length The cutting head advances line automatically. Do not tap head on the ground to advance line. This may break parts and cause cutting head to malfunction. Upon unit start up, the line will advance automatically to the correct cutting path length. Always keep the shield in place when the tool is being operated. Cord Gauge Chart of Cord 25 Ft. (7.5 m) 50 Ft.
MOWING - Your trimmer is ideal for mowing in places conventional lawn mowers cannot reach. In the mowing position, keep the line parallel to the ground. Avoid pressing the head into the ground as this can scalp the ground and damage the tool. Mowing CUSTOMER ,_ SWEEPING - The fanning action of the rotating line can be used for a quick and easy clean up. Keep the line parallel to and above the surfaces being swept and move the tool from side to side.
• Remove lineguideringandspool. 2. Insert one end of line into center cavity of empty spool. Ensure line will feed into spool in the direction shown on the spool (counterclockwise). 3. Continue feeding line into spool, leaving 4 - 6 inches (10 - 15 cm) unwound from center of spool. INSTALLING SPOOL WITH LINE 1. Install replacement spool. 2. Thread line through line guide ring. Useapre-wound spoolorrefillspool withline.If usingapre-wound spool, remove tapestripfromlineand spool.
• Store unit and extension cord indoors in a high, dry place out of the reach of children. Store unit un- _ WARNING: Perform the following steps after each use. • Stop the unit and disconnect the power source when not in use. • Carry the unit with motor stopped. • Store the unit so the line limiter blade cannot cause injury. TROUBLESHOOTING ,_ • plugged. Store unit with all guards in place. Position unit so that any sharp object cannot accidentally cause injury.
Declaraci6n de Garantia Limitadal0 Reglas de Seguridad 10 Montaje 13 Us® 14 Mantenimiento 16 Servicio y Ajustes Piezas de Repuesto AImacenamiento Tabla Diagn6stica Piezas y Encargos 16 17 18 18 Contratapa GARANTIA COMPLETA DE UN A_IO PARA LA CORTADORA A BNEA ELECTRICO CRAFTSMANe Siesta Cortadora EI6ctrica Weedwacker ® Craftsman tiene aiguna faila de funcionamiento debida a materiales omano de obra, durante un aSo a partir de la fecha de compra, Sears la repondr_ gratuitamente, Esta garantia excluye la li
SEGURIDAD DEL USUARIO • Vitese de forma apropiada, Siempre use anteojos de seguridad o protecci6n de ojos similar al hacer uso o mantenimiento del aparato. uExisten anteojos de seguridad.) se siempre m_scara protectora de la cara o m_scara anti-polvo al user el aparato en ambientea polvorientos. Use siempre pantalones largos gruesos, mangas largas, botas y guantes. No use el aparato descalzo ni con sandalias. • Mantenga el cabello por encima de los hombros, at_ndolo para tal efecto si es necesario.
Autorizado (Authorized Service Dealer) deber_ hacertodaslasreparaciones alinterruptor. • Mantenga el cable de extensi6n alejado del usuario y de los obst_culos en todo momento. No exponga los cables al calor, al aceite. al agua o a los bordes filosos. • Evite todo contacto del cuerpo con los conductores a tierra, tales como las cercas o los caSos de metal para evitar la posibilidad de choque el6ctrico.
Las herramientas y los electrodom6sticos con aislamiento doble no necesitan cable a tierra. No se le ha provisto ningtJn medio de conexiSn a tierra a este aparato, tampcco se le debe agregar ning0n medio de conexiSn a tierra. Como resultado, el cable de extensi6n usado con su aparato puede ser enchufado en cualquier tomacorriente el6ctrico normal de 120 voltios. Deben observarse precauciones de seguridad al trabajar con toda herramienta el6ctrica.
CONOZCA SU APARATO LEA ESTE MANUAL DE INSTRUCCIONES Y LAS REGLAS DE SEGURIDAD ANTES DE PONER EL APARATO EN FUNCIONAMIENTO. Compare las ilustraciones a su aparato para familiarizarse con la ubicaci6n de los controles y ajustes. Guarde este manual para uso futuro. Cabezal con Linea de0C_rtd_dpell?_metr° Caja del Manija Auxi ' ro ector Motor -_.
• Usando anteojos de seguridad y ropa gruesa como protecci6n. • Sostenga la mania del gatillo interruptor con la mano derecha y manija auxiliar con la mano izquierda. • Mantenga el aparato debajo delni ..... vel de la cintura. • Corte desde la derecha hacia la izquierda para que los escombros sean arrojados en direcci6n contraria a donde est_ parado. Sin tener que inclinarse, mantenga la linea cerca del suelo y paralela al mismo, sin meterla dentro del material que se est_ cortando.
PARA BARRER - Se puede usar la acci6n ventiladora de la linea girante para barrer r_pida y f_dlmente un _rea determinada. Mantenga la Ifnea paralela al suelo directamente encima de las superficies que se quiera barrer ymeuva el aparato de un lado al otro r_pidamente. CRONOGRAMA Para Barrer _- DE MANTENIMIENTO ,_ ADVERTENCIA: Deseoneete del recurso de energia antes de dar mantenimiento a eete aparato.
Bobina Utilice una bobina previamente enrol]ada o vuelva a enroscar linea nueva en la bobina existente. Si utiliza una bobina pre-enrollada, retire la tira adhesiva de la linea y la bobina. COMO REBOBINAR LA BOBINA CON LINEA NUEVA ]ntroduzca un extremo de la linea dentro de la cavidad central de la bobina vacia. Asegt]rese de que la linea enrolle en la bobina en la direcci6n que se ilustra en la misma (en sentido contrario al de las agujas del reloj). 3.
• Guarde el aparato y el cable de extensi6n a] abrigo de la intemperie. desenchufados, en un lugar alto, seco y fuera del alcance de los nif_os. • Guarde el aparato con todos los protectores en su lugar correspondiente. Cologue el aparato de modo que ning0n objeto filoso pueda causer heridas accidentalmente. _ADVERTENCIA: Realice los siguientes pasosdespu6s decada uso: • Pareelmotorydesconecte elaparatodelacorriente el6ctrica siempre quenoest6enuso.