Instruction Manual 4.0 Amp Motor 13 Inch Cutting Path/0.065 ELECTRIC In. Line WEEDWACKER ® Model No. 358,745230 • • • • Safety Assembly Operation Maintenance • Espafiol ® Read and follow all Safety Rules and Operating WARNING: Instructions before first use of this product. i_ • Sears, 530088342 For to your questions about pm, this Sun product: Call answers 7 am-7 pm, Mon-Sat; 10 am-7 1-800-235-5878 Roebuck 1/11/02 (Hours listed are Central Time) and Co., Hoffman Estates, IL 60179 U.S.A.
Warranty Statement Safety Rules Assembly Operation Maintenance Service & Adjustments FULL ONE YEAR WARRANTY LINE TRIMMER 2 2 5 6 8 9 Parts Available Storage Troubleshooting Table Spanish Parts Ordering ON CRAFTSMAN 9 9 10 11 Back Cover ELECTRIC WEEDWACKER ® If this Craftsman Electric Weedwacker _ Line Trimmer falls to perform properly due to a defect in material or workmanship within (1) one year from the date of purchase, Sears will replace it free of charge.
glasses are available.) Always wear face or dust mask if operation is dusty. Always wear heavy, long pants, long sleeves, boots, and gloves. Do not go barefoot or wear sandals. • Secure hair above shoulder length. Secure or remove loose clothing and jewelry or clothing with loosely hanging ties, straps, tassels, etc. They can be caught in moving parts. • Being fully covered also helps protect you from debris and pieces of toxic plants thrown by spinning line. • Stay Alert.
TRANSPORTING AND STORAGE • Stop the unit and disconnect the power source when not in use. • Carry the unit with motor stopped. • Store the unit so the line limiter blade (on underside of shield) cannot cause injury. • Store unit indoors in a high, dry place out of the reach of children. Store unit unplugged. • Do not hang unit so that the trigger switch is depressed. DOUBLE INSULATION CONSTRUCTION This unit is double insulated to help protect against electric shock.
CARTON CONTENTS Check carton contents against the followinglist. Model 358.745230 • Trimmer • Shield • Cutting line dispenser with extra line Examine parts for damage. Do not use damaged parts. NOTE: If you need assistance or find parts missing or damaged, call 1-800-235-5878. ASSEMBLY ATTACHING THE SHIELD WARNING: The shield must be properly installed. The shield provides partial protection from the risk of thrown objects to the operator and others.
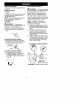
KNOW YOUR TRIMMER READ THIS INSTRUCTION MANUAL AND SAFETY RULES BEFORE OPERATING YOUR UNIT. Compare the illustrations with your unit to familiarize yourself with the location of the various controls and adjustments. Save this manual for future reference. Recessed Plug Assist Handle Cord Retainer Trigger Switch Button Motor Housing J Edge Guide Air Vents P/ Semi-automatic . Head with 0.
CORRECT OPERATING POSITION Trimming 3 in. (8 cm Above Ground Trimming EDGING POSITION YOUcan press this button and twist the lower portion 180 _' into an edging position. Edging _k WARNING: Always wear eye protection. Never lean over the trimmer head. Rocks or debris can ricochet or be thrown into eyes and face and cause blindness or other serious injury. When operating unit, stand as shown and check for the following: • Wear eye protection and heavy clothing.
MOWING Your trimmer is ideal for mowing in places conventional lawn mowers cannot reach. In the mowing position, keep the line parallel to the ground. Avoid pressing the head into the ground as this can scalp the ground and damage the tool. Mowing SWEEPING The fanning action of the rotating line can be used for a quick and easy clean up. Keep the line parallel to and above the surfaces being swept and move the tool from side to side.
REPLACING THE LINE 1. Remove the spool by firmly pulling on the tap button. 2. Clean entire surface of hub and spool. 3. Replace with a pre-wound spool (#71-85837), or cut a length of 30 feet of 0.065" (1.6 mm) diameter Craftsman _'_Pro Trimmer line. Use of heavier lines could overload the unit and damage unit. the hub as shown in the illustration. 8. Align the notch with the line exit hole. 9. Push the spool into the hub until it snaps into place. 10.
TROUBLESHOOTING TABLE _k WARNING: Always stop unit and disconnect from the power source before performing all of the recommended remedies below except remedies that require unit to be operating. TROUBLE Trimmer head stops under a load or does not turn when switcl is pressed. CAUSE 1. Crowding trimmer line against material being cut. 2. Electrical failure. 3. Thrown circuit breaker. 4. Debris stopping head. Line does not _dvance or _aks while cu_ing. Line welds onto spool.
Declaraci6n de Garantia Limitadal 1 Reglas de Seguridad 11 Montaje 14 Use 15 Mantenimiento 18 GARANTIA COMPLETA TRICe CRAFTSMAN@ Servicio y Ajustes Piezas de Repuesto Almacenamiento Tabla Diagn6stica Piezas y Encargos 19 19 19 20 Contratapa DE UN AISle PARA LA CORTADORA A LINEA ELEC- Siesta cortadora electrica Weedwacker_ Craftsman tiene alguna falla de funcionamiento debida a materiales o mane de obra, durante un aSo a partir de la fecha de compra, Sears la reparara o cambiar& Esta garantia excluye l
Este enchufe entrar& solamente en Siacontece alguna situaci6n noprevistaenestemanual, tengacuidado y una posici6n en el enchufe polarizado del cable de extension. Si este enusebuencriterio, sinecesita ayuda, Ilame al 1-800-235-5878. chufe no entrara completamente denSEGURIDAD DELUSUARIO tro del enchu_e del cable de extensi6n, • Vitesedeformaapropiada. Siempre invierta el enchufe. Si continua sin enuseanteojos deseguridad o protec- trar, obtenga el cable de extensi6n polarizado correcto.
• No use el aparato si el interrupter no Io prende y apaga correctamente. El Centro de Servicio Sears debera hacer todas las reparaciones al interruptor. • Mantenga el cable de extensi6n alejado del usuario y de los obstaculos en todo momento. No exponga los cables al calor, al aceite, al agua o a los bordes filosos. • Evite todo contacto del cuerpo con los conductores a tierra, tales como las cercas o los carlos de metal para evitar la posibilidad de choque electrico.
Las herramientas y los electrodomesticos con aislamiento doble no necesitan cable a tierra. No se le ha provisto ningQn medio de conexi6n a tierra a este aparato, tampoco se le debe agregar ning6n medio de conexi6n a tierra. Como resultado, el cable de extensi6n usado con su aparato puede set enchufado en cualquier tomacorriente electrico polarizado de 120 voltios. Deben observarse precauciones de seguridad al trabajar con toda herramienta electrica.
ALINEE LAS FLECHAS AVISO: Si el protector no esta instalada correctamente, su aparato sufrira daSos (incluyendo fallas del motor) directamente. 1. Alinie la flecha de instalaci6n de la protector con la flecha de instalaci6n de la caja del motor (vea la ilustraci6n). 2. Inserte la protector en la caja del motor. Aseg_rese que la linea cortadora est_ libre de rotary que no est_ atrapada entre la protector y la caja del motor. 3. Gire la protector como se ilustra hasta que encaje firmemente en lugar.
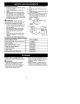
BOTON DE GIRAR O CORTAR BORDES El BOTON DE GIRAR O CORTARBORDES se usa para girar la parte inferior de la unidad a la posici6n de cortar bordes. PROTECTOR DE BORDES El PROTECTOR DE BORDES proteje el aparato contra el contacto con el suelo al recortar bordes. BOT(_N DE TOQUE El BOT6N DE TOQUE se utiliza para avanzar la linea del corte durante la operaci6n y para retire el bobina durante el reemplazo de la linea. USO DEL APARATO los ojos y la cara, causando ceguera u otras heridas graves.
Para recortar Para e scalpar 3 in. (8 cml arriba del suek POSICION PARA CORTAR BORDES Apret&ndos este bot6n se puede hacer girar la parte inferior 180 ° a la posici6n de cortar bordes. PARA CORTAR CESPED El aparato es idealpara cortar cesped en los lugares donde no alcanzan las cortadoras de c_spea convencionales. En la posici6n de cortar paste se mantiene la linea paralela a la tierra. Evite presionar el cabezal contra la tierra, ya que hacerlo puede escalpar la tierra y dafiar el aparato.
CRONOGRAMA DE MANTENIMIENTO ADVERTENCIA: Desconecte del recurso de energia antes de dar mantenimiento a este aparato.
PARA CAMBIAR LA LINEA 1. Retire la bobina tirando firmemente el bot6n de toque. 2. Limpie la superficie entera del cudo y de la bobina. 3. C&mbiela por una bobina pre-enroscad& o corte 10 m (30 pies) de linea marca Craftsman C_con di&metro de 1,6 mm (0,065 de pulgada). _k ADVERTENClA: Nunca use alambre, soga, hilo, etc., que se pueden romper, convirti_ndose asi en proyectiles peligrosos. 4. Meta un cm (1/2 pulgada) de una punta de la linea por el orificio peguefio en la bobina. 5.
TABLA DIAGNOSTICA _k ADVERTENCIA: Siempre desconecte la unidad antes de hacer cualquiera de las reparaciones recomendadas que estan listadas siguientemente que no requieran que la aparato este en operaci6n. SINTOMA El cabezal de corte se detiene bajo carga o no gira cuando se apreta el gatillo interruptor. CAUSA SOLUCION 1. Se est#_ metiendo la linea en el material que se est#_ cortando. 2. Falla electrica. 3. Interruptor de circuito accionado. 4. Escombros parando el cabezal. 1.