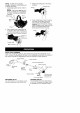
Operator's Manual I CRRFTSMRN°I 4.6 Amp Motor / 0.080 In. Line ELECTRIC WEEDWACKER ® Model No. 358.745350 • Safety • Assembly • Operation • Maintenance • Espa6ol, ,,, p 11 "_\ ® Read and follow all Safety Rules and Operating WARNING: Instructions before first use of this product. For Call answers 7 am-7 • Sears, 545082935 to your questions this product: pm, Mon-Sat; Sun,about 10 am-7 pm 1-800-235-5878 Roebuck 9/12/06 (Hours and Co.
Warranty Statement Safety Rules 2 2 Parts Available Storage Assembly Operation Maintenance 5 6 8 Troubleshooting Service & Adjustments 9 Parts Ordering 10 10 Table Spanish ONE YEAR FULL WARRANTY ON CRAFTSMAN WEEDWACKER ® LINE TRIMMER 10 11 Back Cover ELECTRIC When used and maintained according to the operator's manual, if this product fails due to a defect in material or workmanship within one year from the date of purchase, return it to any Sears store or other Craftsman outlet in the United
glasses areavailable.) Always wear faceordustmask ifoperation is dusty. Always wear heavy, long pants, longsleeves, boots, and gloves. Donotgobarefoot orwear sandals. • Secure hairabove shoulder length. Secure orremove loose clothing andjewelry orclothing withloosely hanging ties,straps, tassels, etc. Theycanbecaught inmoving parts. • Being fullycovered alsohelps protectyoufromdebris andpieces of toxicplants thrown byspinning line. • StayAlert.
• UseonlyCraftsman ®brand trimmer line(seeUSER REPLACEABLE SERVICE PARTS intheSERVICE AND ADJUSTMENTS section). Never use wire,rope, string, etc. • Usespecified trimmer spool.Make surespool isproperly installed and allparts aresecurely fastened. • UseonlyCraftsman replacement parts a nd accessories asrecommended. CUTTING SAFETY • Inspect area to be cut. Remove objects (rocks, broken glass, nails, wire, string, etc.) which can be thrown or become entangled in cutting head.
CARTON CONTENTS Check carton contents against the following list. Model 358.745350 • Trimmer • Shield • Assist handle with wing nut and bolt • Container of line Examine parts for damage. Do not use damaged parts. NOTE: If you need assistance or find parts missing or damaged, call 1-800-235-5878. A ,l_ WARNING: Failure to completely enclose excess wires in upper tube during assembly of the unit may result in damage to the wires and/or the unit or serious injury to the operator including electrocution.
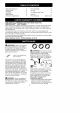
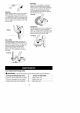
NOTE:Ifshield isnotproperly installed, damage tounit(including motorfailure) willresult. 1. Insert edgeguide intotwoholes in shield. NOTE: Edge guide mustbepositioned onshield prior toinstallation onmotor housing (see following illustration). Edge Guide Front Locking L.Tab 3. Keep front locking tab in the motor housing. Cutting Head Shield 4. Tabs 2. Place shield over cutting head at an angle to the motor housing. Insert front locking tab on shield into opening in front of motor housing.
LINE LIMITER BLADE The LINE UMITER BLADE cuts the cutting line to the proper cutting length. ASSIST HANDLE The ASSIST HANDLE is used to help hold and guide the unit. TRIMMER HEAD The TRIMMER HEAD holds the cutting line and rotates during operation. TWIST AND EDGE BUTTON The TWIST AND EDGE BUTTON is used to twist the lower portion of the unit into an edging position. EDGE GUIDE The EDGE GUIDE protects tile unit from contacting the ground during edging.
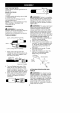
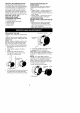
J EDGING While edging allow the tip of the line to make contact. Do not force the line. MOWING Your trimmer is ideal for mowing in places conventional lawn mowers cannot reach. In the mowing position, keep the line parallel to the ground. Avoid pressing the head into the ground as this can scalp the ground and damage the tool. Mowing ////// The edge guard helps protect the unit and keeps the unit from contacting the ground. Take extra caution while edging as objects can be thrown from the _,. _ _<..
GENERAL RECOMMEN DATIONS Thewarranty onthisunitdoes not cover items thathave beensubjected tooperator abuse ornegligence. To receive fullvalue fromthewarranty, theoperator must maintain unitas instructed inthismanual. Various adjustments willneed tobemade periodically toproperly maintain yourunit.
USER REPLACEABLE REPLACEMENT SERVICE PART NUMBER Container of Replacement Assist Handle Bolt Carriage, PARTS PART 71-85907 Line 530403805 530403886 1/4-20 Wing Nut 530016152 Shield Assembly 530404393 Edge Guide 530403845 '_ WARNING: Perform the following steps after each use. • Stopthe unit and disconnect the power source when not in use. • Carry the unit with motor stopped. • Store the unit so the line limiter blade cannot cause injury.
Declaraci6n de Garantia Reglas de Seguridad Montaje Uso Mantenimiento Limitada 11 11 14 16 18 UN AI_IO COMPLETO DE GARANTiA ELECTRICO CRAFTSMAN ® Servicio y Ajustes Piezas de Repuesto AImacenamiento Tabla Diagn6stica Piezas y Encargos PARA LA CORTADORA 19 20 20 20 Contratapa A LINEA Si este producto falla por un defecto en el material o de mano de obra dentro del aSo a partir de la fecha de compra y este se ha utilizado y mantenido de acuerdo al manual del usuario, envielo a cualquier tienda Sears o
SEGURIDAD DI=L USUARIO • V[tese deforma apropiada. Siempre useanteojos deseguridad oprotecci6ndeojossimilar alhacer usoo mantenimiento delaparato. (Existen anteojos deseguridad.) Use siempre mascara protectora dela caraom&scara anti-polvo alusarel aparato en ambientea polvorientos. Use siempre pantalones largos gruesos, mangas largas, botas y guantes. No use el aparato descalzo ni con sandalias. • Mantenga el cabello por encima de los hombros, at&ndolo para tal efecto si es necesario.
• No use el aparato si el interruptor no Io prende y apaga correctamente. El Centre de Servicio Sears deber_t hacer todas las reparaciones al interrupter. • Mantenga el cable de extensi6n alejado del usuario y de los obst@.culos en todo momento. No exponga los cables al calor, al aceite, al agua o a los bordes filosos. • Evite todo contacto del cuerpo con los conductores a tierra, tales como las cercas o los ca_os de metal para evitar la posibilidad de choque el@ctrico.
cable atierra. Noselehaprovisto sujetar la manga, el alambres, etc., ningOn medio deconexi6n atierra a deber_m ser efectuados por personal esteaparato, tampoco seledebe agre- de servicio capacitado. Los repuestos garningOn medio deconexi6n atierra. para un aparato con aislamiento doble Como resultado, elcable deextensi6n deben ser recomendados por el fabriusado consuaparato puede serencante.
manga desujetar sedebe apretar corn- Protector de pletamente antes ydurante elusopara bordes evitar una]esi6n seria alusuario y/oun L.da6oaalaparato. Notrate dedesmon- LengQentas tarelaparato despues delmontaje indelCierre icia]. Trasera AJUSTE DEL MANIJA AUXILIAR 1= Afloje y remueva la tuerca mariposa de la manija auxiliar. 2= Ponga el aparato en una superficie plana. 3= Empuje firmemente la manija auxiliar para que se fije en el tubo.
CONOZCA SU APARATO LEA ESTE MANUAL DEL USUARIO Y LAS REGLA8 DE SEGURIDAD ANTES DE PONER ELAPARATO EN FUNCIONAMIENTO. Compare las ilustraoiones a su aparato para familiarizarse con la ubicaci6n de los controles y ajustes. Guarde este manual para uso futuro. Gatillo Interruptor _._r_ _-_ / Retentor de Cable Enchufe _-_]_ "# Montaje para /" Sujetar la Manga Manija Auxiliar / Caja del Motor -_--_-_-, I_ / Protector "_"_r"_-_._...._ / de bordes __'_._.._ ,_ Aberturas de "%. Ventilaci6n Protector _-_ .
POSICION CORRECTA DE USO PARA RECORTAR Sostenga el cabezal a unes 8 cm (3 pulgadas) del suelo yen &ngulo. Permita Qnicamente que la punta de la linea haga contacto. No meta la linea de corte en el &tea de trabajo. Para recortar 8cm_ arriba de1suelo Para Recortar Para Corta Bordes _ADVERTENClA: Use siempre protecci6n de ojos. Nunca se incline sabre el cabezal: 6ste puede arrojar o hacer rebotar piedras o escombros a los ojos y la cara, causando ceguera u otras heridas graves.
PARA BARRER La acci6n ventiladora de la linea girante sirve para hacer una limieza r#.pida y f_tcil. Mantenga la linea paralela a la superficie que desea limpiar y pot encima, moviendo el aparato de un lado al otro. escalpar Para J i .... PARA CORTAR CESPED El aparato es ideal para cortar c6sped en los lugares donde no alcanzan las cortadoras de c_spea convencionales. En la posici6n de cortar paste se mantiene la linea paralela a la tierra.
DESPUES DE CADA USO INSPECCIONE Y LIMPIAR EL APARATO Y LAS PLACAS • Despu6s de que cada uso, inspeccione la aparato completa para saber si hay piezas flojas o dafladas. Limpie el aparato y las placas usando un trapo hOmedo con detergente suave. • Seque el aparato con un trapo limpio y seco. REEMPLAZO DE LA LINEA EN EL CABEZAL DE CORTE DE LiNEA FIJA • Use siempre linea de recambio Craftsman.
PIEZAS DE SERVIClO AL CLIENTE PIEZAS DE REPUESTO Recipiente N ° de PIEZA 71-85907 de linea 530403805 Manija Auxiliar Tornillo, Maniia Auxiliar, Tuerca Mariposa, Protector Protector • Guarde limitador heridas. 530016152 Manija Auxiliar 530404393 de Bordes _ADVERTENClA: siguientes use: • Pare el rato de que no • Cuando manos, do.