Instruction Manual I CRRFTSMRN°J 25cc/1.5 cu.in. 2-Cycle 17 Inch Cutting Path / 0.080 In. Line GASOLINE WEEDWACKER ® Model No. 358.745540 • • • • • Safety Assembly Operation Maintenance Parts List • Espahol For Occasional Use Only WARNING: Read and follow all Safety Rules and Operating Instructions before first use of this product. For answers to your questions about this product: Call 7 am-7 pm, Mon,-Sat., or 10 am-7 pm, Sun. 1-800-235-5878 Sears, Roebuck 530163370 10/8/02 and Co.
Warranty Statement Safety Rules Assembly Operation Maintenance Service & Adjustments 2 2 4 5 9 10 Storage Troubleshooting Chart Emissions Statement Parts List Spanish Parts and Ordering 11 12 12 14 16 Back Cover FULL ONE YEAR WARRANTY ON CRAFTSMAN ® GAS POWERED WEEDWACKER ® LINE TRIMMER For one year from the date of purchase, when this Craftsman Gas Powered Weedwacker Line Trimmer is maintained, lubricated, and tuned up according to the operating and maintenance instructions in this manual, Sears will r
If situations occur which are not covered in this manual, use care and good judgment. If you need assistance, contact your Sears Service Center or call 1-800-235-5878. OPERATOR SAFETY • Dress properly. Always wear safety glasses or similar eye protection when operating, or performing maintenance, on your unit (safety glasses are available). Eye protection should be marked Z87. • Always wear face or dust mask if operation is dusty. • Always wear heavy, long pants, long sleeves, boots, and gloves.
• Store unit and fuel in area where fuel vapors cannot reach sparks or open flames from water heaters, electric motors or switches, furnaces, etc. • Store unit so line limiter blade cannot accidentally cause injury. The unit can be hung by the tube. • Store unit out of reach of children.
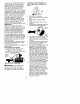
For proper orientation of shield, see KNOW YOUR TRIMMER illustration in OPERATIONsection. Shield _lot 1. Remove wing nut from shield. 2. Insert bracket into slot as shown. 3. Pivot shield until bolt passes through hole in bracket. 4. Securely tighten wing nut onto bolt. Line Limiter Blade _ Nut KNOW YOUR TRIMMER READTHiS INSTRUCTIONMANUALAND SAFETY RULES BEFORE OPERATING YOUR UNIT.
engine oil. We recommend Craftsman brand synthetic oil. Mix gasoline and oil at a ratio of 40:1. A 40:1 ratio is obtained by mixing 3.2 ounces of oil with 1 gallon of unleaded gasoline. Included with this trimmer is a 3.2 ounce container of oil. Pour the entire contents of this container into 1 gallon of gasoline to achieve the proper fuel mixture. DO NOT USE automotive oil or boat oil. These oils will cause engine damage. When mixing fuel, follow instructions printed on container.
STARTING A WARM ENGINE 1. Move ON/OFF switch to the ON position. 2. Move the choke lever to the HALF CHOKE position. 3. Squeeze and hold the throttle trigger. Keep throttle trigger fully squeezed until the engine runs smoothly. 4. Pull starter rope sharply until engine runs, but no more than 5 pulls. 5. Allow engine to run 15 seconds, then move the choke lever to the OFF CHOKE position. NOTE: If engine has not started, pull starter rope 5 more pulls. If engine still does not run, it is probably flooded.
TRIMMING - Hold the bottom of the trimmer head about 3 in. (8 cm) above the ground and at an angle. Allow only the tip of the line to make contact. Do not force trimmer line into work area. Always tap the trimmer head on a grassy area. Tapping on surfaces such as concrete or asphalt can cause excessive wear to the trimmer head. If the line is worn down to 2 in. (5 cm) or less, more than one tap will be required to obtain the most efficient line length. Tr mm ng _ll, WARNING: Use only 0.
EDGING - Adjust trimmer to the edging position (see TWIST AND EDGE section). Allow only the tip of the line to make contact. Do not force trimmer line into work area. MAINTENANCE _dging #_/ SCHEDULE WARNING: Disconnect the spark plug before performing maintenance except for carburetor adjustments.
INSPECT MUFFLER AND SPARK ARRESTING SCREEN _1_WARNING: The muffler on this product contains chemicals known to the State of California to cause cancer. _kWARNING: Muffler is very hot during and after use. Do not touch the muffler or allow combustible material such as dry grass or fuel to do so. As your unit is used, carbon deposits build up on the muffler and spark arresting screen. For normal homeowner use, however, the muffler and spark arresting screen will not require any service. REPLACING THE LINE 1.
Idle Speed Screw If you require further assistance or are unsure about performing this procedure, contact your Sears Service Center or call our customer assistance help line at 1-800-235-5878. Air Filter zl, _____.H_ _IbWARNING: Perform the following steps after each use: • Allow engine to cool, and secure the unit before storing or transporting.
TROUBLESHOOTING TABLE WARNING: Always stop unit and disconnect spark plug before performing all of the recommended remedies below except remedies that require operation of the unit. TROUBLE Engine will not start. Engine will not idle properly. Engine will not accelerate, lacks power, or dies under a load. Engine smokes CAUSE 1. ON/OFF switch in OFF position. 2. Engine flooded. 1. Move ON/OFF switch to the ON position 2. See "Starting a Flooded Engine" in the Operation Section.
emission related part,thepartwillbe repaired orreplaced bySears.OWNER'S WARRANTY RESPONSIBILITIES: As the small off-road engine engine owner, you are responsible for the performance of the required maintenance listed in your instruction manual. Sears recommends that you retain all receipts covering maintenance on your small off-road engine, but Sears cannot deny warranty solely for the lack of receipts or for your failure to ensure the performance of all scheduled maintenance.
Declaraci6n de Garantia Reglas de Seguridad Montaje Uso Mantenimiento Servicio y Ajustes 16 16 19 20 24 25 Almacenaje Tabla Diagn6stica Declaraci6n de Emision 27 28 29 Lista de Piezas Repuesto y Encargos GARANTIA DE UN AI_IO COMPLETO PARA LA CORTADORA GASOLINA WEEDWACKER ® DE CRAFTSMAN ® 14 Contratapa DE LINEA A Durante un aSo, a partir de la fecha de compra, siempre que se haga el mantenimiento, la lubricaci6n y los ajustes a esta Cortadora de Linea a Gasolina Weedwacker de Craftsman segL_nlas inst
ciego o herido, Use anteojos de seguridad y protecci6n en las piernas. Mantenga todas las partes del cuerpo alejadas de la linea girante. Use anteojos de seguridad Mantenga a los niSos, los espectadores y animales a una distancia minima de 15 metros (50 pies). Pare el motor inmediatamente si alguien se le acerca. Si acontece alguna situaci6n no prevista en este manual, tenga cuidado y use buen criterio. Si necesita ayuda, entre en contacto con su Centro de Servicio Sears o Ilame al 1-800-235-5878.
• Pare el motor y permita que se enfrie el aparato antes de retirar la tapa del tanque, • Almac6ne siempre combustible en un recipiente aprobado para los liquidos inflamables. SEGURIDAD AL CORTAR _1_ADVERTENCIA: Inspeccione el 9tea antes de cada uso. Retire los ebjetos (piedras, vidrio rote, clavos, alambre, etc.) que se puedan enredar en la linea e que esta pueda arrejar. Los ebjetos dures pueden dafiar el cabezal y 6ste los puede arrojar, causando graves heridas.
CONTENIDO DE LA CAJA Use la siguiente lista para verificar que todas la piezas hayan sido incluidas: Modelo 358.745540 • Cortadora • Protector • Tuerca Mariposa (atornillada en la protector) • Mango Auxiliar (con el tornillo y la perilla) • Recipiente de Aceite Examine las piezas para verificar que no haya daSos. No use piezas daSadas, AVISO: Si necesita ayuda, si faltan piezas o si hay piezas daSadas, Ilame al nt_mero 1-800-235-5878.
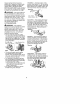
CONOZCA SU APARATO LEA ESTE MANUAL DE INSTRUCCIONES Y LAS REGLAS DE SEGURIDAD ANTES DE PONER EL APARATO EN MARCHA. Compare las ilustraciones con su aparato para familiarizarse con la ubicaci6n de los diversos controles y ajustes. Guarde este manual para uso futuro.
clarelcombustible, sigalasinstruc- PAPA ARRANCAR CON MOTOR clonesimpresas enelrecipiente. Una FRIO (o motor caliente despu_s de vezhayaa_adido elaceitea lagasoli- quedar sin combustible) na,agitealrecipiente brevemente paraasegurar queelcombustible est6 completamente mezclado. Siempre leaysigalasinstrucciones deseguridadquetienenqueverconelcombustible antesdeabastecer elaparato.
delcebador enlaposici6n OFF Use siempre CHOKE.
m_ximo permitido por el limitador de linea. Siempre mantenga la cubierta protectora en su lugar siempre que el aparato est6 en uso. Para avanzar la linea: • Acelere el motor a fondo. • Sostenga el cabezal paralelo al suelo, por encima de un &rea con c6sped. • Toque el cabezal de corte contra el suelo levemente una vez. Con cada toque, la linea avanzar_ aproximadamente 5 cm (2 pulgadas). Para que la linea avance toque el cabezal de corte contra el suelo una vez adecuado___,_.
PARA CORTAR C¢:SPED - Este parato es ideal para cortar c6sped en lugares donde las cortadoras convencionales no Ilegan, En posici6n de cortar c6sped, mantenga la linea paralela al suelo. Evite presionar el cabeza] contra el suelo, ya que de hacerlo podria escalpar la vegetaci6n y dahar el aparato, Para Cortar C_sped PARA BORDEAR - Ajuste el aparato a la posici6n del bordeando (vea la secci6n TWIST AND EDGE).
• Interruptor ON/OFF - Asegt]rese de que el interruptor funcione correctamente sosteni6ndolo en la posici6n OFF. AsegOrese de que el motor se haya detenido por completo, luego, ponga el motor en marcha nuevamente y continQe. • Tanque de Combustible - Deje de usar el aparato si hay seSales de daSos o p6rididas en el tanque de combustible. • Protector - Deje de usar el aparato si el protector est9 daSado.
5. Enrolle lalineaenlabobina deformapareja y ajustada.Enrolle la lineaenladirecci6n enqueapunta laflechaqueseencuentra enla bobina. Bobina Introduzca la linea dentro de la muesca Hueco de salida de Ia linea Introduzca la linea dentro de la muesca, dejando de 7 a 12 cm (3 a 5 pulgadas) sin enrollar. 7. Introduzca la linea dentro del hueco de salida en el cubo como se muestra en la ilustraci6n. 8. Alinee la muesca con el hueco de salida de la line& 9.
_kADVERTENCIA: Realice los siguientes pasos despu_s de cada use: • Permita que el motor se enffie y fije bien el aparato antes de guardarlo o transportarlo.
TABLA DIAGNOSTICA ADVERTENCIA: Siempre apague el aparato y desconecte la bujfa antes de hacer cualquiera de las reparaciones recomendadas a continuad6n que no requieran que la unidad est6 en c 3eraci6n. SINTOMA CAUSA SOLUCION EI motor no arranca. 1. El interruptor ON/OFF esta en posici6n OFF. 2. El motor esta ahogado. 1. Coloque el interruptor ON/OFF a la posici6n ON. 2. Vea "Arranque de Motor Ahogado" en la secci6n Uso. 3. Llene el tanque con la mezcla correcta de combustible. 4.
SUS DERECHOS Y OBLIGACIONES DE GARANTIA: La Agencia de Protecci6n Ambiental de los Estados Unidos, la Junta de Recursos Ambiem tales de California y Sears, Roebuck and Co., U,S,A.
programada paraserreemplazada usted con alguna pregunta relacionacomopartedelmantenimiento requeri- da con sus derechos y responsabilidodeber9 estargarantizada porel dades de garantia, usted deber& enperiodo detiempo quecomienza enla trar en contacto con su centro de fechadecompra inicialhastalafecha servicio autorizado mas cercano o Iladelprimerreemplazo programado mar a Sears al 1-800-469-4663, paradichapieza,DIAGNOSTICO: No DONDE OBTENER SERVICIO DE sedeber_ cobrar alduefioning0n tipo GARANTIA: Servicie