
Instruction manual


•Storeunitandfuelinareawhere
fuelvaporscannotreachsparksor
openflamesfromwaterheaters,
electricmotorsorswitches,fur-
Races,etc.
•Storeunitsolinelimiterbladecan-
notaccidentallycauseinjury.The
unitcanbehungbythetube.
•Storeunitoutofreachofchildren.
SAFETYNOTICE:Exposuretovibra-
tionsthroughprolongeduseofgaso-
linepoweredhandtoolscouldcause
bloodvesselornervedamageinthe
fingers,hands,andjointsofpeople
pronetocirculationdisordersorab-
normalswellings.Prolongedusein
coldweatherhasbeenlinkedtoblood
vesseldamageinotherwisehealthy
people.Ifsymptomsoccursuchas
numbness,pain,lossofstrength,
changeinskincolorortexture,orloss
offeelinginthefingers,hands,or
joints,discontinuetheuseofthistool
andseekmedicalattention.Ananti-
vibrationsystemdoesnotguarantee
theavoidanceoftheseproblems.
Userswhooperatepowertoolsona
continualandregularbasismustmon-
itorcloselytheirphysicalconditionand
theconditionofthistool.
SPECIALNOTICE:Thisunitis
equippedwithatemperaturelimiting
mufflerandsparkarrestingscreen
whichmeetstherequirementsofCali-
forniaCodes4442and4443.AllU.S.
forestlandandthestatesofCalifornia,
Idaho,Maine,Minnesota,NewJersey,
Oregon,andWashingtonrequireby
lawthatmanyinternalcombustionen-
ginesbeequippedwithasparkarrest-
ingscreen.Ifyouoperateinalocale
wheresuchregulationsexist,youare
legallyresponsibleformaintainingthe
operatingconditionoftheseparts.
Failuretodosoisaviolationofthe
law.Fornormalhomeowneruse,the
mufflerandsparkarrestingscreenwill
notrequireanyservice.After50hours
ofuse,werecommendthatthemuffler
beservicedorreplacedbyyourSears
ServiceCenter.
CARTONCONTENTS
Checkcartoncontentsagainstthefol-
lowinglist.
Model358.745651
•Trimmer
•Shield
•WingNut(screwedontoshield)
•AssistHandle(withboltandknob)
•ContainerofOil
Examinepartsfordamage.Donot
usedamagedparts.
NOTE:Ifyouneedassistanceorfind
partsmissingordamaged,call
1-800-235-5878.
Itisnormalforthefuelfiltertorattlein
theemptyfueltank.
Findingfueloroilresidueonmuffleris
normalduetocarburetoradjustments
andtestingdonebythemanufacturer.
ASSEMBLY
_,WARNING: If received as-
sembled, repeat all steps to ensure
your unit is properly assembled and all
fasteners are secure.
Be sure to attach the assist handle to
the unit before you attach the shield.
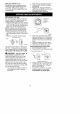
ATTACHING THE HANDLE
(some units are already assembled)
1. Assemble handle to the unit as
shown; make sure bottom of han-
dle is seated in the groove in the
trigger housing.
NOTE: Knob must be assembled on
the right hand side of the unit as
shown in the illustration.
2. Make sure the bolt is seated in the
hex-shaped hole in the handle.
3. Pivot the handle to a comfortable
position.
4. Tighten knob securely.
ATTACHING SHIELD
,_WARNING: The shield must be
properly installed. The shield provides
partial protection from the risk of thrown
objects to the operator and others and
is equipped with a line limiter blade
which cuts excess line to the proper
length. The line limiter blade (on under-
side of shield) is sharp and can cut you.