Instruction Manual CRRFTSMHN 32CC/1.9 cu.in. 2-Cycle GASOLINE WEEDWACKER® Model No. 358.795580 Safety Assembly Operation Maintenance Parts List Español For Occasional Use Only A 9 WARNING: Read and follow all Safety Rules and Operating Instructions before first use of this product. For answers to your questions about this product: Call 7 am-7 pm, Mon.-Sat., or 10 am-7 pm. Sun. 1 -800-235-5878 Sears, Roebuck and Co., Hoffman Estates, !L 60179 U.S.A.
TABLE OF CONTENTS Warranty Statement Safety Rules Assembly Operation Maintenance Service & Adjustments 2 2 4 5 8 9 Storage Troubleshooting Tabie Emissions Statement Parts List Spanish Parts and Ordering 11 12 12 14 16 Back Cover WARRANTY STATEMENT FULL ONE YEAR WARRANTY ON CRAFTSMAN® GAS POWERED WEEDWACKER® LINE TRIMMER.
!f situations occur wtiicti are not cov ered in this manual, use care and good judgment. If you need assis tance, contact your Sears Service Center or call 1-800-235-5878. OPERATOR SAFETY • Dress properly. Always wear safety glasses or similar eye protection when operating, or performing main tenance, on your unit (safety glasses are available). Eye protec tion should be marked Z87. • Always wear face or dust mask if op eration is dusty. • Always wear heavy, long pants, long sleeves, boots, and gloves.
• store unit so line limiter blade cannot accidentally cause injury. The unit can be hung by the tube. • Store unit out of reach of children. SAFETY NOTICE: Exposure to vibra tions through prolonged use of gaso line powered hand tools could cause blood vessel or nerve damage In the fingers, hands, and joints of people prone to circulation disorders or ab normal swellings. Prolonged use in cold weather has been linked to blood vessel damage in otherwise healthy people.
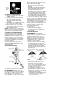
OPERATION KNOW YOUR TRIMMER READ THIS INSTRUCTION MANUAL AND SAFETY RULES BEFORE OPERATING YOUR UNIT. Compare the illustrations with your unit to familiarize yourself with the location of the various controls and adjustments. Save this manual for future reference. Assist Handle Trimmer Head Line Limiter Blade Muffler ON/STOP SWITCH The ON/STOP switch is used to stop the engine. To stop the engine, push and release the engine ON/STOP switch.
engine and let it run until the fuel lines and carburetor are empty. Use fresh fuel next season. Never use engine or carburetor clean er products in the fuel tank or perma nent damage may occur. See the STORAGE section for addition al information. HOW TO STOP YOUR UNIT • To stop the engine, push and re lease the engine ON/STOP switch. The switch will automatically return to the ON position. Wait 5 seconds before attempting to restart unit to allow switch to reset.
Choke position deca! STARTING A WARM ENGINE 1. Move the choke lever to the HALF CHOKE position. 2. Squeeze and hold the throttle trig ger. Keep throttle trigger fully squeezed until the engine runs smoothly. 3. Pull starter rope sharply until engine runs, but no more than 5 pulls. 4. Allow/ engine to run 15 seconds, then move the choke lever to the OFF CHOKE position. NOTE: If engine has not started, pull starter rope 5 more pulls. If engine still does not run, it is probably flooded.
• For mowing or sweeping, use full throttle for a good clean job. TRIMMING - Hold the bottom of the trimmer head about 3 in. (8 cm) above the ground and at an angle. Allow only the tip of the line to make contact. Do not force trimmer line into work area. MOWING - Your trimmer is idea! for mowing in places conventional lawn mowers cannot reach. In the mowing position, keep the line parallel to the ground. Avoid pressing the head into the ground as this can scalp the ground and damage the tool.
CHECK FOR LOOSE FASTENERS AND PARTS • Spark Plug Boot • Air Filter • Housing Screws • Assist Handle Screw • Debris Shield CHECK FOR DAMAGED OR WORN PARTS Contact Sears Service Center for re placement of damaged or worn parts. • ON/STOP Switch - Ensure ON/STOP switch functions properly by pushing and releasing the switch. Make sure engine stops. Wait 5 seconds be fore attempting to restart unit to al low switch to reset.
Insert both ends of your line through the proper holes in the side of the cutting head. Pull the line and make sure the line is against the hub and extended fuii through the positioning tunnels. Line against '/ the hub Positioning Tunnel' f 6. Correctly installed line will be the same length on both ends. REPLACING THE CUTTING HEAD 1. Align hole in the dust cup with the hole in the side of the gearbox by rotating the dust cup. 2. insert a small screwdriver into aligned holes.
STORAGE A WARNING: Perform the follow ing steps after each use: • Allow engine to cool before storing or transporting. • Store unit and fuel in a well venti lated area where fuel vapors cannot reach sparks or open flames from water heaters, electric motors or switches, furnaces, etc. • Store unit with all guards in place. Position unit so that any sharp ob ject cannot accidentally cause injury. • Store unit and fuel well out of the reach of children.
TROUBLESHOOTiNG TABLE ^WARNING: Always stop unit and disconnect spark plug before perform ing all of the recommended remedies below except remedies that require operation of the unit. TROUBLE CAUSE Engine will not start. 1. Engine flooded. 2. Fuel tank empty. 3. Spark plug not firing. 4. Fuel not reaching carburetor. 5. Carburetor requires adjustment. REMEDY 1. See “Starting a Flooded Engine” in Operation Section. 2. Fill tank with correct fuel mixture. 3. Install new spark plug. 4.
that you retain all receipts covering maintenance on your small off-road en gine, but Sears cannot deny warranty solely for the lack of receipts or for your failure to ensure the performance of all scheduled maintenance.
TABLA DE CONTENIDO Declaración de Garantía Reglas de Seguridad Montaje Uso Mantenimiento Servicio y Ajustes 16 16 19 20 24 25 Almacenaje Tabla Diagnóstica Declaración de Emisión Lista de Piezas Repuesto y Encargos 27 28 29 14 Contratapa DECLARACION DE GARANTIA GARANTIA DE UN ANO COMPLETO PARA LA CORTADORA DE LÍNEA A GA SOLINA WEEDWACKER® DE CRAFTSMAN® Durante un año, a partir de la fecha de compra, siempre que se haga el manten imiento, la lubricación y ios ajustes a esta Cortadora de Línea a Gasolina
ojos de seguridad y protección en las piernas. Mantenga todas las partes del cuerpo alejadas de la línea girante. Use anteojos de seguridad Mantenga a los niños, los especta dores y animales a una distancia míni ma de 15 metros {50 pies). Pare el motor inmediatamente si alguien se le acerca. Si acontece alguna situación no prevista en este manual, tenga cuidado y use buen criterio. Si necesita ayuda, entre en contacto con su Centro de Servicio Sears o llame al 1-800-235-5878.
• Evite derramar ei combustible o el aceite. Limpie todo ei combustibie derramado. • Aléjese a por lo menos 3 metros (10 pies) del lugar de abastecimiento antes de poner en marcha el motor. • Pare el motor y permita que se enfrie el aparato antes de retirar la tapa del tanque. • Almacéne siempre combustible en un recipiente aprobado para los líquidos inflamables. SEGURIDAD AL CORTAR A ADVERTENCIA: Inspeccione el área antes de cada uso. Retire ios obje tos (piedras, vidrio roto, clavos, alambre, etc.
MONTAJE CONTENIDO DE LA CAJA Use la siguiente lista para verificar que todas la piezas hayan sido incluidas: Modelo 358.795580 • Cortadora • Protector • Tuerca Mariposa (atornillada en la protector) • Recipiente de linea • Recipiente de aceite Exannine las piezas para verificar que no haya daños. No use piezas daña das. AVISO: Si necesita ayuda, si faltan piezas o si hay piezas dañadas, llame al número 1-800-235-5878. Es normal escuchar que el filtro de com bustible golpetee en el tanque vacío.
CONOZCA SU APARATO LEA ESTE MANUAL DE INSTRUCCIONES Y LAS REGLAS DE SEGURIDAD ANTES DE PONER EL APARATO EN MARCHA. Compare las ilustraciones con su aparato para familiarizarse con la ubicación de los diversos controles y ajustes. Guarde este manual para uso futuro. Mango Auxiliar T ubo Cabezal de Corte ..
completamente mezclado. Siempre lea y siga las instrucciones de seguri dad que tienen que ver con el com bustible antes de abastecer el aparato. IMPORTANTE La experiencia indica que los combus tible mezclados con alcohol (ios llama dos gasohol o los que contienen etanoi o metanol) pueden atraer la humedad, lo que puede causar la se paración y la formación de ácidos du rante el almacenaje. La gasolina àcida puede dañar el sistema de combus tible del motor durante el almacenaje.
7. Tire firmemente del mango de la cuerda de arranque tiasta que el motor arranque, pero no más de 6 tirones. Si el motor no arranca des pués del sexto tirón de la cuerda de arranque {con la palanca del ce bador en la posición HALF CHOKE), mueva la palanca del cebador a la posición FULL CHOKE y oprima el bombeador 6 veces. Apriete y sos tenga el gatillo acelerador y tire de la cuerda de arranque otras 2 veces.
línea cerca de! suelo y paralela al mismo, sin meterla dentro del materi al que se está cortando. No haga marchar el motor a revolu ciones más altas que las necesarias. La línea de corte cortará de una forma más eficiente sin que el motor esté acel erado a fondo. A revoluciones más ba jas, habrá menos ruido y menor vibra ción del motor. Siempre que no se halle cortando, suelte e! gatillo acelerador y permita que el motor vuelva a marcha lenta. Para detener el motor: • Suelte el gatillo acelerador.
PARA BARRER - Se puede usar la acción ventiladora de la Hnea girante para barrer rápida y fácilmente un área determinada. Mantenga la línea para lela al suelo directamente encima de las superficies que se quiera barrer y meuva el aparato de un lado al otro rápidamente. MANTENIMIENTO CRONOGRAMA DE MANTENIMIENTO ADVERTENCIA: Desconecte la bujía antes de hacer cualquier manten imiento, con la excepción de ios ajustes al carburador.
AVISO: Para evitar peligro de incen dio y de emiciones evaporativas noci vas, no limpie el filtro de aire con gaso lina ni cualquier otro solvente inflam able. 3. Limpie el filtro con agua y jabón. 4. Permita que el filtro se seque. 5. Aplique varias gotas de aceite al fil tro; exprima el filtro para distribuir el aceite. 6. Reponga las piezas. CAMBIE LA BUJIA Deberá cambiarse la bujía anualmente para asegurar que el motor arranque fácilmente y tenga un mejor rendimeinto.
Túnel de colocación Linea por fuera del cilindro 6. Si se instala correctamente, la línea tendrá la misma longitud a ambos lados. REEMPLAZO DE LA CABEZAL DE CORTE 1. Haga girar el taza para el polvo para hacer coincidir el orificio con el otro orificio situado a un lado del cajetín de engranajes. 2. Introduzca un destornillador peque ño por los orificios confrontados. Esto previene que el eje gire mientras usted remueva y instale el cabezal de corte. Destornillador N. 3.
ALMACENAJE Añada estabilizador a la gasolina en el A ADVERTENCIA: Realícelos tanque de combustible o en el recipiente siguientes pasos después de cada uso: para almacenar el mismo. Siga las • Permita que el motor se enfríe antes instrucciones de mezcla que se encuen de guardarlo o transportarlo. tran impresas en el envase.
TABLA DiAGNOSTICA ADVERTENCIA: Siempre apague el aparato y desconecte la bujía antes de hacer cualquiera de las reparaciones recomendadas a continuación que no requieran que la unidad esté en operación. SINTOMA CAUSA SOLUCION El motor no arranca. 1. El motor está ahogado. 1. Vea “Arranque de Motor Ahogado” en la sección Uso. 2. Llene el tanque con la mezcla correcta de combustible. 3. Instale una bujia nueva. 2. El tanque de combustible está vacio. 3. La bujía no está haciendo chispa. 4.
DECLARACION DE GARANTIA DE CONTROL DE EMISION U.S. EPA sus DERECHOS Y OBLIGACIONES DE GARANTIA: La Agencia de Pro tección Ambiental de los Estados Uni dos y Sears, Roebuck and Co., U.S.A., se complacen en explicar la garantía con la que cuenta el sistema de control de emisión en su motor pe queño, modelo 2001-2004, para uso fuera de carretera.
plazo programado para dicha pieza. DIAGNOSTICO: No se deberá cobrar al dueño ningún tipo de cargos por la labor de diagnóstico la cual determine que una pieza garantizada se encuen tra defectuosa si el trabajo de diagnóstico ha sido desempeñado por un distribuidor autorizado del servicio Sears. DANOS POR CONSECUECIA: Sears podrá ser responsable de daños ocurridos a otras piezas del mo tor causados por la falla de una pieza garantizada que se encuentre bajo el período de garantía.