Instruction Manual I CRAFTSMAN°I 25cc/1.5 cu.in. 2-Cycle 185 MPH/385 CFM GASOLINE POWERED BLOWER Model No. 358.794120 • Safety Operation Maintenance _j_t _ PartsList Espar__ WARNING: Read and follow all Safety Rules and Operating Instructions before first use of this product. For answers to your questions about this product: Call 7 am-7 pm, Mon.-Sat., or 10 am-7 pm, Sun. 1-800-235-5878 Sears, Roebuck 530165757 9/7/05 and Co., Hoffman (Hours listed are Central Time) Estates, IL 60179 U.S.A.
Warranty Statement Safety Rules Assembly Operation Maintenance 2 2 4 5 8 Storage 9 Troubleshooting Table Emissions Statement Parts List Spanish Parts and Ordering 10 11 13 15 Back FULL ONE YEAR WARRANTY ON CRAFTSMAN ® GAS BLOWER For one (1) year from date of purchase, when this Gas Blower is maintained, lubricated, and tuned up according to the instructions in this manual, Sears will repair, free of charge, any defects in material or workmanship.
HANDLE FUEL WITH CAUTION, IT IS HIGHLY FLAMMABLE • Eliminate all sources of sparks or flame (including smoking, open flames, or work that can cause sparks) in the areas where fuel is mixed, poured, or stored. • Mix and pour fuel in an outdoor area; store fuel in a cool, dry, well ventilated place; use an approved, marked container for all fuel purposes. • Do not smoke while handling fuel or while operating the unit. • Make sure the unit is properly assembled and in good operating condition.
SAFETY NOTICE: Exposure to vibrations through prolonged use of gasoline powered hand tools could cause blood vessel or nerve damage in the fingers, hands, and joints of people prone to circulation disorders or abnormal swelling. Prolonged use in cold weather has been linked to blood vessel damage in otherwise healthy people.
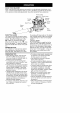
KNOW YOUR BLOWER READ THIS INSTRUCTION MANUAL AND SAFETY RULES BEFORE OPERATING YOUR UNIT. Compare the illustrations with your unit to familiarize yourself with the location of the various controls and adjustments. Save this manual for future reference. Primer Button Choke Throttle Lever Lever Fuel Mix Rope Blower Tube \ Rear Handle THROTTLE LEVER The THRO]q-LE LEVER is used to select the desired engine speed and to stop the engine. Move the throttle lever to the position for full speed operation.
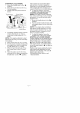
OPERATING POSITION products in the fuel tank or permanent damage may occur. Fuel stabilizer is an acceptable alternative in minimizing the formation of fuel gum deposits during storage. Craftsman brand oil is already blended with fuel stabilizer. See the STORAGE section for additional information. Eye Protection NOTE: Unit must be placed on its side when adding fuel (see illustration below).
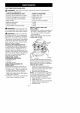
STARTING A COLD 1. Move the throttle position. 2. Move the choke CHOKE position. 3. Slowly press the times. Throttle Lever ENGINE lever to the If the engine has not started after 5 pulls (at HALF CHOKE), repeat the STARTING A COLD ENGINE procedure. If the engine still does not start, proceed to STARTING A FLOODED ENGINE. lever to the FULL primer button 8 9. To stop the engine, move the throttle lever to the STOP position.
CUSTOMER RESPONSIBILITIES A(_ WARNING: Disconnect the spark plug before performing maintenance, service, or adjustments.
REPLACE SPARK PLUG CHECK MUFFLER MOUNTING SCREWS Once each year, ensure muffler mounting screws are secure and tightened properly to prevent damage. Replace spark plug each year to ensure the engine starts easier and runs better. Set spark plug gap at 0.025 inch. Ignition timing is fixed, nonadjustable. 1. Twist, then pull off spark plug boot. 2. Remove spark plug from cylinder and discard. 3. 4. Replace with Champion CJ-6Y spark plug and tighten securely with a 3/4 inch socket wrench.
ENGINE • Remove spark plug and pour 1 teaspoon of 40:1,2-cycle engine oil (air cooled) through the spark plug opening. Slowly pull the starter rope 8 to 10 times to distribute oil. • At the beginning of the next season, use only fresh fuel having the proper gasoline to oil ratio. OTHER • Do not store gasoline from one season to another. • Replace spark plug with new one of recommended type and heat range. • Clean air filter. • Check entire unit for loose screws, nuts, and bolts.
YOUR WARRANTY RIGHTS AND OBLIGATIONS: The U.S. Environmental Protection Agency/California Air Resources Board and Sears, Roebuck and Co., U.S.A., are pleased to explain the emissions control system warranty on your year 2005 and later small off-road engine. In California, all small off-road engines must be designed, built, and equipped to meet the State's stringent anti-smog standards.
vice center or call Sears at 1-800-469-4663. WHERE TO GET WARRANTY SERVICE: Warranty services or repairs shall be provided at all Sears Service Centers. Call 1-800-469-4663.
Declaraci6n de Garantia Reglas de Seguridad Montaje Uso 15 15 18 18 AImacenaje Tabla Diagn6stica Declaraci6n de Emision Lista de Piezas Mantenimiento 22 Repuestos GARANTIA DE UN AI_IO COMPLETOS SOLINA DE LA MARCA CRAFTSMAN y Encargos PARA EL PROPULSOR ® 24 25 26 13 Contratapa DE AIRE A GA- Durante un (1) a_o a partir de la fecha de compra, siempre que se haga el mantenimiento, la lubricaci6n y los ajustes en este Propulsor de Aire a Gasolina segl3n las instrucciones de uso y mantenimiento en el m
• Mantenga el cabello per encima de los hombros, at&ndolo para tal efecto si es necesario. No use joyas, ropa suelta, ni ropa con tiras, corbatas, borlas, etc. que cuelgen libremente, porque podrian quedar enredadas en las piezas en movimiento del aparato. • No use el aparato estando cansado, enfermo, ansioso, ni bajo la infuencia del alcohol, las drogas u otros medicamentos. • Mantenga a niSos, espectadores y animales a una distancia minima de 10 metros (30 pies) al poner en marcha o al usar el aparato.
• Inspeccione frecuentemente la abertura de entrada de aire y los tubos de propulsion, siempre con el motor detenido y la bujia desconectada. Mantengalas aberturas de ventilaci6n y los tubes de descarga libres de escombros que se pueden acumular y limitar la circulaci6n debida de aire. • Nunca coloque objeto alguno dentro de la entrada de aire ya que de hacerIo podfia limitar la circulaci6n d'aire y daSar el aparato.
CONTENIDO DE LA CAJA Verifique que todos Ice articulos de la siguiente lista est6n incluidos: Modelo 358.794120 • Propulsor de Aire • Tubo de Propulsi6n • Aceite de Motor a 2 Tiempos AVlSO: Es normal que el filtro de combustible golpetee en el tanque vacio. MONTAJE ADVERTENCIA: Esta aparato se debe utilizar para el use de propulsi6n solamente. No intente abrir la compuerta de la entrada de aire. La compuerta abierta de la entrada de aire puede causar serios accidentes.
PALANCA DEL ACELERADOR La PALANCA DEL ACELERADOR se uso para seleccionar la velocidad deseada y para detener el motor. Mueva la palanca del acelerador a la posici6n ,t_ para maxima velocidad. Mueva la palanca del acelerador a la posici6n -_ para conseguir la marcha lenta. Para detener el motor, mueva la palanca del acelerador a la posici6n STOR BOMBEADOR El BOMBEADOR es usado para remover aire de el carburador y de las lineas de combustible y las Ilena de mezcla de combustible.
Este motor est& habilitado para funcionar con gasolina sin plomo. Antes de comenzar con el uso, se deber& mezclar la gasolina con un aceite de sint6tico de buena calidad AVISO: El aparato se debe poner de lado al agregar el combustible (vea la ilustraci6n abajo). para motores de 2 tiempos enfriados a aire. Recomendamos el aceite de sint6tico de la marca Craftsman. Mezcle la gasolina con el aceite en la proporci6n 40:1.
PARA ARRANCAR CON MOTOR FRIO 1. Mueva la palanca del acelerador a la posici6n 4r_. 2. Mueva la palanca del cebador a la posici6n FULL CHOKE. 3. Lentamente, presione el bot6n del bombeador 8 veces. Palanca del Botch del aceterador bombeador Palanca 4. del cebador Firmemente, tire del mango de la cuerda de arranque hasta que el motor intente arrancar, pero no m&s de 5 tirones (en temperatures bajo los 30 ° F, 8 tirones).
RESPONSABILIDAD DEL USUARIO ADVERTENCIA: servicio, o ajustes.
Limpieza del filtro del aire: 1. Limpie la cubierta y el &rea contigua para evitar que caiga tierra en la c&mara del carburador cuando remueva la cubierta. 2. Retire las piezas como se ilustra. AVlSO: No limpie el filtro de aire con gasolina ni ning0n otto solvente inflamable, ya que de hacerlo puede crear peligro de incendio y de emiclones evaporativas nocivas. 3. Lave el filtro con agua y jab6n. 4. Permita que el filtro se seque. 5.
ADVERTENClA: Realice los si- guientes pasos despu6s de cada uso: • Permita que el motor se enfr[e y fije bien el aparato antes de guardarlo o transportarlo. • Guarde el aparato y el combustible en un lugar bien ventilado donde los vapores de combustible no puedan entrar en contacto con chispas o llamas abiertas provenientes de termotanques, motores o interruptores el6ctricos, calefactores centrales, etc.
TABLA DIAGNOSTICA ADVERTENCIA: Siempre apague el aparato y desconecte la bujia antes de hacer cualquiera de las reparaciones recomendadas a continuaci6n que no requieran que la unidad est6 en operaci6n. SlNTOMA CAUSA El motor no 1. El motor esta ahogado. SOLUCION arranoa. 2. El tanque de combustible est& vacio. 3. La bujia no estA haciendo chispa. 4. El combustible no est'. Ilegando al carburador. 5. La compresi6n El motor no anda en marcha lenta como debe. estA baja. 1.
SUS DERECHOS Y OBLIGACIONES DE GARANTIA: La Agencia de Protecci6n Ambiental de los Estados Unidos, la Junta de Recursos Ambientales de California y Sears, Roebuck and Co., U.S.A., se complacen en explicar la garantia con la que cuenta el sistema de control de emisi6n en su motor pequefio, modelo 2005 y m&s adelante, para uso fuera de carretera.
para efectos de "reparaci6n o reemplazo si fuera necesario" deber_, garantizarse per un periodo de dos a_os. Cualquier pieza garantizada que este programada para ser reemplazada come parte del mantenimiento requerido deber_, estar garantizada por el periodo de tiempo que comienza en la fecha de compra inicial hasta la fecha del primer reemplazo programado para dicha pieza.