Operator's Manual 32cc/1.9 cu.in. 2-Cycle 17 Inch Cutting Path / 0.095 Inch Line GASOLINE BRUSHWAOKER ® Model No. 358.795820 • Safety • Assembly • • Operation Maintenance • Parts List • Espar_ol, p. 26 DANGER: Read and follow all Safety Rules and Operating Instructions before first use of this product. For answers Call 7 am-7 to your questions about this product: pm, Mon.-Sat., or 10 am-7 pm, Sun. 1-800-235-5878 Sears, Roebuck and Co., Hoffman 545140961 1/11/07 Rev.
Warranty Statement Identification ofSymbols Safety Rules Assembly Operation Maintenance Service &Adjustments TWO YEAR FULL WARRANTY 2 2 3 5 10 18 19 Storage 20 Troubleshooting Table 21 Emissions Statement 22 Parts List 24 Spanish 26 Parts andOrdering Back Cover ON CRAFTSMAN ® GAS BRUSHWACKER ® When used and maintained according to the operator's manual, if this product fails due to a defect in material or workmanship within two years from the date of purchase, return it to any Sears store, Sears Serv
,tl mlWARNING: When using gardening appliances, basic safety precautions must always be followed to reduce the risk of fire and serious injury. '|_'WARNING: Hazard zone for thrown objects. Blade/trimmer line can throw objects violently. Others can be blinded or injured. Keep people and animals 50 feet (15 meters) away. ,_ DANGER: This power tool can be dangerous! This unit can cause serious injury including amputation or blindness to the operator and others.
• Secure hairabove shoulder length. • Keep others away when making carSecure orremove loose clothing and buretor adjustments. jewelry orclothing withloosely hang- • Use only recommended Craftsman ingties, straps, tassels, etc.Theycan accessories and replacement parts. • Have all maintenance and service not becaught inmoving parts. • Being fullycovered alsohelps protect explained in this manual performed by youfromdebris andpieces oftoxic your Sears Service Center. plants thrown byspinning line/blade.
TRANSPORTING AND STORAGE • Stop the unit before carrying. • Keep muffler away from your body. • Allow the engine to cool and secure the unit before storing or transporting it in a vehicle. • Empty the fuel tank before storing or transporting the unit. Use up fuel left in the carburetor by starting the engine and letting it run until it stops. • Store unit so the blade or line limiter blade cannot accidentally cause injury. The unit can be hung by the shaft. • Store unit out of reach of children.
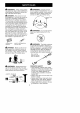
ATTACHING Coupler DANGER: Shipping protector 2. 3. 4. 5. 6. Knob TIGNTFN Remove shipping protector from coupler. Remove the shaft cap from the attachment (if present). Position locking/release button of attachment into guide recess of coupler. Push the attachment into the coupler until the locking/release button snaps into the primary hole. Before using the unit, tighten the knob securely by turning clockwise.
2. Place theupper shoulder strap clamp overtheshaft. 3. Position thelower shoulder strap clamp under theshaft andalign the upper andlower clamp screw holes. ! 5. - TRIMMER HEAD Upper Shoulder Strap Clamp J Strap Lower Clamp Shoulder ! 4. ASSEMBLY INFORMATION TRIMMER HEAD INSTALLATION OF THE TRIMMER HEAD NOTE: Before installing the trimmer head, make sure the dust cup and retaining washer are positioned on the shaft of the gearbox.
ATTACHING THE PLASTIC _WARNING: SHIELD The shield must be properly installed. The shield provides partial protection from the risk of thrown objects to the operator and others and is equipped with a line limiter blade which cuts excess line to the proper length. The line limiter blade (on underside of shield) is sharp and can cut you. 1. Remove wing nut from shield. 2. Insert bracket into slot on shield. 3. Pivot shield until bolt passes through hole in bracket. 4. Tighten the wing nut securely.
8-POINT BLADE DECAL SIDE OF BLADE MUST FACE GEARBOX 5. 6. Place the cupped washer onto the shaft. Make sure the cupped side of the washer is toward the blade. Install the blade nut by threading onto the shaft counterclockwise. NOTE: Make sure all parts are in place as illustrated, and the blade is sandwiched between the dust cup and the retaining washer. There should be no space between the blade and the dust cup or the retaining washer. 7.
KNOW YOUR BRUSHWACKER READ THiS OPERATOR'S MANUAL AND SAFETY RULES BEFORE OPERATING YOUR UNIT. Compare the illustrations with your unit to familiarize yourself with the location of the various controls and adjustments. Save this manual for future reference. Handlebar J Trimmer Coupler Head X& Line Limiter Blade ON/OFF Switch Starter Handle ,_/ Primer Bulb / Blade Muffler ON/OFF SWITCH The ON/OFF SWITCH is used to stop the engine. Move the switch to the OFF position to stop the engine.
Toavoid engine problems, empty the controlled and steady motion until fuelsystem before storage for30days engine starts and runs. 6. Allow unit to run for 5 seconds, then orlonger. Drain thegastank, start the engine andletitrununtil thefuellines fully squeeze the throttle trigger to andcarburetor areempty. Usefresh disengage the starting system (start fuelnextseason. lever returns to RUN position). Never useengine orcarburetor clean- STARTING A WARM ENGINE erproducts inthefueltankorperma- 1.
1. Loosen the coupler by turning knob counterclockwise. the Secondary Hole Upper Shaft Coupler LOOSEN Attachment Locking/Release Button in Primary TIGHTEN 2. Knob Press and hold the locking/release button. Hole OPERATING INSTRUCTIONS To maximize operating efficiency, do not run the engine for longer than 1 minute at a time at full throttle. OPERATING POSITION ALWAYS WEAR: Locking/Release Button Hearing Protection Eye Protection Attachment 3.
be thrown into eyes and face and cause blindness or other serious injury. Before trimming, bring engine to a speed sufficient to cut material to be trimmed. Do not run the engine at a higher speed than necessary. The cutting line will cut efficiently when the engine is run at less than full throttle. At lower speeds, there is less engine noise and vibration. The cutting line will last longer and will be less likely to "weld" onto the spool.
_ Sweeping OPERATING INSTRUCTIONS FOR USE WITH BRUSH BLADE • Blade Thrust is a reaction that only occurs when using a bladed unit. This reaction can cause serious injury such as amputation. Carefully study this section. It is important that you understand what causes blade thrust, how you can reduce the chance of its occurring, and how you can remain in control of unit if blade thrust occurs.
.0%____ __ dt_WARNING: For each optional attachment used, read entire instruction manual before use and follow all warnings and instructions in manual and on attachment. _WARNING: Ensure handlebar remains installed on upper shaft (engine end of unit) at all times. EDGER SAFETY WARNING: Inspect the area to be edged before each use. Remove objects (rocks, broken glass, nails, wire, etc.) which can be thrown by the blade or can wrap around the shaft.
A WARNING: Inspect the area to be cultivated before starting the unit. Remove all debris and hard and sharp objects such as rocks, vines, branches, rope, string, etc. • Avoid heavy contact with solid objects that might stop the tines. If heavy contact occurs, stop the engine and inspect the unit for damage. • Never operate the cultivator without the tine cover in place and properly secured. • Keep the tines and guard clear of debris.
4_WARNING: To prevent serious injury, do not use more than one boom extension with a pole pruner attachment. _WARNING: Keep the pruner away from power lines or electrical wires. • Only use for pruning limbs or branches up to 4 inches (10 cm) in diameter. • Do not operate the unit faster than the speed needed to prune. Do not run the unit at high speed when not pruning. • Always stop the unit when work is delayed or when walking from one cutting location to another.
MAINTENANCE SCHEDULE _1_ WARNING: Disconnect the spark plug before performing except for carburetor adjustments.
REPLACE SPARK PLUG Replace the spark plug each year to ensure the engine starts easier and runs better. Set spark plug gap at 0.025 inch (0.6 mm). Ignition timing is fixed and nonadjustable. 1. 2. 3. 4. LINE REPLACEMENT • Always use Craftsman replacement line. Choose the line size best suited for the job at hand. Red line is designed for cutting grass and small weeds. The black colored line is designed for cutting larger weeds and light brush.
Make adjustments withtheunitsupported sothecutting attachment isoff theground andwillnotmake contact withanyobject. Holdtheunitbyhand whilerunning andmaking adjustments. Keep allpartsofyourbody away fromthecutting attachment and muffler. IdleSpeed Adjustment Allow engine to idle. Adjust speed until engine runs without trimmer head or blade moving or spinning (idle too fast) or engine stalling (idle speed too slow). • Turn idle speed screw clockwise to increase engine speed if engine stalls or dies.
TROUBLESHOOTING _,WARNING: TABLE Always stop ing all of the recommended unit to be operating. unit and disconnect remedies TROUBLE CAUSE Engine will not start. 1. ON/OFF switch OFF position. 2. Engh_e flooded. below spark except plug before remedies perform- that require REMEDY in 3. Fuel tank empty. 4. Spark plug not firing. 5. Fuel not reaching carburetor. 6. Carburetor requires adjustment. 1. Move ON/OFF switch to the ON position. 2. See "Starting a FIooded Engine" in Operation Section.
YOUR WARRANTY RIGHTS AND OBLIGATIONS: The U.S. Environmental Protection Agency/California Air Resources Board and Sears, Roebuck and Co., U.S.A., are pleased to explain the emissions control system warranty on your year 2007 and later small off-road engine. In California, all small off-road engines must be designed, built, and equipped to meet the State's stringent anti-smog standards.
WHERE TO GET WARRANTY SERVICE: Warranty services or repairs shall be provided at all Sears Service Centers. Call 1-800-469-4663. MAINTENANCE, REPLACEMENT AND REPAIR OF EMISSION RELATED PARTS: Any Sears approved replacement part used in the performance of any warranty maintenance or repair on emission related parts will be provided without charge to the owner if the part is under warranty.