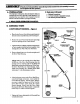
IMPORTANT MANUAL Do Not Throw Away manual MODEL NO, (17 Cutting Path) A WARNING: Read the Operator's Manual and Follow All Warnings and Safety Instructions. Failure To Do So Can Result in Serious Injury. Always Wear Eye Protection During Operation SEARS / CRAFTSMAN. 26¢cc GAS WEED WACKER’ 2 Cycle Engine Fuel Mix 40:1 * Assembly * Maintenance ® Operation ® Repair Parts Sold by Sears, Roebuck and Co., Chicago, 111. 60684 U.S.A. arrears, Roebuck and Co.
ONE YEAR LIMITED WARRANTY ON CRAFTSMAN WEEDWACKER® For One Year from date of purchase, when this Weedwacker® is maintained, lubricated, and wend up according tithe operating and maintenance instructions in the operator's manual, Sears will repair free of charge any defect in material or workmanship. “This warranty excludes nylon ine, spark plug, and sit cleaner; which are dependable parts and become worn during normal Ly use.
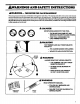
A WARNINGS AND SAFETY INSTRUCTIONS WARNING ~— THIS POWER TOOL CAN BE DANGEROUS! This tool can cause serious injury or blindness tithe operator and others, The warnings and safety instructions in this manual must be followed to provide reasonable safety and efficiency in using this tool. The operator is responsible for following the warnings and instructions in this manual and on the tool.
A WARNINGS AND SAFETY INSTRUCTIONS. continues) & OPERATOR SAFETY 1. Always wear a safety face shield or safety poles. See “Accessories.” 2. Keep hair, fingers, and alt other parts of the body away from openings and moving parts. Always wear heavy, long pants, boots, and gloves. Do not wear loose clothing, jewelry, short pants, sandals, or go barefoot. Secure hair so it is above shoulder length.
KNOW YOUR TRIMMER A. INTRODUCTION C. CARTON CONTENTS Your Trimmer is a versatile product developed for large KEY 7 Screw Throttle Trigger Housing i 18 Nut Throttle Trigger Housing Bracket Assist Handle lawns and wo make short work of a variety of fawn care tasks NO. Qry. trimming, scalping, mowing, and sweeping. 1 Engine 1 Special Features Incidence: .
om ASSEMBLY (11 tool is received assembled, repeat all steps in this section o be sure assembly is correct and is adjusted for the operator.) A. PREPARATION 2. Tools you will need: This Operator's Manual has been developed to help you a. Flathead Screwdriver. assemble the tool and to provide its safe operation. Iris b. 1-1/4 inch wrench or adjustable ch important that you read the entire manual to become o Hex Wrench died with tool. " familiar with the 100! before you begin assembly. 1.
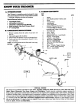
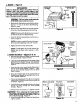
2. THROTTLE CABLE — Figures 2,2,405 [CARNATION] Downtrend the throttle cable. a, Slide the Throttle Trigger Housing from the Foam Grip about 17 to L127 b. Insert the Throttle Cable through the tunnel in the Foam Grip until the end of the Cable extends at least 2 inches beyond the Grip. Figure 3. c. Hold the Trigger away from the Drive Shaft Housing and insert the barrel end of the Throttle Cable into the round opening in the Trigger as shown in Figure 3.
4. Shield ~ Figures A WARNING Failure to install the shield in the position shown in Figures 8 and 9 can result in serious injury to the operator. The length of the shield must be aligned with the length of the drive shaft housing. Direct the widest part of the shield toward the engine, ‘The Line Limiter (on the underside of the shield) is sharp and can cut you. a. Match the Key (Raised area) on the Shield with the Key way ("V" slot) on the Drive Shaft Housing. Figure 8 (inset). b.
6. OPERATING POSITION ~ Figure 11 8. Before starting the Engine, stand as shown in Figure 11 and check for the following: 1). Left arm fully extended, hand holding Assist Handle. 2). Right arm slightly bent, hand holding the Foam Grip, fingers on Throttle Trigger. 3). Engine below waist level. 4). Weightlifter evenly distributed between arms. 5). Without operator bending over, the Trimmer Head is near and parallel tithe ground and easily contacts the material to be cut. b.
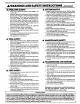
ENGINE INFORMATION A. FUELING YOUR ENGINE 1.FUEL SAFETY a. Use only recommended fuel mixtures. b. Mix and pour fuel outdoors and where there are no sparks or flames. ¢. Use a container approved for fuel. d. De not smoke or allow smoking near fuel or the tool or while using the tool. ¢. Wipe up all fuel spills before starting the engine. f. Move at least 10 feet (3 meters) away from fueling site before starting engine. £. Stop engine before removing fuel cap. Allow the engine to cool before refueling. h.
B. PREOPERATIVE CHECKS A WARNING Review all Warnings and Safety Instructions in this manual, Before operating your fool, always: 1. Inspect the entire tool before each use. Replace damaged parts. Check for fuel leaks and make sure all fasteners are in place and securely fastened. 2. Replace trimmer head parts that are cracked, chipped, broken, or damaged in any other way before using this tool. 3. Use only 080" diameter Sears Laser Line®. Never use wire, rope, string, etc. 4.
4. Fora Warm Engine (After Running Out of Fuel): a. Refuel engine. Move 10 feet (3 meters) away from the fueling site. b. Move Ignition Switch to “on.” Figure I3, ¢. Move Choke to “full” position. Figure 14. d. Grasp Foam Grip and squeeze Throttle Trigger fully. Keep Throttle Trigger fully squeezed until engine runs smoothly, ¢. Pull Starter Rope sharply until engine attempts to Tun, but no more than 5 pulls. £. Move Choke to “off” position. Figure 14. g.
A. TRIMMER SAFETY 19 Always wear a safety face shield or goggles, See “Accessories.” Keep hair, fingers, and all other parts of the body away from openings and moving parts. Always wear heavy, long pants, boots, and gloves. Do not wear loose clothing, jewelry, short pants, sandals, or go barefoot. Secure hair spit is above shoulder length.
C. CUTTING METHODS ® The tip of the line does the cutting, Allow the line io trim tits own pace. You will achieve better results by not crowding the line into the cutting area. The right and wrong ways are shown in Figure 16. # The line will easily remove grass and weeds from around walls, fences, trees, and flower beds, buf it also can cut the tender bark of trees or shrubs and scar Fences.
Is D. LINE REPLACEMENT ® For proper line feed: Use only genuine Sears per-wound spools and 080” diameter Sears Laser Line® Use of other types of spools or lines can result in excessive ‘breakage, line welding, and improper line feed. — Pr-wound spools offer the most convenient method for replacing line as well as optimum performance. ® Always clean dirt and debris from the spool and hub when performing any type maintenance. Uninstalling Spool wiling a. Hold the Trimmer Head as shown in Figure 21.
3. Trouble Shooting the Trimmer Line @ Does not advance, or breaks while cutting ~ Improperly routed in head. — Improperly wound onto spool. — Line size incorrect. — Tou little line outside head. ® Welds on spool — Line size incorrect, — Incorrect spool. ~~ Crowding line against material being cut. — Cutting at higher speeds than necessary. — Wound loosely on spool. GENERAL MAINTENANCE A. MAINTENANCE SAFETY 1. Maintain the tool according to recommended procedures. Keep the trimmer line at the proper length.
C. STARTER ROPE 4A DANGER Never start the engine with the clutch shroud removed. The clutch will fly apart and cause serious injury. A WARNING Do net remove the retaining tab and screw to remove pulley. The spring beneath the pulley is under tension and can fly out causing serious injury, If any part of the pulley Lousing assembly is damaged other than the rope, donor use the tool. Take it to your Sears Service Center. 1 2. 4. Disconnect Spark Plug Wire, Figure 28.
13. Pull the melted ends through a thick, clean rag while the Rope is still hot to obtain smooth, pointed ends. 14. Insert one end of the Rope through the Handle and secure with a knot. 15. Insert the other end of the Rope through the Rope Exit Hole, into the inside of the Housing, into the Pulley, and up through the Pulley Hole. See Inset, Figure 31. 16. Wrap Rope counterclockwise around the Pulley Ratchet and tuck loose end under Rope where incomes out of the Pulley Hole.
E. CARBURETOR ADJUSTMENTS # This is a complicated task and it is important to follow instructions in sequence as indicated. A Warning Make carburetor adjustments with the driveshaft honing supported to prevent trimmer line from contacting any object. Hold the tool with your hand. Do not use the optional shoulder strap for support. A Warning Keep others away when making carburetor adjust meets. WARNING Serious injury tithe operator and others can occur if the carburetor is not properly adjusted.
¢. ACCELERATION CHECK engine to idle. Trigger fully a. If performance is satisfactory, proceed to “d. Deceleration Check.” b. If the engine does not accelerate smoothly, turn the Low Speed Mixture Screw (Figure 26) counterclockwise a small amount (no more than the width of the slot in the adjusting screw). step until smooth acceleration is obtained. NOTE: It may be necessary to repeat b. Idle Speed Adjustment” through “c. Acceleration Check,” to obtain correct adjustments. instructions in “d.
F.STORAGE 1. Allow the engine to cool, empty the fuel system, and secure the tool before transporting or storing. 2. Before storing the tel, use up fuel left in the fuel lines and carburetor by starting the engine and letting it run until it stops, NOTE: If you do not want to remove the fuel from your unit, SEARS CRAFTSMAN Fuel Stabilizer EE A 3. Store tool and fuel in an area where fuel vapors cannot reach sparks or open flames from water heaters, electric motors or switches, furnaces, etc.
SEARS WEEDWACKER® REPAIR PARTS LIST 26 Lubrication @—16 A warning All repairs, adjustments and maintenance not described in the Operator's Manual must be per WPP—29 formed by qualified derv. ice personnel. 27 Operator's Manual | 25 Key Fart Description Rey Fart Description 1 530-027549 | Throttle Cable Says. 17 530-094592 | Hub Ass'y.
SEARS WEEDWACKER® REPAIR PARTS LIST ~ Xo) mon Description Key Tent Description 1 530-015773 Screw 5 530-015768 Lockout 2 530-027529 Air Filter Cover 51 530-039136 Flywheel Says.
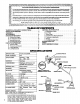
Trouble Shooting Chart MODULE AIR GAP OIL, ENGINE Ratio to Gasoline. Types to Use; not to Use . OPERATION Soa ot Hn iim Checks Position Fuel Mixture . Starter Pulley. WELLER Sheba Storage Trouble Shooting . ENGINE OIL Ratio to Gasoline Types to Use; not to Use FILTER, AIR FLEXIBLE DRIVE SHAFT LUBRICATION . FUEL. Gasoline/Oil Mixture Mixing Fuel. Pouring Fuel | Safety . .. Tor .
QUICK REFERENCE PAGE Read and Follow All Warnings, Safety Instructions and Operating Instructions. Failure to do so can result in serious injury. Page No. PREPARATION. . . i ict 308 1. Know all warnings and safety instructions in this manual 2. Wear safety face shield or goggles for eye protection. 3. Dress safely boots or safety shoes and heavy, long pants. 4, Check tool for worn, loose, missing or damaged parts; repair or replace as necessary before using the tool. 5.
operator’s manual MODEL NO. 17" Cutting Path) How to Order Repair parts SEARS SERVICE IS AT YOUR SERVICE The Model Number will be found onto of the engine with the Serial Number. Always mention the Model Number when requesting service or repair for your unit. All parts listed herein may be ordered fro many Sears Service Center and most Sears Stores. WHEN ORDERING REPAIR PARTS GIVE THE FOLLOWING INFORMATION AS SHOWN IN THIS LIST. 1. The PART NUMBER 3. The PART DESCRIPTION 2.