Operator's Manual CRFIFTSMFIN 24cc/1.3 cu.in. 2-Cycle 17 Inch Cutting Path / .080 In. Line GASOLINE WEEDWAOKER ® Model No. 358.798212 WARNING: Read and follow all Safety Rules and Operating Instructions before first use of this product. For answers Call 7 am-7 to your questions about this product: pm, Mon.-Sat., or 10 am-7 pm, Sun. 1-800-235-5878 Sears, 530087720 Roebuck 2/25/00 and Co.
Warranty Statement Safety Rules Assembly Operation Maintenance Service & Adjustments 2 2 4 5 8 9 Storage Troubleshooting Chart Emissions Statement Parts List Spanish Parts and Ordering FULL ONE YEAR WARRANTY ON CRAFTSMAN WEEDWACKER _ LINE TRIMMER.
If situations occur which are not covered in this manual, use care and good judgment. If you need assistance, contact your Sears Service Center or call 1-800-235-5878. OPERATOR SAFETY • Always wear safety eye protection. • Always wear long pants, long sleeves, boots, and gloves. Wearing safety leg guards is recommended. Do not go barefoot or wear sandals. Stay clear of spinning line. • Secure hair above shoulder length.
weather hasbeen linked toblood vesseldamage inotherwise healthy people. Ifsymptoms occur suchas numbness, pain, lossofstrength, change inskincolorortexture, orloss offeeling inthefingers, hands, or joints, discontinue theuseofthistool attention. AnantiSPECIAL NOTICE: Exposure tovibra- andseekmedical tionsthrough prolonged useofgaso- vibration system doesnotguarantee linepowered hand toolscould cause theavoidance ofthese problems.
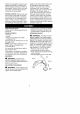
KNOW YOUR TRIMMER READ THIS OPERATOR'S MANUAL AND SAFETY RULES BEFORE OPERATING YOUR UNIT. Compare theillustrations withyourunittofamiliarize yourself withthelocation of the various controls and adjustments. ence. Save this manual for future refer- Assist Handle Tube Trimmer Head \\ Throttle Muffler ON/STOP Trigger ........... Switch \ Spark Plug Starter ...... Shield Choke Lever \ Primer Bulb Fuel Mix Fill Cap CHOKE ON/STOP SWITCH The STOP switch is used to stop engine.
engine andletitrununtilthefuellines • Move choke lever to HALF CHOKE andcarburetor areempty. Usefresh position. fuelnextseason. • Pull starter rope handle no more than Never useengine orcarburetor clean- 6 pulls, until engine runs. erproducts inthefueltankorperma- NOTE: If the engine has not started nentdamage mayoccur. after 6 pulls (at HALF CHOKE), check to SeetheSTORAGE section foraddition- make sure the choke lever is in the alinformation. proper position.
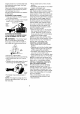
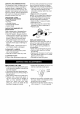
To advance line, tap bottom of trimmer head on ground one time. OPERATING INSTRUCTIONS OPERATING POSITION ALWAYS WEAR: _ ,,_'_'_ H_°;gy _t_s Cut from Llrnplei_e rg_hU.t s line t° "_ _-.. Eye Protection ___ your right to your left. Bring the engine to cutting speed before entering the material to be cut. Do not run the engine at a higher speed than necessary. The cutting line will cut efficiently when the engine is run at less than full throttle.
• For trimming or scalping, use less than full throttle to increase line life and decrease head wear, especially: • During light duty cutting. • Near objects around which the line can wrap such as small posts, trees or fence wire. • For mowing or sweeping, use full throttle for a good clean job. MOWING - Your trimmer is ideal for mowing in places conventional lawn mowers cannot reach. In the mowing position, keep the line parallel to the ground.
GENERAL RECOMMENDATIONS formance andincreases fuelconsumpemissions. Always Thewarranty onthisunitdoesnotcov- tionandharmful clean afterevery 5 hours ofoperation. eritems thathavebeen subjected to • Clean thecover andtheareaaround operator abuse ornegligence. Toreittokeep dirtfromfalling intothe ceive fullvalue fromthewarranty, the chamber when thecover operator must maintain unitasinstruct- carburetor edinthismanual. Various adjustments isremoved. • Remove partsasillustrated.
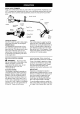
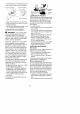
• Insert thelineintothetheexitholes in thehubasshown intheillustration. Lineexitholes Line in Notch \ Screw (with Limiter Cap) Hub f Line in Notch • Align notches with the line exit hole. • Push the spool into the hub until it snaps into place. • Pull the line extending outside of the hub to release it from the notch. CARBURETOR Z_ _, WARNING: ADJUSTMENT The trimmer head will be spinning during most of this procedure. Wear your protective equipment and observe all safety precautions.
judge by how well the engine performs while cutting. • Counterclockwise if the engine has speed but dies or lacks power while cutting. After completing adjustments, check for acceleration. Reset if necessary. Acceleration Prepare unit for storage at end of season or if it will not be used for 30 days or more. stabilizer to the gasoline in the fuel tank or fuel storage container. Follow the mix instructions found on stabilizer container. Run engine at least 5 minutes after adding stabilizer.
TROUBLESHOOTING CHART TROUBLE CAUSE REMEDY Engine will not start. • • • • • • • • Engine flooded. Fuel tank empty. Spark plug not firing. Fuel not reaching carburetor. • Compression Engine will not idle properly. See "Starting Instructions." Fill tank with correct fuel mixture. Install new spark plug. Check for dirty fuel filter; replace. Check for kinked or split fuel line; repair or replace. • Contact a Sears Service Center. low. • Idle speed set too low. • Idle speed set too high.
repaired orreplaced bySEARS. maintenance, or which is scheduled OWNER'S WARRANTY RESPONSI-only for regular inspection to the effect BILITIES: Asthelawnandgarden of "repair or replace as necessary" equipment engine owner, youarere- shall be warranted for 2 years. Any sponsible fortheperformance ofthe warranted part which is scheduled for required maintenance listed inyour replacement as required maintenance Owner's Manual.