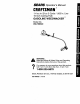
_6 Operator's Manual CRRFTSMRN_ 1.4 cu. in./21cc 2-Cycle / .065 In. Line 16 Inch Cutting Path ® GASOLINE WEEDWACKER Model No. 358.798520 WARNING: Read and follow all Safety Rules and Operating Instructions before first use of this product. For answers to your questions about this product: Call 7 am-7 pm, Mon-Sat; Sun, 10 am-7 pm 1-800-235-5878 Sears, Roebuck and Co., Hoffman Estates IL 60179 USA 530..
Warranty Statement Safety Rules Assembly Operation Maintenance 2 2 4 5 8 Service & Adjustments Storage Troubleshooting Chart Spanish Parts and Ordering 9 11 12 16 Back FULL ONE YEAR WARRANTY ON CRAFTSMAN GAS POWERED WEEDWACKER ® LINE TRIMMER.
• Move at least 10 feet (3 meters) away from fueling site before starting engine. • Stop engine and allow to cool before removing fue] cap. CUTTING SAFETY • Use only for trimming, mowing, edging, and sweeping. Do not use for pruning or hedge trimming. • Inspect the area before each use. Remove objects (rocks, broken glass, nails, wire, etc.) which can be thrown by or become entangled in line. Hard objects can damage the trimmer head and be thrown causing serious injury. • Keep firm footing and balance.
legally responsible for installing and maintaining the operating condition of these parts. Failure to do so is a violation of the law, Refer to the MAINTENANCE section in this manual. vessel damage in otherwise healthy people. If symptoms occur such as numbness, pain, loss of strength, change in skin color or texture, or loss of feeling in the fingers, hands, or joints, discontinue the use of this tool and seek medical attention. An antivibration system does not guarantee the avoidance of these problems.
KNOW YOUR TRIMMER READ THIS OPERATOR'S MANUAL AND SAFETY RULES BEFORE OPERATING YOUR UNIT, Compare the illustrations with your unit to familiarize yourself with the location of the various controls and adjustments. Save this manual for future reference. Assist Handle Tube On/Stop Switch _Thro_le Trimmer Head Starter Rope Choke Lever Debris Shield Line Primer Bulb Fuel Mix Fill Cap ON/STOP SWITCH The On/Stop switch is used to stop the engine. Press and hold the switch to stop the unit.
andcarburetor areempty. Usefresh fuelnextseason. Neveruseengine or carburetor cleaner products in the fuel tank or permanent damage may occur. See the STORAGE section for additional information. STOPPING YOUR ENGINE • Press and hold the On/Stop switch in the STOP position. • If engine does not stop, move choke to the Full Choke position. Choke Lever Engine Stoe STARTING YOUR ENGINE COLD ENGINE OR WARM ENGINE AFTER RUNNING OUT OF FUEL WARNING: The trimmer head will turn while starting the engine.
Iftheunitstilldoesn't start,referto TROUBLESHOOTING chartorcall 1-800-235-5878. OPERATING Always tap the trimmer head on a grassy area. Tapping on surfaces such as concrete or asphalt can cause excessive wear to the trimmer head. INSTRUCTIONS If the line is worn down to 2 in. (5 cm) or less, more than one tap will be required to obtain the most efficient line length. WARNING: Use only .065" (1.6 mm) diameter line. Other sizes of line will not advance properly and can cause serious injury.
WARNING; Always weareyeprotection.Neverleanoverthetrimmer head. Rocks ordebriscanricochet orbe thrown intoeyesandfaceandcause blindness orotherserious injury. TRIMMING - Holdthebottom ofthe trimmer headabout 3 in.(8cm)above theground andatan angle. Allow only the tip of the line to make contact. Do not force trimmer line into work area. Trimm 3 in. (8 cm) Above Ground Mowing I_ ._ _"_'_Ql_\ _ "'_ SWEEPING - The fanning action of the rotating line can be used for a quick and easy clean up.
CHECK FOR DAMAGED WORN PARTS • Wash the filter in soap and water, • Allow filter to dry. • Replace parrs. OR Refer replacement of damaged/worn parrs to your Sears Service Center. • On/Stop Switch - Ensure On/Stop switch functions properly by moving the switch to the "Stop" position. Make sure engine stops; then restart engine and continue. • Fuel Tank - Discontinue use of unit if fuel tank shows signs of damage or leaks. • Debris Shield - Discontinue use of unit if debris shield is damaged.
• Push the line into the notch, leaving 3 to 5 inches (7 - 12 cm) unwound. • Insert the line into the exit hole in the hub as shown in the irlustration. • Align the notch with the line exit hole. • Push the spool into the hub until it snaps into place. • Pull the line extending outside the hub to release it from the notch. Small .
Acceleration Check Mixture Screw (with Limiter Cap) If engine dies or hesitates instead of aecererating, turn mixture adjustment counterclockwise until you have smooth acceleration. Recheck and adjust as necessary for acceptable performance. I___ldle "_lr_:__--. Air Filter Cover -_-_ Prepare unit for storage at end of season or if it will not be used for 30 days or more. WARNING: • Allow engine to cool, and secure the unit before storing or transporting.
TROUBLESHOOTING CHART TROUBLE CAUSE REMEDY Engine will not start. • • • • • • • • Engine flooded. Fuel tank empty. Spark plug not firing. Fuel not reaching carburetor, Compression low. Engine will not idle properly, Engine will not accelerate, lacks power, or dies under a load. Engine smokes excessively. See "Starting Instructions." Fill tank with correct fuel mixture. Install newspark plug. Check for dirty fuel filter; clean. Check for kinked or split fuel line repair or replace.
REPAIR PARTS WARNING SEARS MODEL 356,79852g All repairs, adjustments and maintenance not described 5 must be performed by qualified service personnel 2. t _7. " _ _-- go. Ref. 1. 2. 3. 4. 5. 6, 7. S. 9. 10. 11* 12. 13. 14. 45. Part NO. 530-402473 530_)15880 530-049107 530_)385g 1 530-038580 530-038708 530-015820 530-094742 530092062 530-016152 530-069691 530-095238 530015814 530--069686 71-85839 I Ref. Description Drive Shaft 16. 17. 18, 19. 20. Screw-Throttle Hsg. Trigge_ 33_rottle Hsg.
REPAIR PARTS 41. 40. 45. 44 46. 47 48 8 I 38. 39. 43. 57. 67 73. 59. 71. 3. 66. 1. 60 ReE I 2, 3. 4. 5. 6. 7. 8. 9. 10. 11. 12. • 13. 14. 15. 16. f7. 18. 19. 20. 21._ 22 PaR No.
REPAIR PARTS _arburetor Assembly Kit Number #$30_69642 KIT KIT KIT I 2. Ref. Part NO. , .