Operator’s Manual 21” LAWN MOWER Model No. 247.377440 CAUTION: Before using this product, read this manual and follow all safety rules and operating instructions. • • • • • • SAFETY UNPACKING P. 8 ASSEMBLY OPERATION MAINTENANCE ESPAÑOL Sears Brands Management Corporation, Hoffman Estates, IL 60179, U.S.A. Visit our website: www.craftsman.com Form No.
TABLE OF CONTENTS Warranty Statement. . . . . . . . . . . . . . . . . . . . . . . . . . . . . . Page 2 Service and Maintenance. . . . . . . . . . . . . . . . . . . . Pages 14-16 Safety Instructions. . . . . . . . . . . . . . . . . . . . . . . . . . . . Pages 3-6 Off-Season Storage. . . . . . . . . . . . . . . . . . . . . . . . . . . . . . Page 17 Slope Guide . . . . . . . . . . . . . . . . . . . . . . . . . . . . . . . . . . . . . Page 7 Troubleshooting. . . . . . . . . . . . . . . . . . . . . . . . .
SAFETY INSTRUCTIONS WARNING DANGER This symbol points out important safety instructions which, if not followed, could endanger the personal safety and/or property of yourself and others. Read and follow all instructions in this manual before attempting to operate this machine. Failure to comply with these instructions may result in personal injury. When you see this symbol, HEED ITS WARNING! This machine was built to be operated according to the safe operation practices in this manual.
SAFETY INSTRUCTIONS • If the equipment should start to vibrate abnormally, stop the engine and check immediately for the cause. Vibration is generally a warning of trouble. • Shut the engine off and wait until the blade comes to a complete stop before removing the grass catcher or unclogging the chute. The cutting blade continues to rotate for a few seconds after the blade control is released. Never place any part of the body in the blade area until you are sure the blade has stopped rotating.
SAFETY INSTRUCTIONS • Never store the machine or fuel container near an open flame, spark or pilot light as on a water heater, space heater, furnace, clothes dryer or other gas appliances. • To reduce fire hazard, keep machine free of grass, leaves, or other debris build-up. Clean up oil or fuel spillage and remove any fuel-soaked debris. • Allow machine to cool at least 5 minutes before storing. • General Service: • Never run an engine indoors or in a poorly ventilated area.
SAFETY INSTRUCTIONS SAFETY SYMBOLS This page depicts and describes safety symbols that may appear on this product. Read, understand, and follow all instructions on the machine before attempting to assemble and operate. Symbol Description READ THE OPERATOR’S MANUAL(S) Read, understand, and follow all instructions in the manual(s) before attempting to assemble and operate DANGER — ROTATING BLADES To reduce the risk of injury, keep hands and feet away.
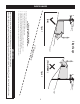
SLOPE GAUGE (OK) Figure 1 Slope Gauge ne d a s h e d li 15° Slope 15° USE THIS SLOPE GAUGE TO DETERMINE IF A SLOPE IS TOO STEEP FOR SAFE OPERATION! To check the slope, proceed as follows: 1. Remove this page and fold along the dashed line. 2. Locate a vertical object on or behind the slope (e.g. a pole, building, fence, tree, etc.) 3. Align either side of the slope gauge with the object (See Figure 1 and Figure 2 ). 4.
ASSEMBLY IMPORTANT: This unit is shipped without gasoline or oil in the engine. Be certain to service engine with gasoline and oil as instructed in the Operation section of the Engine Manual before starting or running your machine. NOTE: Reference to right and left hand side of the Lawn Mower is observed from the operating position. b Unpacking Opening Carton 1. Cut each corner of the carton vertically from top to bottom. 2. Remove all loose parts. 3. Remove loose packing material.
ASSEMBLY NOTE: When pulling upward on handle, make sure to not pull handle all the way out. 4. b. Insert the T-bolts removed in Step 2 through the handle brackets and lower handle and tighten securely to secure the handle in place. See Figure 4. c. Reattach wing nuts and carriage bolts removed in Step 1 into lower holes of handle as shown in Figure 5. a d The rope guide is attached to the right side of the upper handle. Loosen the wing knob which secures the rope guide. Refer to Figure 6. a.
ADJUSTMENTS Attaching Side Discharge Cover Your mower is shipped as a mulcher. To convert to side discharge, make sure grass catcher is off of the unit and rear discharge door is closed. 1. On the side of the mower, lift the mulch cover. See Figure 9. 2. Slide two hooks of side discharge cover under hinge pin on mulching cover assembly. Lower mulching cover. Do not remove side mulching cover at any time, even when you are not mulching.
OPERATION Blade Control Drive Control Electric Starter Push Key Recoil Starter Battery Charger Side Discharge Chute Deck Wash Cutting Height Adjustment Lever Cutting Height Adjustment Lever Trail Shield (Not Shown) Battery Compartment Oil Fill Cap/Dipstick Mulch Cover Figure 13 Blade Control Deck Wash The blade control is attached to the upper handle of the mower. Depress and squeeze it against the upper handle to operate the unit. Release it to stop engine and blade.
OPERATION GAS AND OIL FILL-UP IMPORTANT: This unit is shipped without gasoline or oil in the engine. Be certain to service engine with gasoline and oil as instructed in this section before starting or running your machine. H Oil (one 18 ounce bottle shipped with unit) First Time Use 1. Remove oil fill dipstick (G). See Figure 14. 2. With the mower on level ground, empty entire contents of oil bottle provided into the engine oil fill (H). 3. Replace oil fill dipstick and tighten.
OPERATION WARNING Be sure no one other than the operator is standing near the lawn mower while starting engine or operating mower. Never run engine indoors or in enclosed, poorly ventilated areas. Engine exhaust contains carbon monoxide, an odorless and deadly gas. Keep hands, feet, hair and loose clothing away from any moving parts on engine and lawn mower. 1 TO START ENGINE 1.
SERVICE AND MAINTENANCE MAINTENANCE SCHEDULE Follow the maintenance schedule given below. This chart describes service guidelines only. Use the Service Log column to keep track of completed maintenance tasks. To locate the nearest Sears Service Center or to schedule service, call the following toll free number:1-888-331-4569. WARNING Before performing any type of maintenance/service, disengage all controls and stop the engine. Wait until all moving parts have come to a complete stop.
SERVICE AND MAINTENANCE Mower Maintenance Deck Wash Your mower’s deck is equipped with a water port on its surface as part of its deck wash system. Use the deck wash to rinse grass clippings from the deck’s underside and prevent the buildup of corrosive chemicals. Complete the following steps AFTER EACH MOWING: 1. Push the mower to a level, clear spot on your lawn, near enough for your garden hose to reach. Remove the grass bag if attached.
SERVICE AND MAINTENANCE To ensure safe operation of your mower, periodically check the blade bolt for correct torque. Belt Care NOTE: Several components must be removed in order to change the mower’s self-propulsion drive belt. See an authorized Sears Service Center to have your belt replaced. 2 1 Charging Electric Starter Battery WARNING The battery contains corrosive fluid and toxic material; handle with care and keep away from children. Do not puncture, disassemble, mutilate or incinerate the battery.
OFF-SEASON STORAGE WARNING Never store lawn mower with fuel in tank indoors or in poorly ventilated areas where fuel fumes may reach an open flame, spark, or pilot light as on a furnace, water heater, clothes dryer, or gas appliance. Preparing The Engine Preparing The Lawn Mower For engines stored over 30 days: • Clean and lubricate mower thoroughly as described in the lubrication instructions. • Do not use a pressure washer or garden hose to clean your unit.
TROUBLESHOOTING WARNING Disconnect the spark plug wire and ground it against the engine to prevent unintended starting. Before performing any type of maintenance/service, disengage all controls and stop the engine. Wait until all moving parts have come to a complete stop. Always wear safety glasses during operation or while performing any adjustments or repairs. This section addresses minor service issues.
TROUBLESHOOTING Problem Cause Remedy Idles poorly 1. Spark plug fouled, faulty, or gap too wide. 2. Dirty air cleaner. 1. Reset gap or replace spark plug. 2. Refer to Air Cleaner Maintenance in the Engine Manual. Excessive vibration 1. Cutting blade loose or unbalanced. 2. Bent cutting blade. 1. Tighten blade and adapter. Balance blade. 2. Replace blade. Mower will not mulch grass 1. Wet grass. 2. Excessively high grass. 1. Do not mow when grass is wet; wait until later to cut. 2.
(This page applicable in the U.S.A. and Canada only.) Sears Brands Management Corporation (Sears), the California Air Resources Board (CARB) and the United States Environmental Protection Agency (U.S.
REPAIR PROTECTION AGREEMENT Congratulations on making a smart purchase. Your new Craftsman® product is designed and manufactured for years of dependable operation. But like all products, it may require repair from time to time. That’s when having a Repair Protection Agreement can save you money and aggravation.
ÍNDICE Declaración de garantía. . . . . . . . . . . . . . . . . . . . . . . . . . . . . . 22 Operación. . . . . . . . . . . . . . . . . . . . . . . . . . . . . . . . . . . . . . . . 32-34 Instrucciones de seguridad. . . . . . . . . . . . . . . . . . . . . . . . 23-26 Servicio y Mantenimiento . . . . . . . . . . . . . . . . . . . . . . . . . 35-38 Pendiente De Calibre. . . . . . . . . . . . . . . . . . . . . . . . . . . . . . . . . 27 Almacenamiento fuera de temporada . . . . . . . . . . . . . . . .
INSTRUCCIONES DE SEGURIDAD ADVERTENCIA PELIGRO La presencia de este símbolo indica que se trata de instrucciones importantes de seguridad que se deben respetar para evitar poner en peligro su seguridad personal y/o material y la de otras personas. Lea y siga todas las instrucciones de este manual antes de poner en funcionamiento esta máquina. Si no respeta estas instrucciones podría provocar lesiones personales.
INSTRUCCIONES DE SEGURIDAD • Nunca opere la podadora en césped húmedo. Siempre esté seguro de su equilibrio. Si tropieza y cae puede lesionarse gravemente. Si siente que pierde el equilibrio, suelte inmediatamente la manija de control de la cuchilla y la cuchilla dejará de girar en tres segundos. • Corte el césped solamente con luz de día o con una buena luz artificial. Camine, nunca corra. • Detenga la cuchilla cuando cruce caminos de gravilla, pasos o andadores.
INSTRUCCIONES DE SEGURIDAD • Nunca recargue el tanque de combustible. Llene el tanque no más de 1 pulgada por debajo de la base del cuello de llenado para dejar espacio para la expansión del combustible. • No cambie la configuración del regulador del motor ni acelere demasiado el mismo. El regulador controla la velocidad máxima segura de operación del motor. • Vuelva a colocar la tapa de la gasolina y ajústela bien. • • Limpie la gasolina derramada sobre el motor y el equipo.
INSTRUCCIONES DE SEGURIDAD SÍMBOLOS DE SEGURIDAD Esta página representa y describe la seguridad los símbolos que pueden parecer en este producto. Lea, comprenda, y siga todas instrucciones en la máquina antes procurar para reunir y operar. Símbolo Descripción LEA EL MANUAL(S) DEL OPERADOR Lea, comprenda, y siga todas instrucciones en el manual (manuales) antes procurar para reunir y operar. PELIGRO— GIRANDO HOJAS Para reducir el riesgo de herida, guarde manos y pies lejos.
PENDIENTE DE CALIBRE (ACEPTAR) Figura 1 15° Pendiente ne 15° lí Figura 2 (DEMASIADO ESCARPADO) nua a d i s c onti USO DE ESTE PENDIENTE DE CALIBRE PARA DETERMINAR SI UNA PENDIENTE ES DEMASIADO ESCARPADO PARA UNA OPERACIÓN SEGURA! Para comprobar la pendiente, haga lo siguiente: 1. Borrar esta página y doble a lo largo de la línea discontinua. 2. Localizar un objeto vertical sobre o detrás de la pendiente (un poste, un edificio, una valla, un árbol, etc.) 3.
MONTAJE IMPORTANTE: Esta unidad se envía sin gasolina ni aceite en el motor. Antes de comenzar o correr la máquina cargue el motor con gasolina y aceite como se indica en la sección de operación de del manual de motor. NOTA: Las referencias a los lados derecho e izquierdo de la cortadora de césped se hacen observando la máquina desde la posición de operación. b Desembalaje Apertura De La Caja De Cartón 1. Corte cada una de las esquinas de la caja verticalmente, de la parte superior a la base. 2.
MONTAJE 3. Siga los siguientes pasos para completar conjunto del mango: a. Tire hacia arriba en el asa hasta agujeros en la manija (que se muestra en la Figura 3 corte de la cubierta) se alinean con los agujeros en el mango soporte. Vea la Figura 4. c NOTA: Al tirar hacia arriba la palanca, asegúrese de que no tire de manejar todo el camino. b. c. 4. Inserte el T-pernos quitó anteriormente a través del mango corchetes y asa inferior y apriete bien para asegurar el mango en su lugar. Vea la Figura 4.
MONTAJE Conexión de la colectora de césped 1. Para ensamblar el colector de césped (de ser necesario), Haga el cierto bolso es dio vuelta a la derecha el lado antes de reunir (la advertencia de la etiqueta será por fuera): a. Coloque la bolsa sobre el marco con el lado negro de plástico en el fondo. b. 2. b a Deslice el canal de plástico sobre los ganchos del marco. Vea la Figura 7. Para acoplar el colector de césped: a. Levante la puerta de descarga posterior. b.
AJUSTES Ajustes Altura de corte Hay una palanca de ajuste de altura de corte, situado encima de la rueda delantera derecha y trasera. 1. Presione la palanca hacia la rueda (unidad tenderá a caer cuando se suelta la palanca). 2. Muévala a cualquier de las posiciones para la altura de corte deseado. Vea la Figura 10. 3. Libere la palanca hacia la cubierta de la podadora. IMPORTANTE: Tanto las ruedas delanteras y traseras deben colocarse en la misma posición relativa.
OPERACIÓN Control de cuchilla Control de la transmisión Arranque Eléctrico Pulsar Tecla Arrancador de retroceso Cargador de batería Lavado de la Plataforma Canal de Descarga Lateral Palanca de ajuste de altura de corte Palanca de ajuste de altura de corte Escudo de Ruta� (No mostrada) Compartimiento de la batería Tapón de aceite/varilla de medición del nivel Clavija para abono de aceite Figura 13 Control de Cuchilla Canal de Descarga Lateral El control de la cuchilla está unido a la manija superior
OPERACIÓN LLENADO DE GASOLINA Y ACEITE Aceite (se envía una botella junto con la unidad) H Primer uso 1. Saque la varilla del nivel de aceite (G). Vea la Figura 14. 2. Con la cortadora de césped ubicada en suelo nivelado, vierta el aceite lentamente por dentro del tubo de llenado de aceite del motor (H). 3. Vuelva a colocar la varilla de llenado de aceite y ajústela.
OPERACIÓN ADVERTENCIA Asegúrese de que ninguna persona aparte del operador permanezca cerca de la cortadora mientras arranca el motor u opera la misma. Nunca encienda el motor en espacios cerrados o en una zona con poca ventilación. El escape del motor contiene monóxido de carbono, un gas inodoro y letal. Mantenga las manos, los pies, el cabello y la ropa suelta alejados de las partes móviles del motor y de la cortadora. 1 PARA ENCENDER EL MOTOR 1.
SERVICIO Y MANTENIMIENTO PROGRAMA DE MANTENIMIENTO Siga el cronograma de mantenimiento que se presenta a continuación. Esta tabla sólo describe pautas de servicio. Utilice la columna Registro de Servicio para hacer el seguimiento de las tareas de mantenimiento completadas. Para ubicar el Centro de Servicio Sears más cercano o para programar un servicio, simplemente comuníquese con Sears al teléfono 1-888-331-4569.
SERVICIO Y MANTENIMIENTO Mantenimiento Del Motor Limpie el motor • Diariamente o antes de cada uso, limpie el césped, la grasa o los residuos acumulados del motor. Mantenga limpios el varillaje, los resortes y los controles. Mantenga el área que rodea al silenciador y detrás del mismo libre de cualquier residuo combustible. • El mantenimiento del motor en condiciones limpias permite el movimiento de aire alrededor del mismo.
SERVICIO Y MANTENIMIENTO Cuidado de la cuchilla ADVERTENCIA Adaptador de la Misma Cuando saque la cuchilla de corte para afilarla o reemplazarla, protéjase las manos usando un par de guantes para trabajo rudo o un trapo grueso para sostener la cuchilla. Inspeccione periódicamente el adaptador de la cuchilla en busca de rajaduras, especialmente cuando golpee un objeto extraño. Realice los reemplazos que resulten necesarios. Siga los pasos que aparecen debajo para realizar el mantenimiento de la cuchilla.
SERVICIO Y MANTENIMIENTO Carga de la Batería ADVERTENCIA La batería contiene fluido corrosivo y material tóxico; manipule con cuidado y mantenga alejado de los niños. No perfore, desensamble, mutile o prenda fuego a la batería. Los gases explosivos podrían purgarse durante la carga o descarga. Utilice en un área bien ventilada, alejada de las fuentes de ignición. 2 1 NOTA: La clavija especialmente diseñada del cargador únicamente se adaptará a la clavija en la caja de las baterías. 1.
ALMACENAMIENTO FUERA DE TEMPORADA ADVERTENCIA Nunca almacene la cortadora de césped con combustible en el tanque en un espacio cerrado o en áreas con poca ventilación, donde los gases del combustible puedan alcanzar el fuego, chispas o una luz piloto como la que tienen algunos hornos, calentadores de agua, secadores de ropa o algún otro dispositivo a gas.
SOLUCIÓN DE PROBLEMAS ADVERTENCIA Antes de realizar cualquier tipo del mantenimiento/servicio, suelte todos los mandos y pare el motor. Espere hasta que todas las partes de movimiento hayan venido a una parada completa. Desconecte el alambre de bujía y báselo contra el motor para prevenir el comienzo involuntario. Siempre lleve puestos cristales inastillables durante la operación o realizando cualquier ajuste o reparaciones. Esta sección se ocupa de cuestiones de menor importancia del servicio.
SOLUCIÓN DE PROBLEMAS Problema Causa Solución El motor recalienta 1. El nivel de aceite del motor está bajo. 2. Flujo de aire restringido. 1. Llene el motor con la cantidad y tipo de aceite adecuado. 2. Limpie los residuos de alrededor de las aletas de refrigeración del motor y del alojamiento del soplador. El motor vacila a altas revoluciones 1. Poca separación de los electrodos de la bujía. 1. Ajuste la separación. Consulte la sección Mantenimiento del manual de motor.
(Esta página se aplica sólo en EE.UU. y Canadá).
ACUERDO DE PROTECCIÓN PARA REPARACIONES Felicitaciones por haber realizado una adquisición inteligente. El producto Craftsman® que ha adquirido está diseñado y fabricado para brindar muchos años de funcionamiento confiable. Pero como todos los productos a veces puede requerir de reparaciones. Es en ese momento cuando el disponer de un Acuerdo de protección para reparaciones le puede ahorrar dinero y problemas.
Product questions or problems? 1-888-331-4569 Customer Care Hot Line Get answers to questions, troubleshoot problems, order parts, or schedule repair service. Para respuestas a preguntas o problemas, y ordenar piezas o pedir servicio para la reparación de su equipo. To help us help you, register your product at www.craftsman.com/registration Para poderte ayudar mejor, registra tu producto en www.craftsman.