
Owner's Manual


Release
• Empty the drawer.
• Fully extend the drawer.
REMOVING DRAWERS
LABELS (IF APPLICABLE)
Process:
• Apply a light lm of glass cleaner to the surface where
the label is to be applied.
• Peel the label from the backing and place the label in
position.
• Check alignment of the label and adjust accordingly.
• Hold the label in position and squeegee off excess liquid
with a towel, working from the center toward each end of
the label.
• Suggested label location is shown.
Lever Style - Lift or lower (depending on the slide) the
release lever on both sides, (this allows the slides to ride
over the stops). Pull out to remove.
3
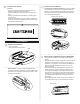
OPERATION
slide carrier
slide
Spring Retainer
Ball bearing slide - Pull slides and slide carrier out to fully
extended position (see illustration.) Hold the slide on the
cabinet while aligning it with the slide on drawer. Slightly
insert one side and repeat for the other side. Slowly push
drawer to its fully closed position to engage slide. Open
drawer and reclose to ensure proper operation.
INSTALLING DRAWERS
REMOVING AND INSTALLING SLIDES
• To remove the slide from the unit, rst remove the
drawer.
• After removing the drawer check to see if the unit has
rivets located on the front of the slide. To drill out rivets,
use a 5/32-in drill bit. The rivets will need to be replaced
with 5/32-in rivets.
• To reinstall the slide in the appropriate position in the
unit, align front and back lances with mounting holes in
the side of the unit. Pull towards the front of the unit and
downwards until rivet holes in slide line up with holes in
the unit. The rivets will need to be replaced with 5/32-in
rivets.
• For smooth operation, make sure the drawers are
matched with their original slides.