Owner's Manual ® 40" TINE DETHATCHER Model No. 486.243152 Model No. 486.24316 CAUTION: Before using this product, read this manual and follow all Safety Rules and Operating Instructions. STOP DO NOT RETURN TO STORE For Missing Parts or Assembly Questions Call 1-866-576-8388 • • • • • Safety Assembly Operation Maintenance Parts Sears, Roebuck and Co., Hoffman Estates, IL 60179 U.S.A. www.sears.com/craftsman PRINTED IN U.S.A. FORM NO.
TABLE OF CONTENTS SAFETY RULES........................................................... 2 FULL SIZE HARDWARE CHART................................. 3 CARTON CONTENTS.................................................. 4 ASSEMBLY................................................................... 4 OPERATION................................................................. 6 MAINTENANCE/STORAGE......................................... 6 REPAIR PARTS ..........................................................
HARDWARE PACKAGE CONTENTS SHOWN FULL SIZE A B C D E F H I NOT SHOWN FULL SIZE J Ref. Qty. A B C D E F G 2 2 2 11 4 1 1 K Description Shoulder Bolt Hex Bolt, 5/16" x 2" Lg. Hex Bolt, 5/16" x 1-1/4" Lg. Hex Bolt, 5/16" x 1" Lg. Carriage Bolt, 5/16" x 1" Hair Cotter Pin, 1/8" Hitch Pin, 3/8" 3 Ref. Qty.
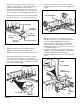
ASSEMBLY CARTON CONTENTS • 1 • 2 3 Assemble two (tall) hitch arm mount brackets and two (short) angle brackets to the bottom of the tine shield at the rear. Use four 5/16" x 1" hex bolts and 5/16" nylock nuts. Do not tighten yet. Position the brackets as shown in figure 1. Assemble two angle brackets to the bottom of the tine shield at the front. Use two 5/16" x 1" hex bolts and 5/16" nylock nuts. Do not tighten yet. Position the brackets as shown in figure 1.
• • • Assemble the front ends of the hitch mount arms together using two 5/16" x 1-1/4" hex bolts and 5/16" nylock nuts. Do not tighten yet. See figure 3. Assemble the hitch brackets to the top and bottom of the hitch mount arms using two 5/16" x 2" hex bolts and 5/16" nylock nuts. Do not tighten yet. See figure 3. Assemble the 3/8" hitch pin through the hitch brackets and secure it with a 1/8" hair cotter pin. See figure 3.
OPERATION Regular removal of thatch is critical to maintenance of a healthy lawn. Excessive thatch prevents air, water and fertilizer from reaching the roots. To effectively dislodge excessive thatch from your lawn, read these instructions for proper adjustment and operation of the dethatcher. OPERATING TIPS • Vary the vehicle's forward speed until the best dethatching action is achieved.
PARTS 40" TINE DETHATCHER MODELS 486.243152, 486.24316 15 8 15 15 6 15 4 16 3 18 4 10 16 12 12 15 16 15 9 1 13 19 7 16 12 15 12 5 16 16 7 16 14 2 16 DESCRIPTION REF. NO.
Get it fixed, at your home or ours! Your Home For expert troubleshooting and home solutions advice: www.managemyhome.com For repair – in your home – of all major brand appliances, lawn and garden equipment, or heating and cooling systems, no matter who made it, no matter who sold it! For the replacement parts, accessories and owner’s manuals that you need to do-it-yourself. For Sears professional installation of home appliances and items like garage door openers and water heaters.