Owner's Manual I CRAFI'SMAN+ I SLEEVE HITCH Model No. 486.24535 " .+ - CAUTION: • • • • • Before using this product, read this manual and follow all Safety Rules and Operating Instructions. IMPORTANT - READ THIS For Missing Parts or Assembly Please Call 866-576-8388 Safety Assembly Operation Maintenance Parts FIRST!!! Questions Mon.-Fri. 7 am - 5 pm CST. FAX 217-728-2032 or e-mail info@agri-fab.com Missing parts will be sent UPS in 24 hours directly to your home. Sears, Roebuck and Co., www.
SAFETY RULES ........................................................ FULL SIZE HARDWARE CHART ............................. CARTON CONTENTS ............................................... ASSEMBLY ................................................................ OPERATION .............................................................. LIMITED ONE YEAR WARRANTY 2 3 4 4 6 MAINTENANCE ......................................................... 6 REPAIR PARTS ILLUSTRATION ............................
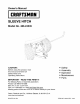
J JF J J J J J J J J J J J J J J G J H J J J J J L K J M N O \\\ \\\ KEY A B C D E F G H I QTY. 2 1 4 4 1 2 1 4 4 KEY DESCRIPTION J K L M N O P Q R Hex Bolt, 5/8" x 2-1/2" Hex Bolt, 5/8" x 1-3/4" Hex Bolt, 3/8" x 1-1/4" Hex Bolt, 3/8" x 1" Carriage Bolt, 5/16" x 1-3/4" Shoulder Bolt Hex Nut, 5/16" Hex Nut, 3/8" Hex Lock Nut, 3/8" NOTE: Bolt (C), Lock Washer (N) and Nut (H) will not be used unless the mounting holes in the tractor do not already contain bolts and nuts. 3 QTY.
CARTON • CONTENTS • 4 1 Remove the nuts from the two bolts in each side of the tractor, leaving the bolts in place. See figure 2. Attach the Mounting Brackets to the bolts using the original nuts and two 3/8" flat washers. The brackets should be turned so that the bends increase the distance between the rear of the brackets. See Figure 2. NOTE: If no bolt and nut are present in a hole, use a 3/8" x 1-1/4" hex bolt, 3/8" lock washer and 3/8" hex nut to attach the Mounting Bracket to the hole. 1. 2.
• Placethe L.H.PivotBracketontotheendof the Lift LeverAssembly(the R.H.PivotBracketcomes alreadyinstalledonthe assembly).SeeFigure4. • Attachthe R.H.andL.H.PivotBracketstothe SleeveHitchFrameAssemblyusingfour3/8"x 1" hexboltsand3/8"hexlocknuts.SeeFigure4. • Assemble the two 5/8" jam nuts halfway onto the two 5/8" x 2-1/2" hex bolts. Screw the bolts into the nuts that are welded to the Sleeve Hitch Lift Assembly. Snug the jam nuts against the welded nuts. See figure 6.
• Move the lift lever backward hitch. to lower the sleeve • Attach an implement using the sleeve hitch pin. Tighten the stabilizer bolts against the implement hitch and then tighten the jam nuts. To remove the entire Sleeve Hitch attachment, remove the 5/8" x 1-3/4" hex bolt and 5/8" nylock nut which fasten the bottom of the sleeve hitch to the tractor hitch, then lift the attachment of the tractor.
REPAIR PARTS FOR MODEL 486.24535 SLEEVE HITCH 27 26 20 21 3 17 18 19 \ J \, 7 12 9 I 2 13 \ \ 15 f\ \ 11 15 12 / 6 Ref Part No. 1 2 3 4 5 6 7 8 9 10 11 12 13 14 24722 24723 24792 43001 43082 64098 64982 24732 47947 712-0242 711-0225 47951 712-0261 47950 Qty Description 1 1 1 4 4 1 1 1 2 2 3 2 2 1 Ref Sleeve Hitch Frame Pivot Bracket, L.H. Pivot Bracket, R.H.
no matter who made it, no matter who sold it! 1-800-4-MY-HOME sMAnytime, day or night (1-800-469-4663) www.sears.com To bring in products such as vacuums, lawn equipment and electronics for repair, call for the location of your nearest Sears Parts & Repair Center. 1-800-488-1222 Anytime, day or night www.sears.com For the replacement parts, accessories that you1_eed 800tbodo-i_yourself, 366 PART and owner's manuals call Sears PartsDirectSM, 6a.m.-11p.m.